


Patient Medication Information: uses, side effects, how to take - Hemlibra
Serious warnings and precautions box
What Hemlibra is used for:
Hemlibra is a medicine that can be used by all age groups. It is used to treat people:
- who have haemophilia A (a bleeding condition people can be born with or develop), which is caused by a missing or faulty protein (factor VIII) that prevents blood from clotting normally,
- who have also developed “factor VIII inhibitors” that prevent replacement factor VIII from working properly,
- or by patients who do not have “factor VIII inhibitors”
This medicine is to be used weekly, every 2 weeks or every 4 weeks unless your doctor tells you to stop taking it.
Hemlibra increases the potential for your blood to clot and may cause the following serious side effects when used with another drug to treat bleeding known as aPCC (activated prothrombin complex concentrate):
- Thrombotic microangiopathy (TMA). This is a condition involving blood clots and injury to small blood vessels that may cause harm to your kidneys, brain, and other organs. Symptoms include confusion, weakness, swelling of arms and legs, yellowing of skin and eyes, stomach or back pain, nausea or vomiting, feeling sick or decreased urination.
- Blood clots (thromboembolism). Blood clots may form in blood vessels in your arm, leg, lung, or head. Symptoms include swollen arms or legs, pain or redness in arms or legs, difficulty breathing, chest tightness, fast heart rate, coughing blood, feeling faint, headache, numbness in your face, eye pain or swelling, or trouble seeing.
Stop taking aPCC at least twenty-four hours before starting Hemlibra. Avoid taking aPCC while taking Hemlibra unless no other treatments are available. If aPCC is required, take no more than 50 units per kilogram (U/kg). If you feel that you need more than 100 U/kg to control bleeding talk to your healthcare professional. If you experience symptoms described here, stop taking aPCC and Hemlibra and seek medical help.
Your doctor should monitor you closely for these side effects if it is recommended that Hemlibra and aPCC be taken at the same time.
How Hemlibra works:
Hemlibra contains the active substance “emicizumab”. This belongs to a group of medicines called “monoclonal antibodies”. Monoclonal antibodies are a type of protein that recognises and binds to a target in the body. Factor VIII is a protein that helps the body form clots and stop bleeding by binding to other proteins. When people have haemophilia A, factor VIII is missing or not working properly. Hemlibra works like Factor VIII, by binding to the same clotting factors as Factor VIII, which helps your blood to clot. Hemlibra is injected under the skin (subcutaneously).
The ingredients in Hemlibra are:
Medicinal ingredient(s): emicizumab
Non-medicinal ingredients: L-arginine, L-histidine, L-aspartic acid, Poloxamer 188 and water for injection.
Hemlibra comes in the following dosage form(s):
Solution, in vials of 12 mg/0.4 mL (30 mg/mL), 30 mg/mL, 60 mg/0.4 mL (150 mg/mL), 105 mg/0.7 mL (150 mg/mL), 150 mg/mL, 300 mg/2 mL (150 mg/mL). Reconstitution is not required.
Do not use Hemlibra if:
- you are allergic to emicizumab or any of the other ingredients of this medicine or components of the container
To help avoid side effects and ensure proper use, talk to your healthcare professional before you take Hemlibra. Talk about any health conditions or problems you may have, including if you:
start using Hemlibra, it is very important you talk to your doctor about when and how to use “bypassing agents” while receiving Hemlibra, as this may differ from before. Examples of bypassing agents include “activated prothrombin complex concentrate” (aPCC, also called FEIBA NF) and “recombinant FVIIa” (rFVIIa, also called eptacog alfa or NiaStase RT®).
Serious and potentially life threatening side effects have been observed when aPCC was used in patients who were also receiving Hemlibra. For more information, see below in “The following may interact with Hemlibra, Using a bypassing agent while receiving Hemlibra”.
Be aware of the potentially serious side effects of using aPCC while receiving Hemlibra. In a study, the following serious side effects have been reported when aPCC was used in patients also receiving Hemlibra:
Thrombotic microangiopathy
- Thrombotic microangiopathy is a serious and potentially life threatening condition.
- When people have thrombotic microangiopathy, the lining of the blood vessels can be damaged and blood clots may develop in small blood vessels. In some cases, this can cause damage to the kidneys and/or other organs.
- It is important to know the symptoms of thrombotic microangiopathy, in case you develop the condition (see below in “Possible side effects from using Hemlibra”).
- Stop using Hemlibra and aPCC, and talk to a doctor immediately if you or your caregiver notices any symptoms of thrombotic microangiopathy.
Blood clots (thromboembolism)
- Blood clots may form. In rare cases, a blood clot can block blood vessels and may be life threatening.
- It is important to know the symptoms of blood clots, in case clots develop (see below in “Possible side effects from using Hemlibra”).
- Stop using Hemlibra and aPCC, and talk to a doctor immediately if you or your caregiver notices any symptoms of blood clots.
Stop using Hemlibra and aPCC, and talk to a doctor immediately if you or your caregiver notices any symptoms of blood clots.
Other warnings you should know about:
Laboratory tests
Tell your doctor if you are using Hemlibra before you have laboratory tests that measure how well your blood is clotting. This is because the presence of Hemlibra in the blood may interfere with some of these laboratory tests, leading to inaccurate results.
Pregnancy and breast-feeding
If you are pregnant or breast-feeding, think you may be pregnant or are planning to have a baby, ask your doctor or pharmacist for advice before using this medicine. Your doctor will consider the benefit of you taking Hemlibra against the risk to your baby. You should use an effective method of birth control (contraception) during treatment with Hemlibra and for 6 months after your last injection of Hemlibra.
Immunogenicity
Your body may make antibodies against Hemlibra, which may stop Hemlibra from working properly. Contact your healthcare provider immediately if you notice that Hemlibra has stopped working for you (e.g. increase in bleeds).
Tell your healthcare professional about all the medicines you take, including any drugs, vitamins, minerals, natural supplements or alternative medicines.
The following may interact with Hemlibra:
Using a bypassing agent while receiving Hemlibra
- Before you start using Hemlibra, talk to your doctor and carefully follow their instructions regarding when to use a bypassing agent and the dose and schedule you should use. Hemlibra increases the ability of your blood to clot. Therefore, the dose of bypassing agent required may be lower than the dose you used prior to starting Hemlibra.
- Avoid using aPCC unless no other treatment options are available. However, if aPCC is required, talk to your doctor in case you feel you need more than 50 units/kg of aPCC total.
Educational materials for Healthcare Professionals and patients are available from Hoffmann-La Roche Limited by calling 1-888-762-4388.
How to take Hemlibra:
A doctor qualified to care for patients with hemophilia will start you on treatment with Hemlibra. Always use this medicine exactly as your doctor has told you. Check with your healthcare provider if you are not sure.
Keeping a record
Each time you use Hemlibra, record the name and batch number of the medicine.
How Hemlibra is given
If you or your caregiver gives an injection of Hemlibra, please refer to the Instruction for Use at the end of this leaflet.
- Hemlibra is given by injection under the skin (subcutaneously).
- Your doctor or nurse will show you and/or your caregiver how to inject Hemlibra.
- Once you and/or your caregiver have been trained, you should be able to inject this medicine at home, by yourself or with the help of a caregiver.
- Do not inject Hemlibra into a vein or muscle. To correctly insert the needle under the skin, pinch a fold of loose skin at the clean injection site with your free hand. Pinching the skin is important to ensure that you inject under the skin (into fatty tissue) but not any deeper (into muscle). Injecting into a muscle could result in an uncomfortable injection.
- Prepare and give the injection under clean and germ-free conditions using “aseptic technique”. You will be given more information about this by your doctor or nurse.
- Before using the medicine, check the solution for particles or discolouration. The solution should be clear to slightly yellow. Do not use this medicine if you notice that it is cloudy, discoloured, or contains visible particles.
Where to inject Hemlibra
- Your doctor will show you and/or your caregiver which areas of the body should be injected with Hemlibra.
- The recommended places to give an injection are: the front of the waist (lower abdomen), upper outer arms, or the front of the thighs. Only give an injection in the recommended places.
- Each time you or your caregiver gives an injection, use a different area of the body to the one you used before, using one of the recommended places (front of the waist, upper outer arms, or the front of the thighs).
- Do not give injections where the skin is red, bruised, tender, hard, or areas where there are moles or scars.
- When using Hemlibra, other medicines injected under the skin should be given in a different area.
Using syringes and needles
- A syringe, a transfer needle with filter and an injection needle are needed to withdraw the Hemlibra solution from the vial into the syringe and inject it under the skin.
- Syringes, transfer needles with filter and injection needles are not provided in this pack. For more information, see the “Instructions for Use” below.
- Make sure that you use a new injection needle for each injection and dispose of it after a single use.
- A 1 millilitre syringe should be used for an injection up to 1 millilitre of Hemlibra solution.
- A 2 to 3 millilitre syringe should be used for an injection greater than 1 millilitre and up to 2 millilitres of Hemlibra solution.
Use in children and adolescents
Hemlibra can be used in children and adolescents of all ages (for the recommended dose, see “Usual dose”).
If a child would like to self-inject the medicine, the child’s healthcare provider and the parent or caregiver should agree on whether it is appropriate for them to do so. Self-injection for children below the age of 7 years is not recommended.
Usual dose:
- Weeks 1 to 4: The dose is 3 milligrams for every 1 kilogram you weigh, injected once a week. This loading dose is for all patients.
For patients 12 years of age or older who weigh 40 kilograms or more, your doctor will prescribe one of the 3 doses beginning on week 5 as listed below:
- 1.5 milligrams for every 1 kilogram you weigh, injected once a week or,
- 3 milligrams for every 1 kilogram you weigh, injected once every 2 weeks or,
- 6 milligrams for every 1 kilogram you weigh, injected once every 4 weeks.
For patients 11 years of age or younger and any patient who weighs less than 40 kilograms, your doctor will prescribe one of the 2 doses beginning on week 5 as listed below:
- 1.5 milligrams for every 1 kilogram you weigh, injected once a week or
- 3 milligrams for every 1 kilogram you weigh, injected once every 2 weeks.
The dose of Hemlibra is dependent on your weight and your doctor should tell you how much to inject.
Instructions for Use (Transfer Needle with Filter)
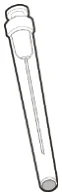
Transfer Needle with Filter
(For transfer of HEMLIBRA from vial to syringe)
You must read, understand and follow the Instructions for Use before injecting Hemlibra. Your healthcare provider should show you how to prepare, measure, and inject Hemlibra properly before you use it for the first time. Ask your healthcare provider if you have any questions.
Important Information:
- Do not inject yourself or someone else unless you have been shown how to by your healthcare provider.
- Make sure the name Hemlibra appears on the box and vial label.
- Before opening the vial, read the vial label to make sure you have the medicine strength(s) needed to give the dose prescribed by your healthcare provider. Depending on your dose, you may need to use more than 1 vial to give your total prescribed dose.
- Check the expiry date on the box and vial label. Do not use if the expiry date has passed.
- Only use the vial once. After you inject your dose, throw away any unused Hemlibra left in the vial. Do not save unused medicine in the vial for later use.
- Only use the syringes, transfer needles with filter, and injection needles that your healthcare provider prescribes.
- Only use the syringes, transfer needles with filter and injection needles once. Throw away any used syringes and needles.
- If your prescribed dose is more than 2 mL, you will need to administer more than one (1) subcutaneous injection of Hemlibra; contact your healthcare provider for the appropriate injection instructions.
- Do not inject the medicine intravenously.
Storing Hemlibra vials:
- Keep the vial in the refrigerator (2°C to 8°C). Do not freeze.
- Keep the vial in the original box to protect the medicine from light.
- Once removed from the refrigerator, the unopened vial can be kept at room temperature (below 30°C) for up to 7 days. After storage at room temperature, unopened vials may be returned to the refrigerator. Cumulative storage time (total amount of time outside cold storage) at room temperature should not exceed 7 days.
- Discard vials that have been kept at room temperature for more than 7 days or exposed to temperatures above 30°C.
- Keep the vials out of the sight and reach of children.
- Take the vial out of the refrigerator 15 minutes before use and allow it to reach room temperature (below 30°C) before preparing an injection.
- Do not shake the vial.
Storing needles and syringes:
- Keep the transfer needle with filter, injection needle and syringe dry.
- Keep the transfer needle with filter, injection needle and syringe out of the sight and reach of children.
Inspecting the medicine and your supplies:
- Collect all supplies listed below to prepare and give your injection.
- Check the expiry date on the box, on the vial label and on the supplies listed below. Do not use if the expiry date has passed.
Do not use the vial if:
- the medicine is cloudy, hazy or coloured.
- the medicine contains particles.
- the cap covering the stopper is missing.
- Inspect the supplies for damage. Do not use if they appear damaged or if they have been dropped.
- Place the supplies on a clean, well-lit flat work surface.
Included in the box:
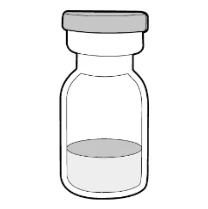
- Vial containing the medicine
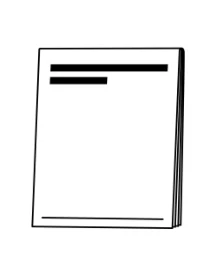
- Hemlibra Instructions for Use
Not included in the box:
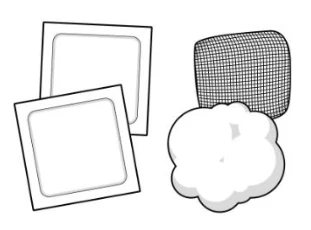
Alcohol wipes
Note: If you need to use more than 1 vial to inject your prescribed dose, you must use a new alcohol wipe for each vial.
- Gauze
- Cotton ball
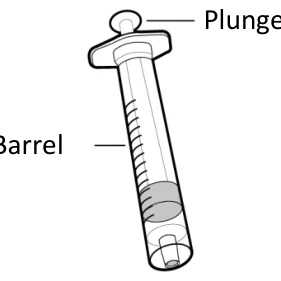
- Syringe
- For injection amount up to 1 mL use a 1 mL syringe.
- For injection amount between 1 mL and 2 mL use a 2 mL or 3 mL syringe.
- Note: Do not use 2 or 3 mL syringe for doses up to 1 mL.
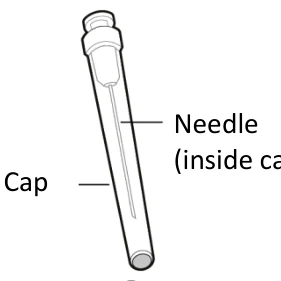
18G Transfer needle with 5 micrometer filter
Note: If you need to use more than 1 vial to inject your prescribed dose, you must use a new transfer needle with filter for each vial.
- Do not use the transfer needle with filter to inject medicine.
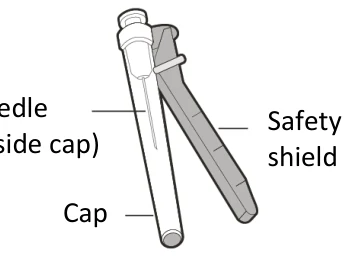
- Injection needle with safety shield (Used to inject medicine).
- Do not use the injection needle to withdraw medicine from vial.
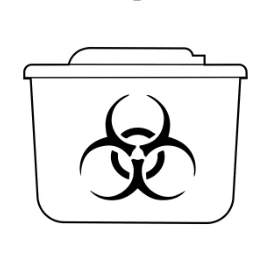
- Sharps disposal container
Plunger
Barrel
Needle
(inside cap)
Cap
Safety shield
Needle
(inside cap)
Cap
Get ready:
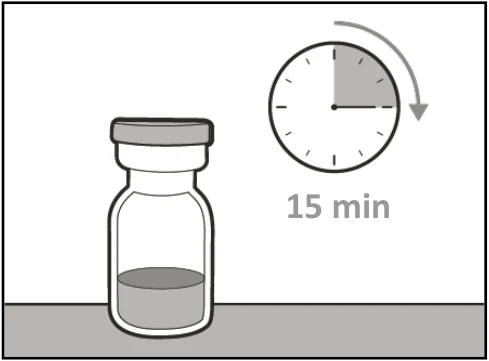
- Before use, allow the vial(s) to warm up to room temperature for about 15 minutes on a clean flat surface away from direct sunlight.
- Do not try to warm the vial by any other way.
- Wash your hands well with soap and water.
Selecting and preparing an injection site:
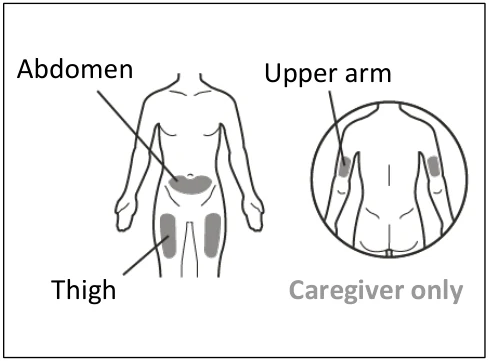
- Clean the chosen injection site area using an alcohol wipe.
- Let the skin dry for about 10 seconds.
- Do not touch, fan or blow on the cleaned area before your injection.
For your injection, you can use your:
- Thigh (front and middle).
- Stomach area (abdomen), except for the 5 cm around the navel (belly button).
- Outer area of the upper arm (only if a caregiver is giving the injection).
- You should use a different injection site each time you give an injection, at least 2.5 cm away from the area you used for any previous injection.
- Do not inject into areas that could be irritated by a belt or waistband.
- Do not inject into moles, scars, bruises, or areas where the skin is tender, red, hard or the skin is broken.
Preparing the syringe for injection:
- Once the syringe has been filled with the medicine, it must be used immediately.
- Once the injection needle cap has been removed, the medicine in the syringe must be injected under the skin within 5 minutes.
- Do not touch exposed needles or place them on a surface once the cap has been removed.
- Do not use the syringe if the needle touches any surface.
Important information after the injection:
- If you see drops of blood at the injection site, you can press a sterile cotton ball or gauze over the injection site for at least 10 seconds, until bleeding has stopped.
- If you have bruising (small area of bleeding under the skin), an ice pack can also be pressed gently on the site. If bleeding does not stop, please contact your healthcare provider.
Do not rub the injection site after an injection.
15 min
Abdomen
Upper arm
Caregiver only
Thigh
Disposing of the medicine and supplies:
Important: Always keep the sharps disposal container out of reach of children.
- Throw away any used caps, vial(s), needles and syringes in a sharps or puncture-proof container. Put your used needles and syringes in a sharps disposal container straight away after use. Do not throw away any loose caps, vials, needles and syringes in your household waste.
If you do not have a sharps disposal container, you may use a household container that is:
- made of heavy-duty plastic.
- can be closed with a tight-fitting, puncture resistant lid, without sharps being able to come out.
- upright and stable during use.
- leak-resistant.
- properly labelled to warn of hazardous waste inside the container.
- When your sharps disposal container is almost full, you will need to follow your local guidelines for the right way to throw away of your sharps disposal container.
- Do not throw away any used sharps disposal container in your household waste unless your local guidelines permit this. Do not recycle your used sharps disposal container.
- PREPARATION
Step 1. Remove vial cap and clean top
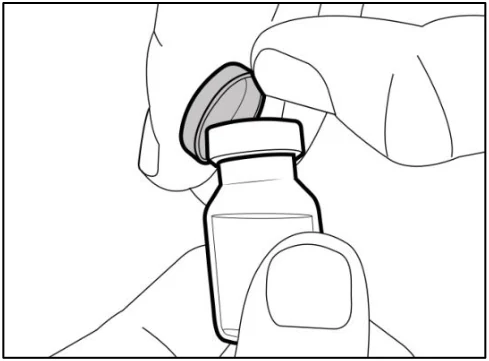
- Take the cap off the vial(s).
- Throw away the vial cap(s) into the sharps disposal container.
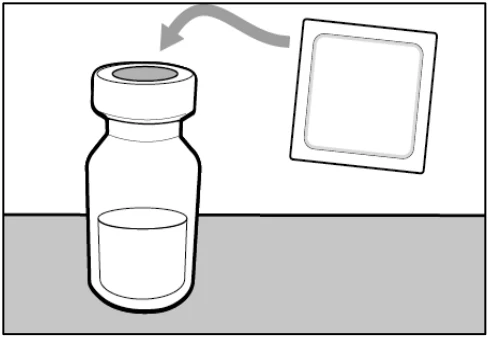
- Clean the top of the vial(s) stopper with an alcohol wipe.
Step 2. Attach transfer needle with filter to syringe
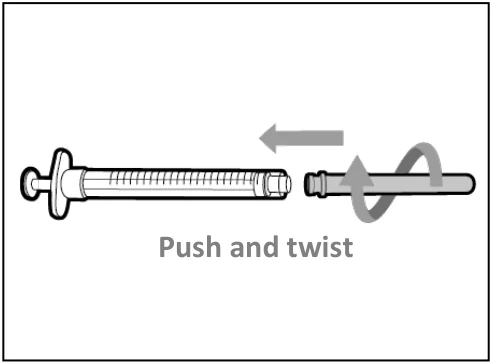
- Push and twist the transfer needle with filter clockwise onto the syringe until it is fully attached.
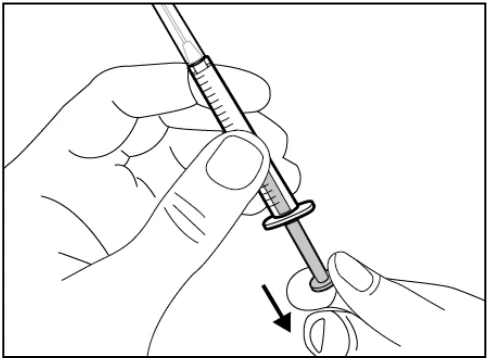
- Slowly pull back on the plunger and draw air into the syringe that is the same amount as your prescribed dose.
Step 3. Uncap transfer needle with filter
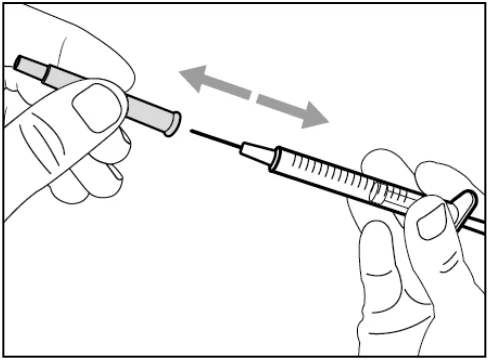
- Hold the syringe by the barrel with the transfer needle with filter pointing up.
- Carefully pull the transfer needle with filter cap straight off and away from your body. Do not throw the cap away. Place the transfer needle with filter cap down on a clean flat surface. You will need to recap the transfer needle with filter after transferring the medicine.
- Do not touch the needle tip or place it on a surface after the needle cap has been removed.
Push and twist
Step 4. Inject air into vial
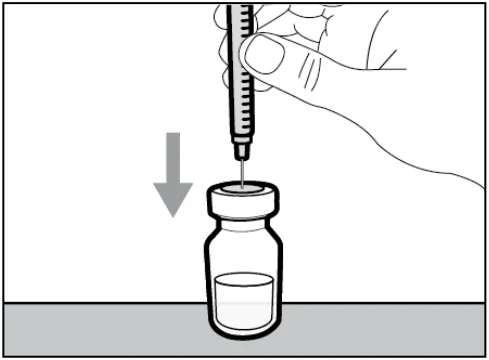
- Keep the vial on the flat working surface and insert the transfer needle with filter and syringe straight down into the centre of the vial stopper.
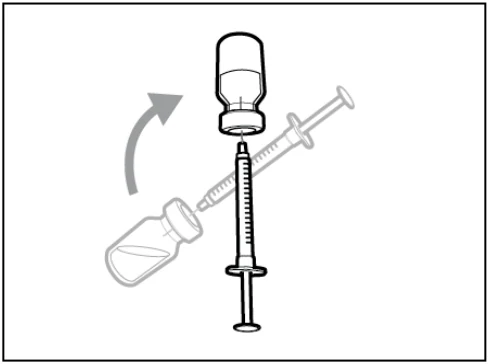
- Keep the needle in the vial and turn the vial upside down.
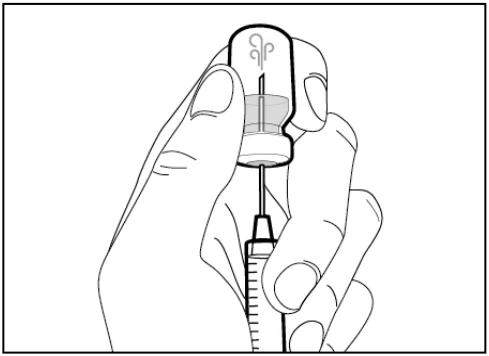
- With the needle pointing upwards, push on the plunger to inject the air from the syringe above the medicine.
- Keep your finger pressed down on the syringe plunger.
- Do not inject air into the medicine as this could create air bubbles or foam in the medicine.
Step 5. Transfer medicine to syringe
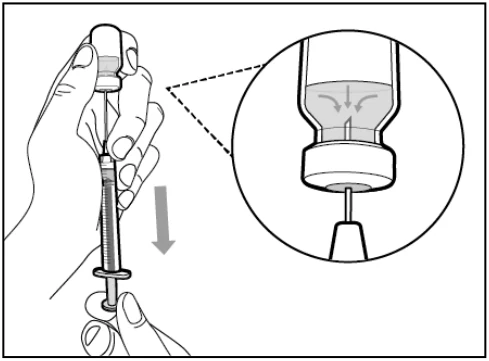
- Slide the tip of the needle down so that it is within the medicine.
- With the syringe pointing upwards, slowly pull back the plunger to fill the syringe with more than the amount of medicine needed for your prescribed dose.
- Hold the plunger firmly to ensure it does not pull back in.
- Be careful not to pull the plunger out of the syringe.
Important: If your prescribed dose is more than the amount of Hemlibra in the vial, withdraw all of the medicine and go to the “Combining Vials” section now.
Step 6. Remove air bubbles
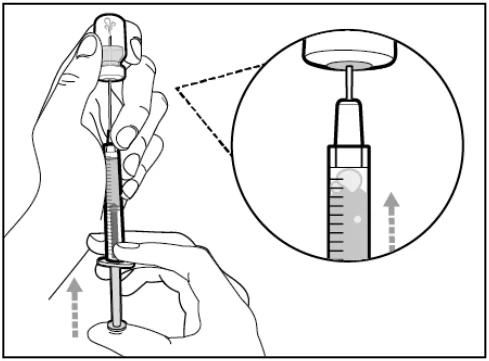
- Keep the needle in the vial and check the syringe for larger air bubbles. Large air bubbles can reduce the dose you receive.
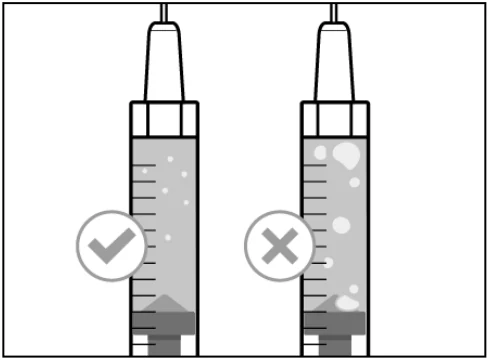
- Remove the larger air bubbles by gently tapping the syringe barrel with your fingers until the air bubbles rise to the top of the syringe. Move the tip of the needle above the medicine and slowly push the plunger up to push the air bubbles out of the syringe.
- If the amount of medicine in the syringe is now at or below your prescribed dose, move the tip of the needle to within the medicine and slowly pull back the plunger until you have more than the amount of medicine needed for your prescribed dose.
- Be careful not to pull the plunger out of the syringe.
- Repeat the steps above until you have removed the larger air bubbles.
Note: Ensure you have enough medicine in the syringe to complete your dose before moving onto the next step. If you cannot remove all medicine, turn the vial upright to reach the remaining amount.
Do not use the transfer needle with filter to inject medicine as this may cause pain and bleeding.
- 2. INJECTION
Step 7. Recap transfer needle with filter
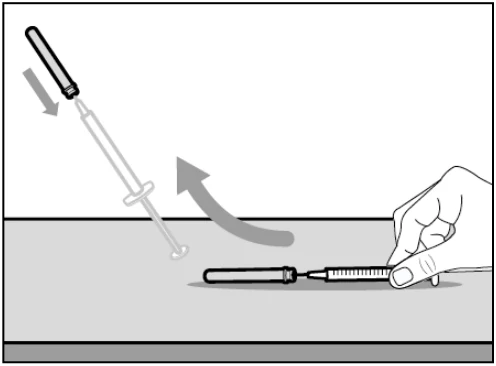
- Remove the syringe and transfer needle with filter from the vial.
- Using one hand, slide the transfer needle with filter into the cap and scoop upwards to cover the needle.
- Once the needle is covered, push the transfer needle with filter cap towards the syringe to fully attach it with one hand to prevent accidentally sticking yourself with the needle.
Step 8. Clean injection site
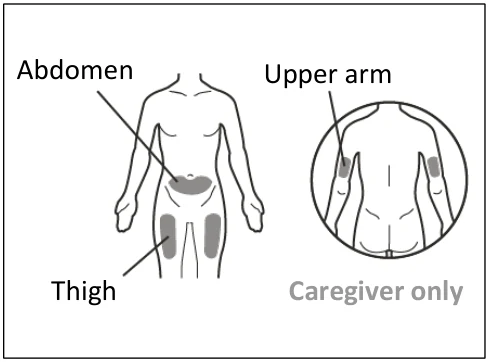
- Select and clean your injection site with an alcohol wipe.
Step 9. Remove the used transfer needle with filter from the syringe
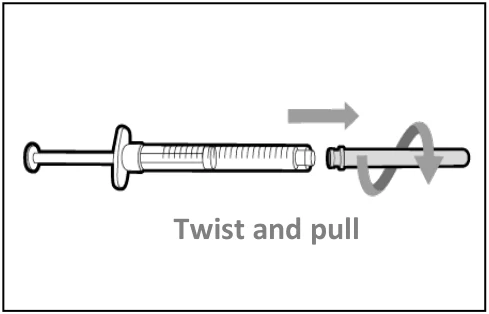
- Remove the used transfer needle with filter from the syringe by twisting anticlockwise and gently pulling.
- Throw away the used transfer needle with filter into a sharps disposal container.
Step 10. Attach injection needle to syringe
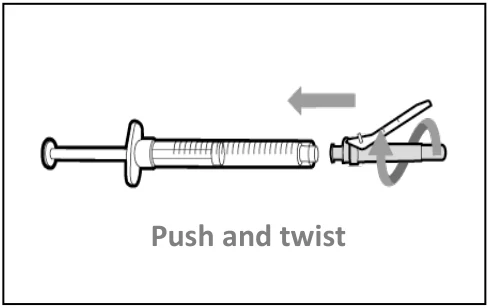
- Push and twist the injection needle clockwise onto the syringe until it is fully attached.
Abdomen
Upper arm
Caregiver only
Thigh
Twist and pull
Push and twist
Step 11. Move safety shield
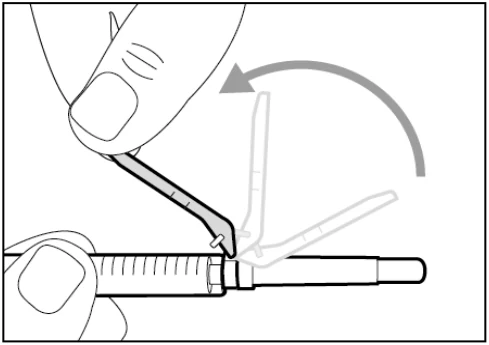
- Move the safety shield away from the needle and towards the syringe barrel.
Step 12. Uncap injection needle
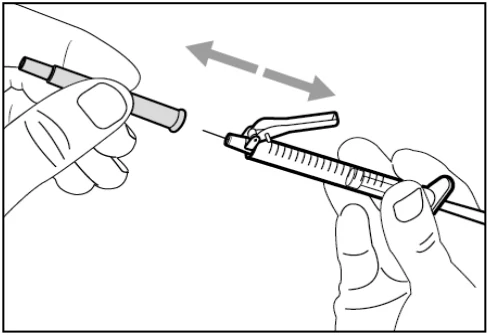
- Carefully pull the injection needle cap straightaway from the syringe.
- Throw away the cap into a sharps disposal container.
- Do not touch the needle tip or allow it to touch any surface.
- After the injection needle cap has been removed, the medicine in the syringe must be injected within 5 minutes.
Step 13. Adjust plunger to prescribed dose
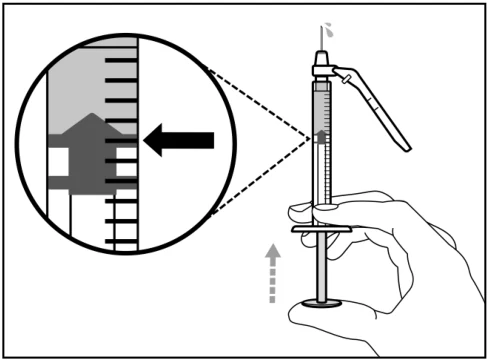
- Hold the syringe with the needle pointing up and slowly push the plunger to your prescribed dose.
- Check your dose, ensure the top rim of the plunger is in line with the mark on the syringe for your prescribed dose.
Step 14. Subcutaneous (under the skin) injection
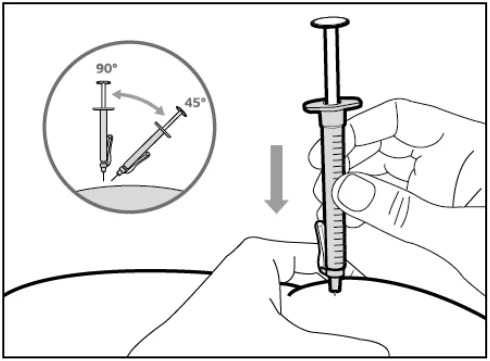
- Pinch the selected injection site and fully insert the needle at a 45° to 90° angle with a quick, firm action. Do not hold or push on the plunger while inserting the needle.
- Hold the position of the syringe and let go of the pinched injection site.
Step 15. Inject the medicine
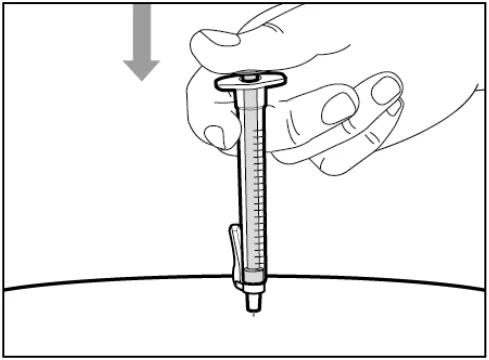
- Slowly inject all of the medicine by gently pushing the plunger all the way down.
- Remove the needle and syringe from the injection site at the same angle as inserted.
- DISPOSAL
Step 16. Cover needle with safety shield
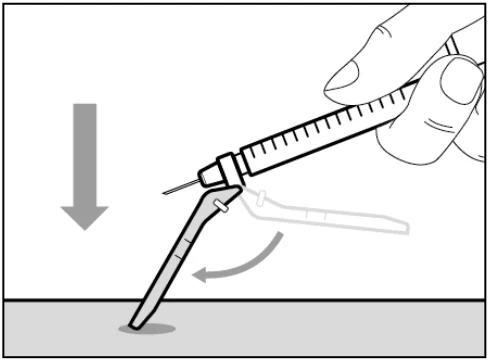
- Move the safety shield forward 90°, away from the syringe barrel.
- Holding the syringe with one hand, press the safety shield down against a flat surface with a firm, quick motion until you hear a “click”.
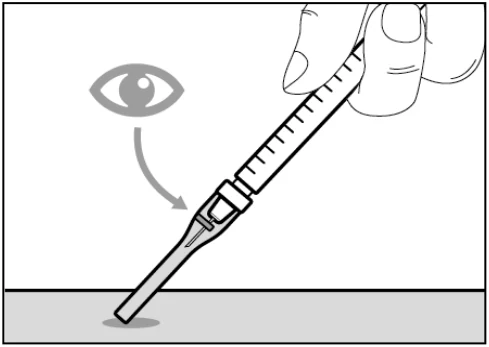
- If you do not hear a click, look to see that the needle is fully covered by the safety shield.
- Keep your fingers behind the safety shield and away from the needle at all times.
- Do not detach the injection needle.
Step 17. Throw away the syringe and needle
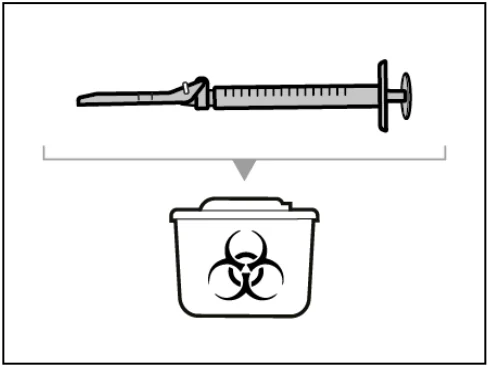
- Put your used needles and syringes in a sharps disposal container right away after use. For further information refer to the section “Disposing of the medicine and supplies”.
- Do not try to remove the used injection needle from the used syringe.
- Do not recap the injection needle with the cap.
- Important: Always keep the sharps disposal container out of reach of children.
- Throw away any used caps, vial(s), needles and syringes in a sharps or puncture-proof container.
Combining Vials
If you need to use more than 1 vial to get to your prescribed dose, follow these steps after you have drawn up the medicine from the first vial as described in step 5. You must use a new transfer needle with filter for each vial.
Step A. Recap transfer needle with filter
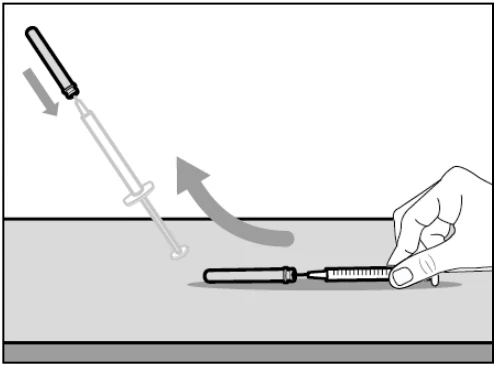
- Remove the syringe and transfer needle with filter from the vial.
- Using one hand, slide the transfer needle with filter into the cap and scoop upwards to cover the needle.
- Once the needle is covered, push the transfer needle with filter cap towards the syringe to fully attach it with one hand to prevent accidentally sticking yourself with the needle.
Step B. Remove the used transfer needle with filter from the syringe
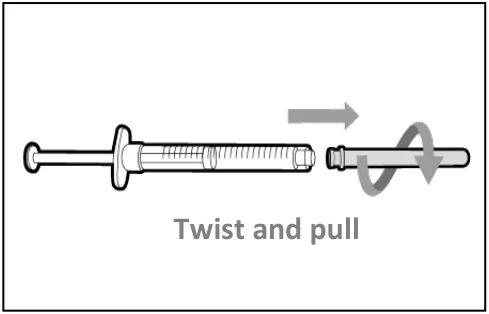
- Remove the used transfer needle with filter from the syringe by twisting anticlockwise and gently pulling.
- Throw away the used transfer needle with filter into a sharps disposal container.
Twist and pull
Step C. Attach a new transfer needle with filter to the syringe
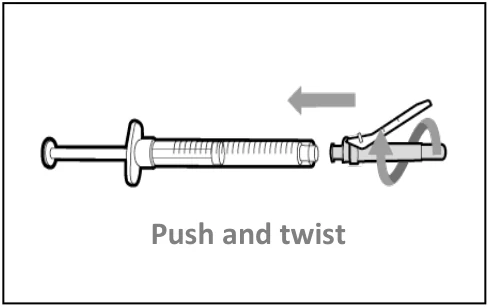
- Push and twist a new transfer needle with filter clockwise onto the syringe until it is fully attached.
- Slowly pull back the plunger and draw some air into the syringe.
Step D. Uncap transfer needle with filter
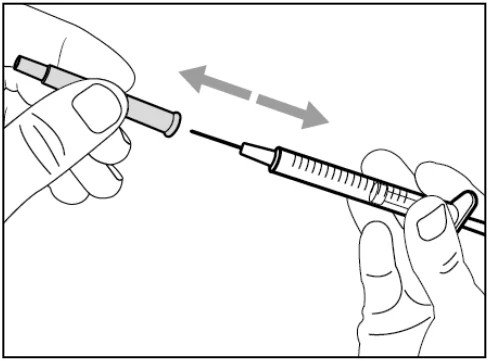
- Hold the syringe by the barrel with the transfer needle with filter pointing up.
- Carefully pull the transfer needle with filter cap straight off and away from your body. Do not throw the cap away. You will need to recap the transfer needle with filter after transferring the medicine.
- Do not touch the needle tip.
Step E. Inject air into vial
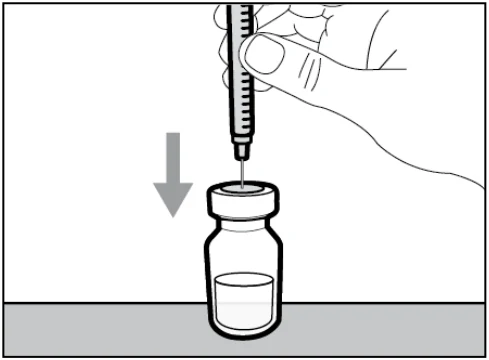
- With the new vial on the flat working surface, insert the new transfer needle with filter and syringe, straight down into the centre of the vial stopper.
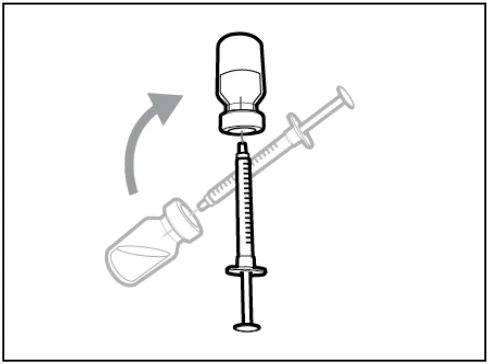
- Keep the needle in the vial and turn the vial upside down.
Push and twist
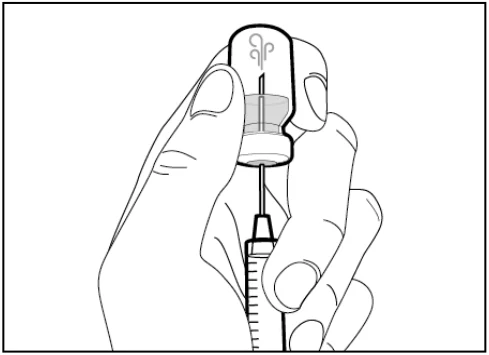
- With the needle pointing upwards, push on the plunger to inject the air from the syringe above the medicine.
- Keep your finger pressed down on the syringe plunger.
- Do not inject air into the medicine as this could create air bubbles or foam in the medicine.
Step F. Transfer medicine to syringe
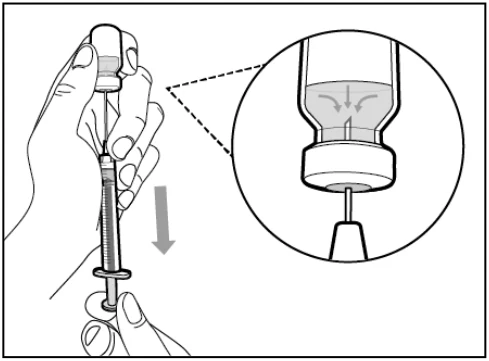
- Slide the tip of the needle down so that it is within the medicine.
- With the syringe pointing upwards, slowly pull back the plunger to fill the syringe with more than the amount of medicine needed for your prescribed dose.
- Hold the plunger firmly to ensure it does not pull back in.
- Be careful not to pull the plunger out of the syringe.
Note: Ensure you have enough medicine in the syringe to complete your dose before moving onto the next steps. If you cannot remove all medicine, turn the vial upright to reach the remaining amount.
Do not use the transfer needle with filter to inject medicine as this may cause pain and bleeding.
Repeat steps A to F with each additional vial until you have more than the amount of medicine needed for your prescribed dose. Once completed, keep the transfer needle with filter inserted in the vial and return to Step 6 “Remove air bubbles”. Continue with the remaining steps.
Overdose:
If you or your caregiver uses more Hemlibra than you are supposed to, tell your doctor immediately. This is because you may be at risk of developing side effects such as blood clots. Always use Hemlibra exactly as your doctor has told you, and check with your doctor, pharmacist or nurse if you are not sure.
If you think you, or a person you are caring for, have taken too much Hemlibra, contact a healthcare professional, hospital emergency department, regional poison control centre or Health Canada’s toll-free number, 1-844 POISON-X (1-844-764-7669) immediately, even if there are no signs or symptoms.
Missed dose:
If you forget your scheduled weekly injection, inject the forgotten dose as soon as possible before the day of the next scheduled dose. Then, continue to inject the medicine once a week as scheduled. Do not inject a double dose to make up for a forgotten dose.
If you are not sure what to do, ask your doctor, pharmacist or nurse.
Do not stop using Hemlibra without talking to your doctor. If you stop using Hemlibra, you may no longer be protected against bleeding.
If you have any further questions on the use of this medicine, ask your doctor, pharmacist or nurse.
Possible side effects from using Hemlibra:
These are not all the possible side effects you may have when taking Hemlibra. If you experience any side effects not listed here, tell your healthcare professional.
Very common: may affect 1 in 10 or more people
- a reaction in the area the injection was given (redness, itching, pain, swelling)
- headache
Common: may affect from 1 in 100 up to 1 in 10 people
- fever
- joint pain
- muscle aches
- diarrhea
- hives
- rash
Uncommon: may affect from 1 in 1000 up to 1 in 100 people
- blood clot in a vein behind your eye (cavernous sinus thrombosis)
- severe damage of the skin tissue (skin necrosis)
- blood clot in a vein near the surface of the skin (thrombophlebitis superficial)
- tiny blood clots that create damage to the small blood vessels (thrombotic microangiopathy)
- swelling under the skin (angioedema)
Serious side effects and what to do about them
| Frequency/Side Effect/Symptom | Talk to your healthcare professional | Stop taking the/this drug (if applicable) and get immediate medical help | |
|---|---|---|---|
| Only if severe | In all cases | ||
| Uncommon | |||
Thrombotic microangiopathy:
| ✓ | ✓ | |
Blood clots (thromboembolism):
| ✓ | ✓ | |
If you have a troublesome symptom or side effect that is not listed here or becomes bad enough to interfere with your daily activities, tell your healthcare professional.
Reporting side effects
You can report any suspected side effects associated with the use of health products to Health Canada by:
- Visiting the Web page on Adverse Reaction Reporting (canada.ca/drug-device-reporting) for information on how to report online, by mail or by fax; or
- Calling toll-free at 1-866-234-2345.
NOTE: Contact your healthcare professional if you need information about how to manage your side effects. The Canada Vigilance Program does not provide medical advice.
Storage:
Store in a refrigerator (2°C to 8°C). Do not freeze. Do not shake.
Store in the original pack in order to protect from light.
Do not use this medicine after the expiry date listed on the carton and the vial label after “EXP”. The expiry date refers to the last day of that month.
Once removed from the refrigerator, unopened vials may be kept at room temperature (below 30°C) for up to 7 days. After storage at room temperature, unopened vials may be returned back to the refrigerator. The total length of time the medicine is stored at room temperature should not be more than 7 days.
Once transferred from the vial to the syringe, use Hemlibra straight away. Do not refrigerate the solution in the syringe.
Throw away any unused solution appropriately. Do not throw away any medicines via wastewater or household waste. Ask your pharmacist how to throw away medicines you no longer use. These measures will help protect the environment.
Keep out of reach and sight of children.
If you want more information about Hemlibra:
- Talk to your healthcare professional
- Educational materials for Healthcare Professionals and patients are available from Hoffmann-La Roche Limited by calling 1-888-762-4388.
- Find the full product monograph that is prepared for healthcare professionals and includes the Patient Medication Information by visiting the Health Canada Drug Product Database website (https://www.canada.ca/en/health-canada/services/drugs-health-products/drug-products/drug-product-database.html); the manufacturer’s website www.rochecanada.com; or by calling 1-888-762-4388.
Date of Authorization: August 5, 2025
©2018-2025, Hoffmann-La Roche Limited.
Hemlibra® is a registered trademark of Chugai Seiyaku Kabushiki Kaisha, used under license.
All other trademarks are the property of their respective owners.

Hoffmann-La Roche Limited
Mississauga, ON L5N 5M8