


Patient Medication Information: uses, side effects, how to take - Rystiggo
What RYSTIGGO is used for:
RYSTIGGO is used to treat adult patients with generalized Myasthenia Gravis (gMG), a certain type of disease affecting the muscles.
Generalized MG causes weakness of muscles involved in movement and/or breathing. This is an “autoimmune disorder” which means that it is caused by your antibodies. These antibodies target and destroy proteins that are responsible for communication between nerves and muscles. This then results in muscle weakness.
How RYSTIGGO works:
RYSTIGGO belongs to a group of medicines called monoclonal antibodies. This medicine works by reducing the level of immunoglobulin G (IgG) antibodies, including IgG autoantibodies (antibodies against your own body) that attack healthy tissue in autoimmune diseases such as generalised myasthenia gravis.
RYSTIGGO contains the active substance rozanolixizumab. Rozanolixizumab is a monoclonal antibody (a type of protein) designed to recognize and attach to FcRn, a protein that keeps the IgG antibodies in the body for a longer period of time.
The ingredients in RYSTIGGO are:
Medicinal ingredient: rozanolixizumab
Non-medicinal ingredients: L-histidine, L-histidine hydrochloride monohydrate, L-proline, polysorbate 80, and water for injection
RYSTIGGO comes in the following dosage forms:
Solution for subcutaneous infusion: 140 mg/mL
- 280 mg rozanolixizumab in 2 mL vial
- 420 mg rozanolixizumab in 3 mL vial
- 560 mg rozanolixizumab in 4 mL vial
- 840 mg rozanolixizumab in 6 mL vial
Do not use RYSTIGGO if:
- You are allergic to rozanolixizumab or any of the other ingredients of this medicine. See “The ingredients in RYSTIGGO are”.
To help avoid side effects and ensure proper use, talk to your healthcare professional before you take RYSTIGGO. Talk about any health conditions or problems you may have, including if you:
- have a condition called hyperprolinaemia, a rare genetic disorder in which an excess of the amino acid, proline, builds up in the body
have had a recent vaccination or are scheduled to receive any vaccinations. You should receive
any required vaccines at least 4 weeks before you start treatment with RYSTIGGO.
- have a history of infection or think you have an infection. Before starting or during treatment with this medicine, inform your healthcare professional if you have any infections.
are pregnant, think you may be pregnant or are planning to have a baby, ask your healthcare professional for advice before using this medicine. The effects of RYSTIGGO in pregnancy are not known.
- are breastfeeding or plan to breastfeed. It is not known if RYSTIGGO passes into your breast milk.
Other warnings you should know about:
RYSTIGGO is not approved for children and adolescents under 18 years of age because it has not been studied in this age group.
It is not known whether RYSTIGGO may affect your fertility. Talk to your healthcare professional if you are planning on having children.
RYSTIGGO may cause serious side effects, including:
- Inflammation of the membranes that surround the brain and spinal cord (aseptic meningitis). Aseptic meningitis has been observed in association with this medicine. Seek immediate medical attention if you develop symptoms of aseptic meningitis such as severe headache, fever, stiffness of the neck, nausea, vomiting and/or intolerance to bright light.
- This medicine contains a protein that can cause allergic reactions in some people. Tell your healthcare provider right away if you have signs or symptoms of an infusion reaction (allergic reaction) during and for 15 minutes after treatment. Some of the signs and symptoms of an infusion reaction (allergic reaction) may include: rash, swelling, itching, hives, trouble breathing, low blood pressure, fainting.
- Tell your healthcare provider right away if you have signs or symptoms of an infection before starting or during treatment with RYSTIGGO. Some of the signs and symptoms may include fever, chills, frequent and/or painful urination, cough, runny nose, wheezing, shortness of breath, fatigue, sore throat, excess phlegm, nasal discharge, back pain, and/or chest pain.
Tell your healthcare professional about all the medicines you take, including any drugs, vitamins, minerals, natural supplements or alternative medicines.
- Tell your healthcare professional or pharmacist if you are using, have recently used or might use any other medicines.
- Taking RYSTIGGO with other medicines may result in the loss of effect of the other medications. Other medicines may impair the effect of RYSTIGGO. Tell your healthcare professional if you are taking or planning to take other medicines.
How to take RYSTIGGO:
- Take RYSTIGGO exactly as directed by your healthcare professional.
- RYSTIGGO is given as an infusion under the skin (subcutaneous use). It is injected into the tummy area, in the lower right or lower left below the belly button. Injections should not be given into areas where the skin is tender, bruised, red or hard.
- RYSTIGGO can be injected by your healthcare professional using an infusion pump (also known as a syringe pump) or using a syringe manual push.
RYSTIGGO can also be self-injected or injected by a caregiver using only the syringe manual push, after proper training by a healthcare professional on how to properly administer RYSTIGGO.
- Before you take RYSTIGGO, make sure your healthcare professional goes through the important information with you and/or your caregiver and shows you how to properly prepare and inject RYSTIGGO.
- Read the “Instructions for Use – Self-administration via Syringe Manual Push” at the end of this leaflet before using RYSTIGGO. This leaflet includes additional important details for the safe and proper use of RYSTIGGO.
Usual dose:
RYSTIGGO is given once every week for 6 weeks (treatment cycle). Your healthcare professional will tell you when to administer your future treatment cycles.
Your healthcare professional will calculate the correct dose for you taking into account your weight:
- if you weigh at least 100 kg, the recommended dose is 840 mg (requiring 6 mL per administration)
- if you weigh from 70 kg to less than 100 kg, the recommended dose is 560 mg (requiring 4 mL per administration)
- if you weigh from 50 kg to less than 70 kg, the recommended dose is 420 mg (requiring 3 mL per administration)
- if you weigh from 35 kg to less than 50 kg, the recommended dose is 280 mg (requiring 2 mL per administration)
Overdose:
| If you think you, or a person you are caring for, have taken too much RYSTIGGO, contact a healthcare professional, hospital emergency department, regional poison control centre or Health Canada’s toll-free number, 1-844 POISON-X (1-844-764-7669) immediately, even if there are no signs or symptoms. |
|---|
Missed dose:
If you miss a dose, you may give the injection for up to 4 days after the missed dose. Thereafter, the next dose should be given according to the original dosing schedule until the treatment cycle is completed.
Do not stop using this medicine without talking to your healthcare professional first. Interrupting or stopping treatment with RYSTIGGO may cause your symptoms of generalised myasthenia gravis to come back. Your healthcare professional will advise you on how long you should be treated with this medicine.
If you have any further questions on the use of this medicine, ask your healthcare professional.
Possible side effects from using RYSTIGGO:
These are not all the possible side effects you may have when taking RYSTIGGO. If you experience any side effects not listed here, tell your healthcare professional.
Very common: may affect more than 1 in 10 people
- Headache (including migraine)
- Diarrhea
- Fever (pyrexia)
Common: may affect up to 1 in 10 people
- Feeling sick (nausea)
- Upper respiratory tract infections (e.g., common cold, runny or stuffy nose, sinusitis)
- Joint pain (arthralgia)
- Skin rash, sometimes with red bumps (rash papular)
- Injection site reaction, injection site rash, redness of the skin (erythema), inflammation, discomfort and infusion site pain
- Stomach ache
- Viral infections (including shingles and cold sores)
If you have a troublesome symptom or side effect that is not listed here or becomes bad enough to interfere with your daily activities, tell your healthcare professional.
Reporting side effects
You can report any suspected side effects associated with the use of health products to Health Canada by:
NOTE: Contact your healthcare professional if you need information about how to manage your side effects. The Canada Vigilance Program does not provide medical advice. |
Storage:
Store in a refrigerator (2°C to 8°C or 36°F to 46°F).
Do not freeze. Do not shake.
Keep RYSTIGGO in the original box to protect it from light.
RYSTIGGO may be removed from the refrigerator, kept at room temperature (up to 25°C/77°F) in the original outer carton package, for only one single period of up to 20 days. Do not use this medicine after this time period. There is a space on the box so you can write the date it was taken out of the refrigerator.
Keep out of reach and sight of children.
If you want more information about RYSTIGGO:
- Talk to your healthcare professional
- Find the full product monograph that is prepared for healthcare professionals and includes the Patient Medication Information by visiting the Health Canada Drug Product Database website (Drug Product Database: Access the database); the manufacturer’s website (www.ucb-canada.ca); or by calling 1-866-709-8444.
Date of Authorization: 2026-10-14
RYSTIGGO® is a registered trademark of UCB Biopharma SRL.
INSTRUCTIONS FOR USE - Self-administration via Syringe Manual Push
PrRYSTIGGO®
rozanolixizumab injection
Read all of these instructions before using RYSTIGGO. Your healthcare professional should show you or a caregiver how to inject RYSTIGGO before you use it for the first time. Do not inject yourself or someone else until you have been shown how to inject RYSTIGGO the right way. This information does not replace talking to your healthcare professional about your medical condition or treatment.
The table below shows the recommended dose (per administration) taking into account the patient’s weight.
| Body weight | ≥ 35 to <50 kg | ≥ 50 to < 70 kg | ≥ 70 to < 100 kg | ≥ 100 kg |
|---|---|---|---|---|
| Recommended dose (mg) | 280 mg | 420 mg | 560 mg | 840 mg |
| Amount of medication required per administration (mL) | 2 mL | 3 mL | 4 mL | 6 mL |
! Important information you need to know before giving yourself or someone else RYSTIGGO
- For under the skin (subcutaneous) use only.
- Use each vial only once.
- Check your dose – you may need more than 1 vial to prepare your prescribed dose.
- Do not use RYSTIGGO if the expiry date has passed.
- Before using RYSTIGGO, check if the dose on the box(es) is the same as your prescribed dose. Do not use if the dose is not the same as your prescription. Contact your doctor or nurse for next steps.
- Do not use the vial if the liquid is cloudy or has particles you can see. The medicine should be colourless to pale brownish-yellow, clear to slightly opalescent (pearly white).
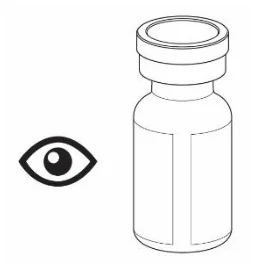
- Do not shake the vial.
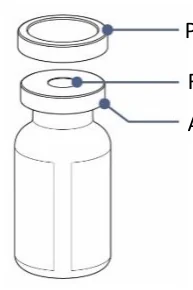
- Do not use the vial if the protective cap is missing or broken. If any of the vials are broken or do not have a cap, report and return them to the pharmacy.
Protective Cap Rubber Stopper Aluminium Shield |
|---|
How to store RYSTIGGO
- Store in a refrigerator (2 °C to 8 °C).
- Do not freeze.
- Keep RYSTIGGO in the original box to protect it from light.
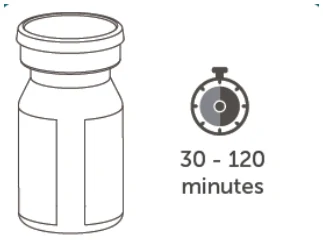
- Remove the box from the refrigerator before your infusion. For a more comfortable infusion, let the vial reach room temperature before you use this medicine. This may take 30 to 120 minutes. Do not warm in any other way.
- If the vial has been stored at room temperature (see PATIENT MEDICATION INFORMATION, Storage section), it can be used immediately.
! Keep this medicine out of the sight and reach of children.
Step-by-step instructions
- 1. Get ready
Step 1: Gather all the supplies you will need on a clean and flat work surface:
Included in the RYSTIGGO box(es):
- RYSTIGGO vial
- RYSTIGGO Package Leaflet which includes the Instructions for Use
! Check your dose – you may need more than 1 vial to prepare your prescribed dose.
Not included in the RYSTIGGO box:
- Syringe (5 -10 ml depending on your prescribed dose)
- Transfer needle(s) or a vented vial adaptor
- Infusion set with a 26G or larger diameter needle. The infusion tubing should be 61 cm in length or shorter.
Alcohol wipes.
- Transparent or see-through dressing
- Tape
- Adhesive bandage.
- Sharps disposal container
- Clean container (bowl) or paper towel to collect extra liquid when filling the infusion line.
Step 2: Clean your work surface and hands
- Clean your work surface with disinfectant and wash your hands carefully with soap and water or use a hand sanitiser. Dry them with a clean towel.
- Prepare the vial(s) and syringe
! Check your dose – you may need more than 1 vial to prepare your prescribed dose.
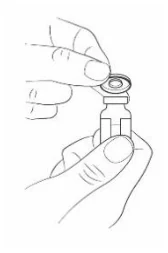
Step 3: Remove the protective cap from the vial(s)
- Take the protective cap off the vial(s) by holding the edge and lifting upwards.
- Clean the rubber stopper with an alcohol wipe. Allow to air-dry.
- Leave the aluminium shield in place.
- Check your dose - if you need more than one vial to prepare your prescribed dose, remove all the caps and clean the stoppers.
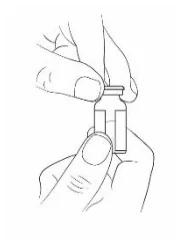
! If you are using a vented vial adaptor instead of a transfer needle, you can skip directly to Step 7.
Step 4: Attach the transfer needle to the syringe
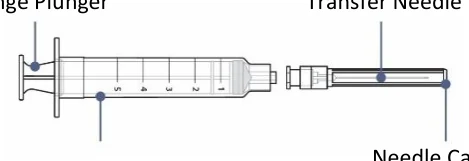
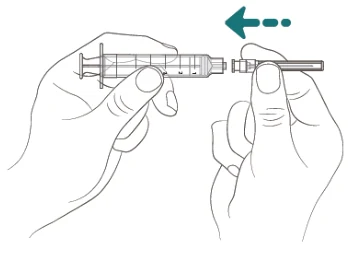
- Remove the syringe and transfer needle from the packaging. Do not touch the tip of the syringe or the base of the needle to avoid germs.
- With the needle cap still on, gently push or twist the transfer needle onto the syringe until it is firmly connected.
Syringe Syringe Plunger Transfer Needle Needle Cap |
|---|
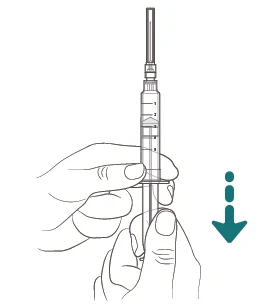
Step 5: Draw air into the syringe
- Keep the needle cap on while you are doing this.
- Slowly pull down on the syringe plunger to draw air into the syringe.
- Fill the syringe with about the same amount of air as the amount of medicine in the vial.
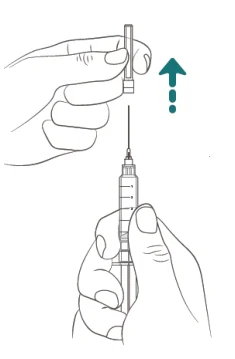
Step 6: Remove the needle cap from the transfer needle
- Hold the syringe with one hand.
- With your other hand, hold the transfer needle cap and pull it straight off the needle
- Place the cap on the table to throw away later.
- Do not touch the needle tip.
- Do not let the needle tip touch anything after you remove the cap.
Step 7: Insert the transfer needle or vented vial adaptor directly into the vial
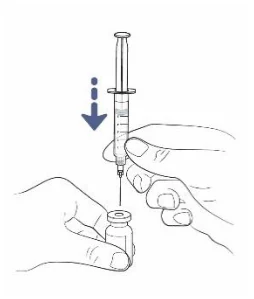
Follow the instructions for the infusion method you are using:
Using transfer needle
- Place the vial on the table and insert the transfer needle straight through the rubber stopper.
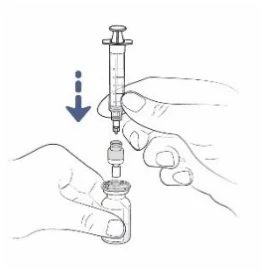
Using vial adaptor
- Place the vial on the table and insert the vial adaptor straight through the rubber stopper.
- Attach the syringe to the vented vial adaptor.
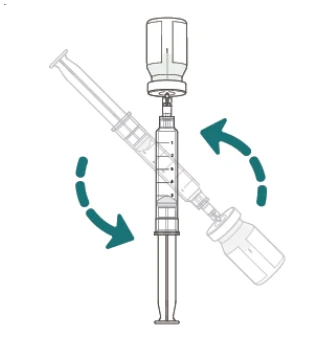
Step 8: Turn the vial and syringe
- Now turn the vial and syringe upside-down.
- Keep the transfer needle or vented vial adaptor inside the vial.
! If you are using a vented vial adaptor, you can skip directly to Step 11.
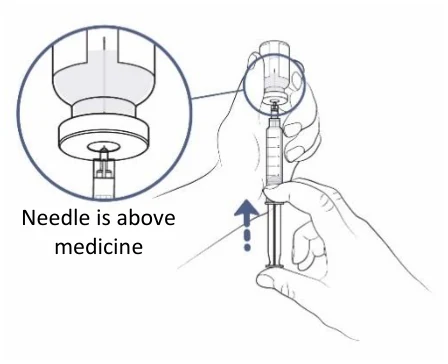
Step 9: Push air from the syringe into the vial
- Check that the transfer needle now points upwards and make sure the needle tip is in the space above the medicine.
- Slowly push the syringe plunger upwards to push all the air from the syringe into the vial. Keep your thumb pressed on the syringe plunger the whole time – so you do not let air into the syringe.
- Keep the needle tip in the space above the medicine the whole time.
- Do not push air into the medicine as this can create bubbles.
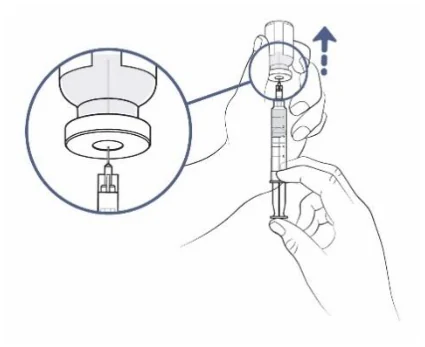
Step 10: Get ready to fill the syringe
Keep your thumb pushed on the syringe plunger. With your other hand, pull the vial slowly and carefully upwards so the needle tip is fully covered by the liquid medicine.
Needle is above medicine
Step 11: Fill the syringe with as much medicine as possible
! Check your dose – you may need more than 1 vial to prepare your prescribed dose.
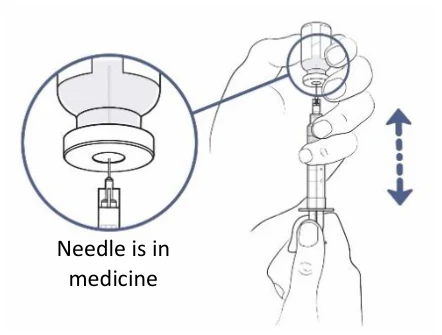
Now slowly pull the syringe plunger down and fill the syringe with medicine.
If you are using a transfer needle to fill the syringe, do the following:
- Keep pulling the vial slowly and carefully upwards to keep the tip of the needle fully covered by the liquid.
- Adjust the needle tip to keep it in the liquid. This will help you to take as much medicine out of the vial(s) as possible.
- You should now have more medicine in the syringe than your prescribed dose. You will adjust this later.
! There will also be a very small amount of the medicine that you cannot take out of the vial. You will throw this away with the vial later.
! If you are using a vented vial adaptor, detach the syringe from the vented vial adaptor. Leave the vented vial adaptor in the vial. You can throw this away at the end of the infusion. You can now skip directly to Step 14.
Step 12: Remove air from the syringe
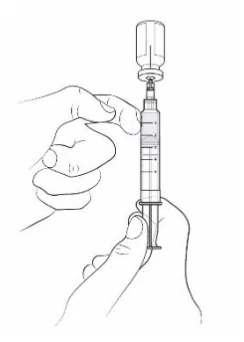
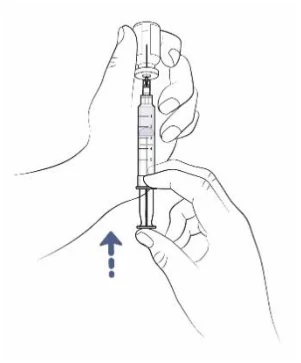
If there is any space between the liquid in the syringe and the top of the syringe, slowly push the plunger to push air back into the vial.
If you see air bubbles in the syringe, you can remove them by tapping gently on the syringe with your index finger. Now slowly push the plunger to push air back into the vial.
Needle is in medicine
Step 13: Remove the transfer needle from the vial and the syringe
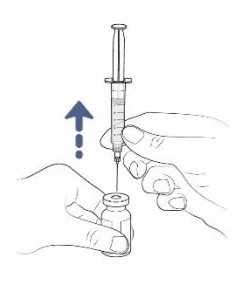
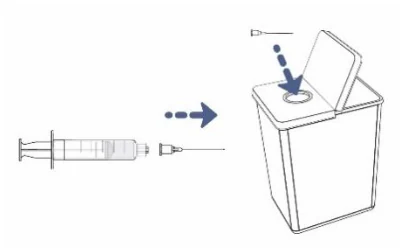
- Turn the vial and syringe over and put the vial on the work surface.
Remove the transfer needle and syringe from the vial by pulling straight up on the syringe.
- Remove the transfer needle from the syringe by pulling or twisting carefully on the base of the needle.
- Do not touch the needle. Do not put the needle cap back on.
- Throw the needle away in the sharps disposal container.
- If you are using a vented vial adaptor instead of a needle, it is not necessary to remove the vented vial adaptor from the vial before throwing them away.
Step 14: Re-check your dose
- If you need to use another vial to prepare your prescribed dose, repeat Steps 4-13 with the same syringe and a new transfer needle or vented vial adaptor to avoid contamination.
- Prepare for infusion
Step 15: Attach the infusion set onto the syringe
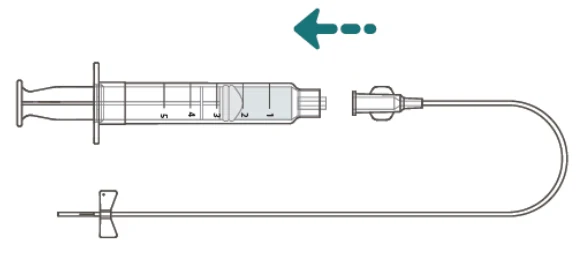
- Place the syringe on the clean work surface while you are preparing the infusion line.
- Remove the infusion set from the protective pouch.
- Remove the cap from the end of the infusion set by twisting it off. Place the cap on the work surface to throw away later.
- Attach the infusion set onto the syringe until firmly connected. Do not touch the tip of the syringe or the base of the infusion set to avoid germs.
- Do not remove the needle cap from the infusion set needle.
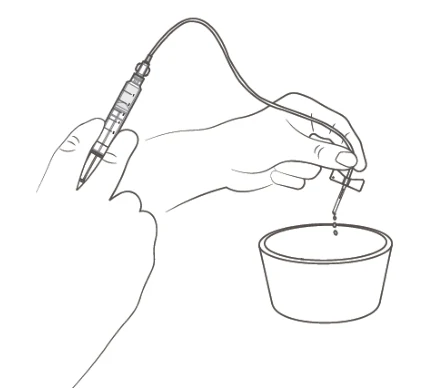
Step 16: Fill the infusion set with medicine
- Make sure you have a bowl or paper towel in front of you – you can use it to collect any medicine from the infusion line that is not needed.
- Keep the cap on the infusion line needle and hold it over the bowl. Now hold the syringe in a vertical position and fill the infusion line with medicine by pushing gently on the syringe plunger.
- The amount of liquid left in the syringe must match your prescribed dose.
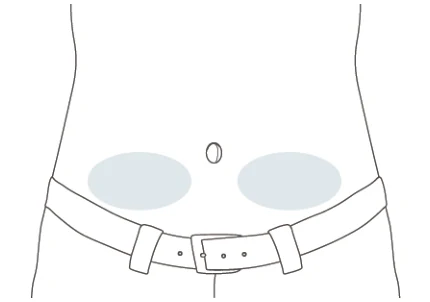
Step 17: Choose and prepare the infusion site
Choose an infusion site to the lower left or lower right side of the belly (abdomen), below the level of the belly button.
Do not use an area of skin which:
- is tender, bruised, red or hard
- has scars or stretch marks.
Prepare the infusion site:
Clean the infusion area with an alcohol wipe for 30-seconds and allow it to air-dry. Do not touch the area
after it has been cleaned.
Infusion set
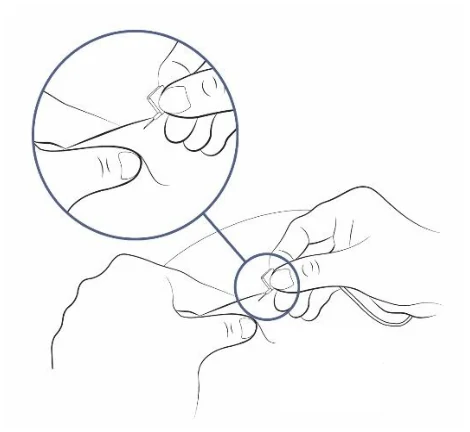
Step 18: Insert the infusion set needle
- Carefully remove the needle cap from the infusion set needle.
- Fold the butterfly wings together and hold them with your thumb and index finger of one hand.
- With your other hand, pinch the skin between 2 fingers to make a fold.
- Push the needle into the middle of the skin and push it under the skin.
- The needle should go in easily. If it is difficult, you can pull the needle out slightly.

- There are different types of infusion sets (some without a butterfly-type needle and some that allow the needle to be withdrawn leaving behind a small, flexible tube (called a cannula)). Your nurse or doctor will explain to you how to use your infusion set.
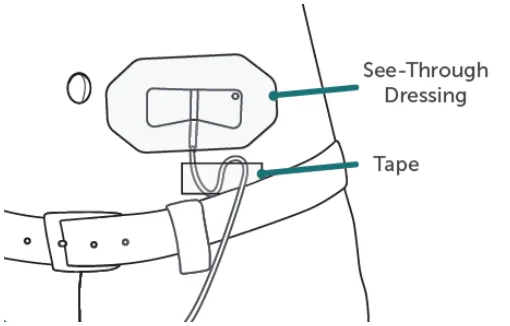
Step 19: Secure the infusion set
- Use a transparent or see-through dressing to hold the infusion set in place. Some infusion sets have a built-in adhesive.
- You can use tape to hold the infusion line on your skin.
- Infuse and finish
Step 20: Start the infusion for Syringe Manual Push
- Sit back comfortably and push firmly on the syringe plunger to infuse the medicine.
- You should infuse the medicine at a speed that feels comfortable to you (infusion times are usually around 5 minutes but may range from 1 minute to 30 minutes). Keep pushing until there is no more medicine left in the syringe.
- Before and during the infusion, make sure that the infusion line does not twist or bend. If this happens, the flow of medicine can be interrupted. In this case, correct the bend in the infusion line and try again.
If it feels uncomfortable or if any of the medicine flows back into the infusion line, you can push more slowly.
For illustration only. Your specific supplies may look different.
! Note: There will be some medicine left in the infusion line. This is normal and you can throw it away in the sharps disposal container.
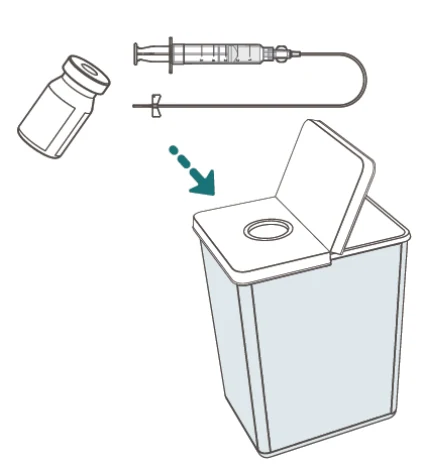
Step 21: Finish the infusion and clean up
- After you finish the infusion, do not try to take the dressing off the needle. Remove them both from your skin together and throw them away with the syringe in the sharps disposal container.
- There may be a drop or two of liquid at the infusion site after you take out the needle. This is normal.
- Cover the infusion site with a clean dressing, such as an adhesive bandage.
- Throw away any used vial(s) and leftover medicine into the sharps disposal container.
- Throw away any other used supplies in your household waste.
! Always keep the sharps disposal container out of the sight and reach of children.