


Patient Medication Information: uses, side effects, how to take - Yorvipath
What Yorvipath is used for:
Yorvipath is used to treat adults with chronic low parathyroid hormone levels (hypoparathyroidism).
How Yorvipath works:
In people with hypoparathyroidism, the body produces no or too little parathyroid hormones (PTH). Because of this, they cannot keep the levels of calcium and phosphate within a normal range, and this leads to the symptoms of the condition, such as muscle spasms, twitching, and tingling in your fingertips, toes and lips. Yorvipath replaces the missing PTH to help control the levels of calcium and phosphate.
The ingredients in Yorvipath are:
Medicinal ingredients: Palopegteriparatide
Non-medicinal ingredients: Hydrochloric acid, mannitol, metacresol, sodium hydroxide, succinic acid, water for injection
Yorvipath comes in the following dosage forms:
Solution for injection in pre-filled pens, available as:
| Pre-filled Pen | Doses delivered | Push button colour |
|---|---|---|
| 168 mcg / 0.56 mL | 6 mcg, 9 mcg, 12 mcg | blue |
| 294 mcg / 0.98 mL | 15 mcg, 18 mcg, 21 mcg | orange |
| 420 mcg / 1.4 mL | 24 mcg, 27 mcg, 30 mcg | burgundy |
Each package contains 2 inner boxes. Each inner box contains 1 Yorvipath pen and 15 disposable needles (including 1 spare needle). Thus, each package contains a total of 2 Yorvipath pens and 30 disposable needles.
Do not use Yorvipath if:
- you are allergic to palopegteriparatide or any of the other ingredients in Yorvipath.
- you have pseudohypoparathyroidism, a condition in which the body does not adequately respond to the parathyroid hormone produced by the body.
To help avoid side effects and ensure proper use, talk to your healthcare professional before you take Yorvipath. Talk about any health conditions or problems you may have, including if you:
are at higher risk of a type of bone cancer called osteosarcoma. This is especially important:
- if you have a bone disease that increases your risk of developing osteosarcoma (including if you have Paget’s disease of the bone).
- if a blood test shows that you have unexplained increases in bone alkaline phosphatase.
- if you have cancer of the bones or other cancer that has spread to your bones.
- if you are having or have had radiation therapy to the skeleton.
- if you are affected with a condition that runs in your family that can increase your chance of getting cancer in your bones.
- are taking digoxin or digitoxin, which is prescribed for heart failure, fast heart rate, or irregular heart rhythm
- have or have had problems with your kidneys
- have or have had problems with your liver
Other warnings you should know about:
Allergic Reaction (hypersensitivity)
- You may experience an allergic reaction especially when starting Yorvipath.
- Get medical help right away if you have signs and symptoms of a sudden serious allergic reaction (e.g. breathing difficulty, swelling of your face, mouth, or tongue, fast heartbeat, hives, rash, fever).
High levels of calcium in your blood (hypercalcemia)
- You may experience increased levels of calcium in your blood, especially when starting or increasing your dose of Yorvipath, or if you have to use 2 pens to make up your daily dose.
- Contact your healthcare professional if you experience nausea, dizziness, vomiting, constipation, lethargy, or muscle weakness that do not go away.
Low levels of calcium in your blood (hypocalcemia)
- You may experience decreased levels of calcium in your blood if you suddenly discontinue Yorvipath, or if you have to use 2 pens to make up your daily dose.
- Contact your healthcare professional if you experience confusion, memory loss, depression, hallucinations, muscle spasms, muscle cramps, numbness or tingling in the hands, feet, or face.
Check-up and testing: You will have regular visits with your healthcare professional during your treatment with Yorvipath. They will:
- Do a blood test to check your calcium and vitamin D levels before you start treatment with Yorvipath.
Check how you respond to the Yorvipath treatment:
- 7 days after starting treatment and
- 7 to 14 days after your dose is changed
This will be done using tests to measure the level of calcium in your blood or urine. Your healthcare professional may tell you to change the amount of calcium or vitamin D you take (in any form, including foods rich in calcium).
Tell your healthcare professional about all the medicines you take, including any drugs, vitamins, minerals, natural supplements or alternative medicines.
The following may interact with Yorvipath:
- Cardiac glycosides (such as digoxin or digitoxin), which are used to treat heart conditions
- Medicines used to treat osteoporosis and other conditions that affect the density and strength of bones such as bisphosphonates, denosumab, or romosozumab
- A type of water pills, called thiazide or loop diuretics used to treat high blood pressure
- Systemic corticosteroids used to treat inflammation
- Lithium which is used to treat mental illnesses such as bipolar disorder
How to take Yorvipath:
- Before you use the pen for the first time, your healthcare professional will show you how to inject Yorvipath. Use exactly as your healthcare professional tells you to use it.
- Yorvipath is an injection given under the skin (‘subcutaneous injection’). This means that it is injected with a short needle into the fatty tissue under the skin.
- Inject Yorvipath once per day. Set a reminder on a calendar to remind yourself of your daily injection.
- Some people may feel dizzy, get a fast heartbeat, or feel light-headed right after injecting Yorvipath. For the first few doses, give your injection of Yorvipath in a place where you can sit or lie down right away if you get these symptoms. If your symptoms get worse or do not go away, contact your healthcare professional before you continue using Yorvipath.
- Yorvipath should be injected into the belly (abdomen) or front of the thigh, and it is important to inject into a different area every day to help avoid damaging your skin. You can change between the left and right side of the belly and between the left and right front of the thigh.
- See INSTRUCTIONS FOR USE for full administration instructions. You should always use the pen as described in the INSTRUCTIONS FOR USE.
Usual dose:
- Your healthcare professional will decide the best dosage for you based on your condition.
- The recommended starting dose of Yorvipath is 18 mcg once daily.
- Your healthcare professional may advise you to gradually change your dose based on your response to the medicine. Your dosage will be adjusted until you are using a dose that keeps the amount of calcium in your body within the normal range without the need for active vitamin D or calcium treatments.
- Initially, you will take Yorvipath with calcium and active vitamin D. During treatment, your healthcare professional may change your doses of calcium and active vitamin D.
If your dose is above 30 mcg per day:
- Your healthcare professional will explain how to take your dose.
- You will need to administer two injections, one after the other, in separate injection sites.
- You should use a different Yorvipath pen for the second daily injection, even if the two pens have the same-coloured push button (same strength).
- Using two separate pens will increase your risk of having high or low levels of calcium in your blood. Be aware of the symptoms and contact your healthcare professional right away if you develop signs of high or low levels of calcium.
- Refer to the table below for which pens to use. Always check with your healthcare professional if you are not sure.
Recommended scheme for Yorvipath dosing above 30 mcg/day
| Total Dose | First pen turn dial to dose of: | Second pen turn dial to dose of: | Which Yorvipath pen to use? | |||||
|---|---|---|---|---|---|---|---|---|
Orange pen (294 mcg / 0.98 mL) | Orange pen (294 mcg / 0.98 mL) | Use 2 separate orange pens one after the other in 2 separate injection sites | ||||||
| 33 mcg/day | 15 mcg | + | 18 mcg | |||||
| 36 mcg/day | 18 mcg | + | 18 mcg | |||||
| 39 mcg/day | 18 mcg | + | 21 mcg | |||||
| 42 mcg/day | 21 mcg | + | 21 mcg | |||||
Orange pen (294 mcg / 0.98 mL) | Burgundy pen (420 mcg / 1.4 mL) | ATTENTION: for this dose, you must use two different strength pens one after the other, in separate injection sites | ||||||
| 45 mcg/day | 21 mcg | + | 24 mcg | First injection: Use 1 orange pen (294 mcg / 0.98 mL pen) + Second injection: Use 1 burgundy pen (420 mcg / 1.4 mL pen) | ||||
Burgundy pen (420 mcg / 1.4 mL) | Burgundy pen (420 mcg / 1.4 mL) | Use 2 separate burgundy pens one after the other in 2 separate injection sites | ||||||
| 48 mcg/day | 24 mcg | + | 24 mcg | |||||
| 51 mcg/day | 24 mcg | + | 27 mcg | |||||
| 54 mcg/day | 27 mcg | + | 27 mcg | |||||
| 57 mcg/day | 27 mcg | + | 30 mcg | |||||
| 60 mcg/day | 30 mcg | + | 30 mcg | |||||
Yorvipath 294 mcg / 0.98 mL pen delivers doses of 15, 18, or 21 mcg (with orange push button).
Yorvipath 420 mcg / 1.4 mL pen delivers doses of 24, 27, or 30 mcg (with burgundy push button).
Overdose:
If you use more Yorvipath than you should, immediately contact your healthcare professional and describe any symptoms you get. An overdose may lead to high levels of calcium in the blood. Symptoms may include but are not limited to being sick (vomiting), dizziness, feeling thirsty, confusion, muscle weakness, and irregular heartbeat.
| If you think you, or a person you are caring for, have taken too much Yorvipath, contact a healthcare professional, hospital emergency department, regional poison control centre or Health Canada’s toll-free number, 1-844 POISON-X (1-844-764-7669) immediately, even if there are no signs or symptoms. |
|---|
Missed dose:
If you forget to inject a dose of Yorvipath, and:
- less than 12 hours have passed: inject the missed dose as soon as you remember.
- more than 12 hours have passed: skip the missed dose. Inject your next dose as you normally would.
Do NOT take two doses at the same time to make up for a missed dose.
Possible side effects from using Yorvipath:
These are not all the possible side effects you may have when taking Yorvipath. If you experience any side effects not listed here, tell your healthcare professional.
- Headache
- Thirst
- Rash
- Tingling in your fingertips, toes and lips
- Nausea or vomiting
- Feeling tired or weak
- Redness, bruising, pain, bleeding, rash or swelling where you injected the medicine
- Feeling like your heart Is fluttering or beating too fast
- Sore mouth or sore throat
- Diarrhea or constipation
- Abdominal pain or abdominal discomfort
- Skin reaction to sunlight
- The need to pass urine often or at night
- Chest pain or chest discomfort
- High blood pressure
Serious side effects and what to do about them
| Frequency/Side Effect/Symptom | Talk to your healthcare professional | Stop taking this drug and get immediate medical help | |
|---|---|---|---|
| Only if severe | In all cases | ||
| Common | |||
| Hypercalcemia (high levels of calcium in the blood): being sick (vomiting), dizziness, feeling thirsty, confusion, muscle weakness, and irregular heartbeat | √ | ||
| Hypocalcemia (low levels of calcium in the blood): muscle pain, bone pain, muscle twitching, chest discomfort, chest pain, tingling in your fingertips, toes and lips (paraesthesia), muscle spasms and cramps, oral numbness, and seizures | √ | ||
| Orthostatic Hypotension: Dizziness, light-headedness or fainting when you sit up or stand up | √ | ||
| Unknown | |||
| Hypersensitivity (allergic reactions): difficulty breathing, swelling of your face, tongue or throat, fast heartbeat, hives, or rash | √ | √ | |
Reporting Side Effects
You can report any suspected side effects associated with the use of health products to Health Canada by:
NOTE: Contact your healthcare professional if you need information about how to manage your side effects. The Canada Vigilance Program does not provide medical advice. |
Storage:
- Do not use this medicine after the expiry date which is stated on the carton.
- Do not use this medicine if you notice that the solution is cloudy, coloured, or has visible particles in it.
- Keep out of reach and sight of children.
Before first use:
- Store in a refrigerator (2 °C to 8 °C). Do not freeze.
- Store in the original package with the pen cap on in order to protect from light.
After first use:
- Store at room temperature below 30°C.
- Keep the pen cap on the pre-filled pen in order to protect from light.
- Discard each pen 14 days after first use.
If you want more information about Yorvipath:
- Talk to your healthcare professional
- Find the full product monograph that is prepared for healthcare professionals and includes this Patient Medication Information by visiting the Health Canada Drug Product Database website: (https://www.canada.ca/en/health-canada/services/drugs-health-products/drug-products/drug-product-database.html; the manufacturer’s website www.pendopharm.com or by calling 1-888-550-6060.
Date of Authorization: 2026-10-08
Yorvipath® is a registered trademark of Ascendis Pharma Bone Diseases A/S, used under license.
INSTRUCTIONS FOR USE
PrYorvipath®
palopegteriparatide injection
168 mcg / 0.56 mL
For 6, 9 or 12 mcg doses only
Solution for injection in pre-filled pen
For subcutaneous use
These instructions for use contain information on how to inject Yorvipath
Additional information
If you do not understand or are unable to complete a step that is described in these instructions for use, contact your doctor or nurse.
Important information you need to know before using your Yorvipath pen Read and follow the package leaflet and these instructions for use carefully so that you inject Yorvipath the right way. Make sure you have received training from your doctor or nurse before injecting. This is important to make sure that you get the correct treatment. For correct use
|
|---|
Caring for your pen
|
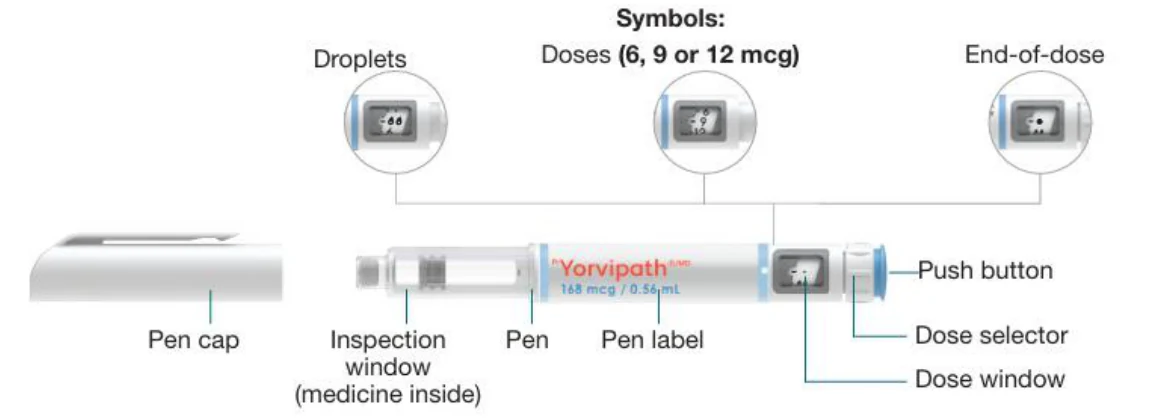
Parts overview
Figure A
Parts of the Yorvipath multi-use prefilled pen
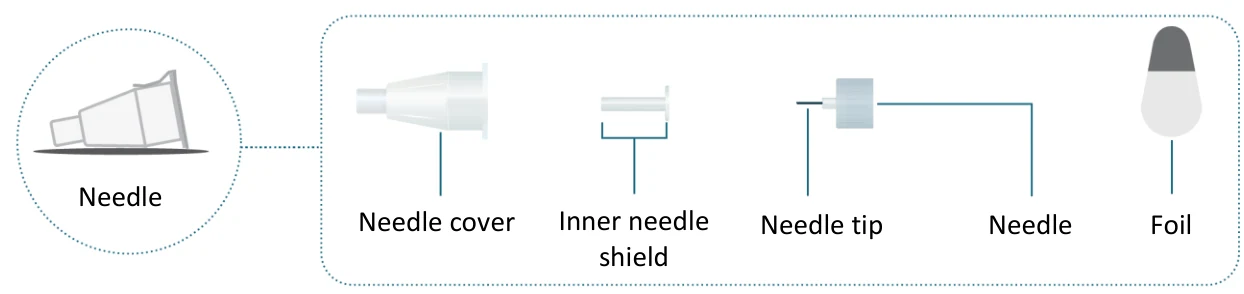
Pen needle parts (needles are included in the inner carton)
You will also need
Figure B

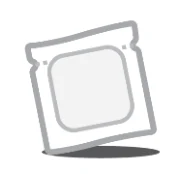
Sharps disposal container
Alcohol wipe
Needle
Needle cover
Inner needle shield
Needle tip
Needle
Foil
| 1 Prepare your supplies for the injection | ||
|---|---|---|
Before you start: Step 1
| ||
Step 2 Wash your hands well with soap and water (figure C). | Figure C 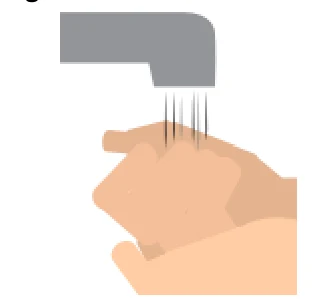 | |
| 2 Prepare pen with a new needle | ||
Step 1 Take your Yorvipath pen out from the inner carton. Make sure it is the correct strength and check the expiry date. Take a needle and check the expiry date on the needle (figure D). Important: If the medicine is expired, do not use the pen. Use a new pen. | Figure D 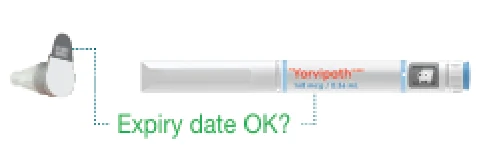 | |
Step 2 Pull off the pen cap and check the inspection window to make sure the medicine inside the pen is clear and colourless (figure E). Important: If the medicine has visible particles in it do not use the pen. Use a new pen. | Figure E 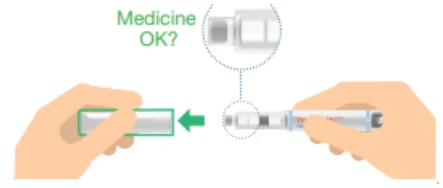 | |
Step 3 Pull the foil off the needle (figure F). This needle can only be used 1 time. Always use a new needle for each injection. Important: Make sure to only use the needles that come with the Yorvipath pen for your injections. | Figure F 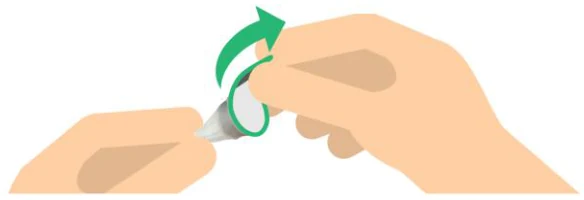 | |
Step 4 Attach the needle straight onto your pen, then screw the needle onto the pen until secure (clockwise) (figure G). | Figure G 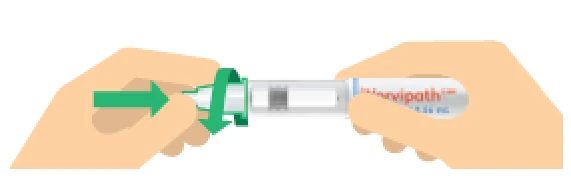 | |
Step 5 Pull off the needle cover and the inner needle shield (figure H). Throw away the inner needle shield (in the regular garbage) and keep the needle cover for later. | 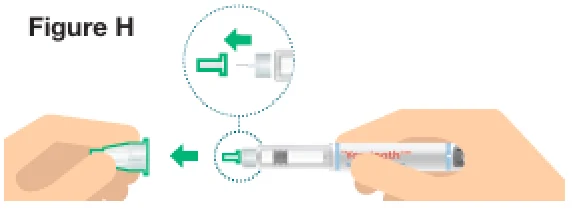 | |
| 3 If new pen, test pen flow | ||
Only test pen flow (steps A - C) the first time you use a new pen. See below for instructions on troubleshooting. If your pen is already in use, go to section "3 Prepare injection and select dose". | ||
Step A Turn the dose selector clockwise (to the right) 2 clicks until you see the droplet symbol “ ” in the dose window (figure I). Note: You can always correct the selection by turning the dose selector. | Figure I 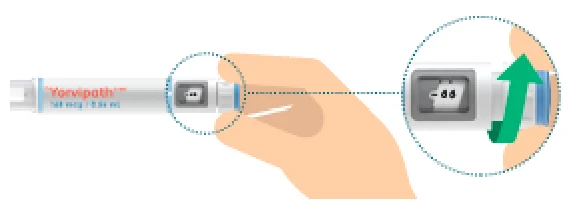 | |

Day
1
Step B Make any air bubbles rise to the top of the pen by tapping the inspection window (figure J). Keep the pen with the needle tip pointed up. Note: Tiny air bubbles are ok. | Figure J 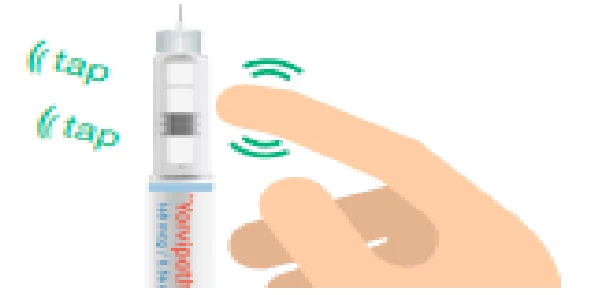 |
|---|---|
Step C Press the push button and watch drops of medicine come out of the needle tip. When you press, make sure that the dose selector rotates back to the symbol “●” (figure K). Important: If you do not see drops of medicine, repeat this test (steps A - C) up to 5 times. If drops are still not seen, change the needle and repeat the test. | Figure K 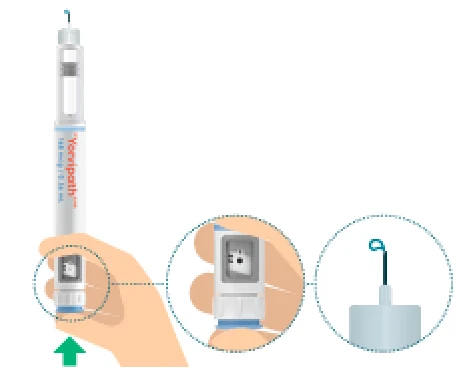 |
| 4 Prepare injection and select dose | |
Step 6 Choose injection site. There are two regions of your body you can inject into (figure L). Avoid injecting where skin is red, swollen or scarred. Choose a different injection site each time you inject. | Figure L |
Belly (abdomen)
at least 5 centimetres
away from the belly button
Front of the thighs
Front
Step 7 Clean the injection site with an alcohol wipe (figure M). | Figure M 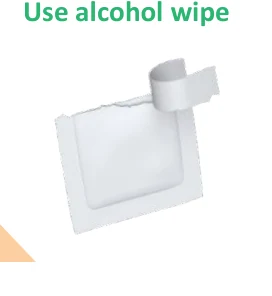 Use alcohol wipe | |
|---|---|---|
Step 8 Select your dose as prescribed by your doctor (6, 9 or 12 mcg) by turning the dose selector clockwise (to the right) (figure N). Important: Make sure not to press the push button while selecting your dose to not spill medicine. Note: Always throw away your pen and use another pen if you cannot dial a full dose. | Figure N 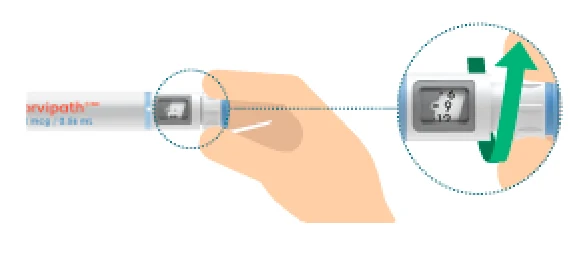 | |
| 5 Inject dose | ||
| Use the injection technique recommended by your doctor or nurse. Read this whole section (steps 9 - 11) before you start to inject. | ||
Step 9 Make sure you can see the dose window. To insert the needle into the skin (figure O), press the pen against injection site in a straight movement. | Figure O 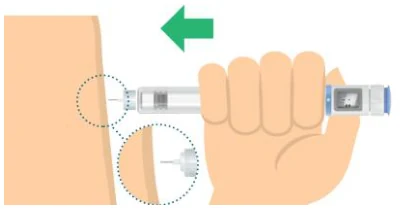 | |
Step 10 Press the push button all the way in and hold steady for 5 seconds (COUNT TO 5 S-L-O-W-L-Y). Make sure the dose selector rotates back to the symbol “●”. This means that you have given the full dose (figure P). | Figure P Press… 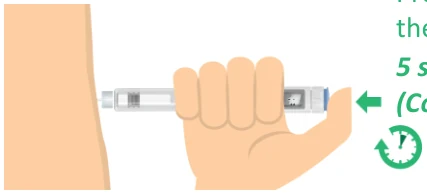 then hold 5 seconds (Count SLOWLY) | |
Step 11 Slowly remove the pen from the injection site in a straight angle (figure Q). | Figure Q 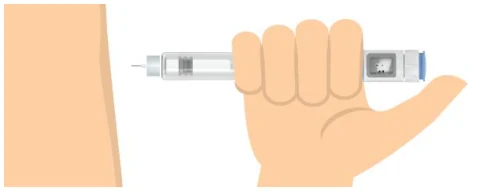 | |
| 6 Throw away used needle | ||
Step 12 Reattach the needle cover to carefully remove the needle. Lead the needle tip into the needle cover and secure the needle cover onto the needle (figure R). Important: Always reattach the needle cover before removing the needle to reduce the risk of needle stick and cross-contamination. | Figure R 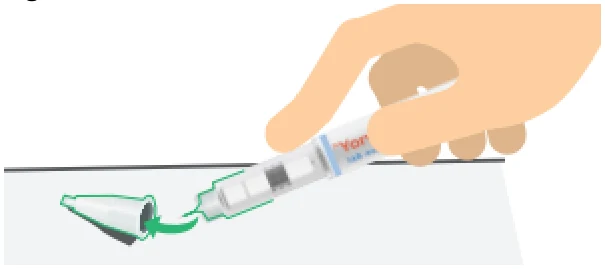 | |
Step 13 Unscrew the needle. Safely throw away the needle according to local regulations. (figure S). | Figure S 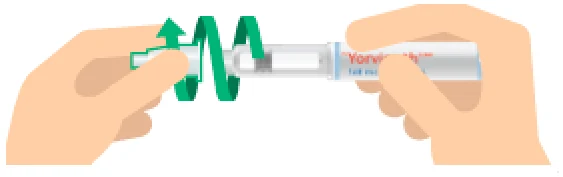 | |
Step 14 Click the pen cap firmly onto the pen to protect it between injections and to protect the medicine from light (figure T). | 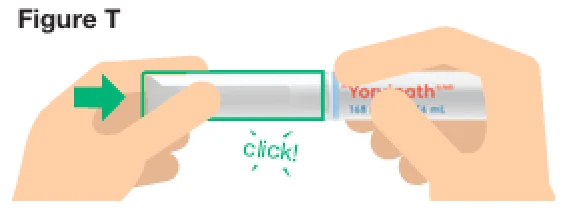 | |
| 7 Throw away used pen | ||
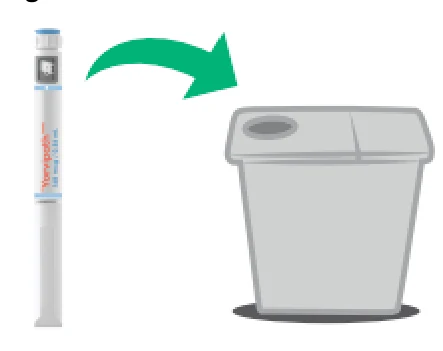
Important: Always throw away your pen after 14 days of use, even if it still has medicine inside (figure U). This is important to make sure that you get the full effect of your medicine. It is recommended to fill out the 'Open date:' field on the carton, in order to know when 14 days have passed. Note: Remember to throw away the extra needle when you throw away your pen. | Figure U | |

 |
Day
14
Troubleshooting
You should only test the pen flow (section 2) the first time you use a new pen (or if you think it might be damaged) to not waste medicine. The test checks to make sure the medicine flows through the pen so that you get the right doses of medicine.
If you see no drop on the needle tip after 5 attempts, it might be because there is no flow through the pen and needle. Change the needle (see section 5, step 12) and test the pen flow again (see section 2, steps A - C). You can be sure the flow works correctly when you see the drop of medicine. If it still does not work discard the pen and contact your health care provider.
Your injection is only completed after you have pressed the push button all the way in and the dose selector has rotated back to the “●” and you have kept the needle in the skin for 5 seconds (COUNT TO FIVE slowly).
Some medicine might flow back into the pen or flow backward from the injection site and be left on the skin. Holding the pen in the skin for 5 seconds helps to make sure that all the medicine has been injected.
The pen does not allow a larger dose to be set than what is left in the pen. If your dose is larger than the amount of medicine left in the pen you will not be able to dial a full dose. You must throw away your pen and take the full dose of medicine with a new pen. |
|---|
INSTRUCTIONS FOR USE
PrYorvipath®
palopegteriparatide injection
294 mcg / 0.98 mL
For 15, 18 or 21 mcg doses only
Solution for injection in pre-filled pen
For subcutaneous use
These instructions for use contain information on how to inject Yorvipath
Additional information
If you do not understand or are unable to complete a step that is described in these instructions for use, contact your doctor or nurse.
Important information you need to know before using your Yorvipath pen Read and follow the package leaflet and these instructions for use carefully so that you inject Yorvipath the right way. Make sure you have received training from your doctor or nurse before injecting. This is important to make sure that you get the correct treatment. For correct use
|
|---|
Special instructions for doses larger than 30 mcg/day If your dose is above 30 mcg/day:
|
Caring for your pen
|
Parts overview
Figure A Parts of the Yorvipath multi-use prefilled pen
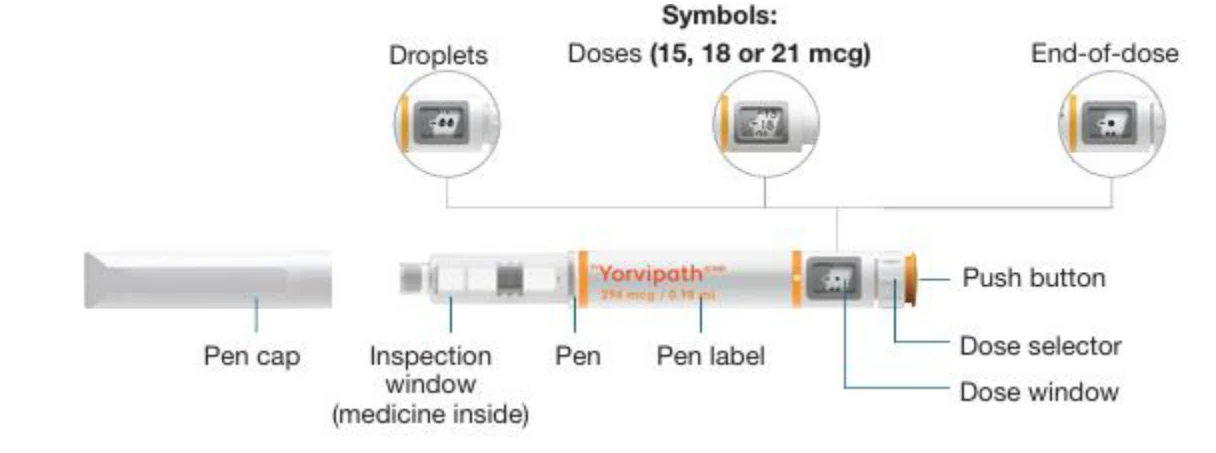
Pen needle parts (needles are included in the inner carton)
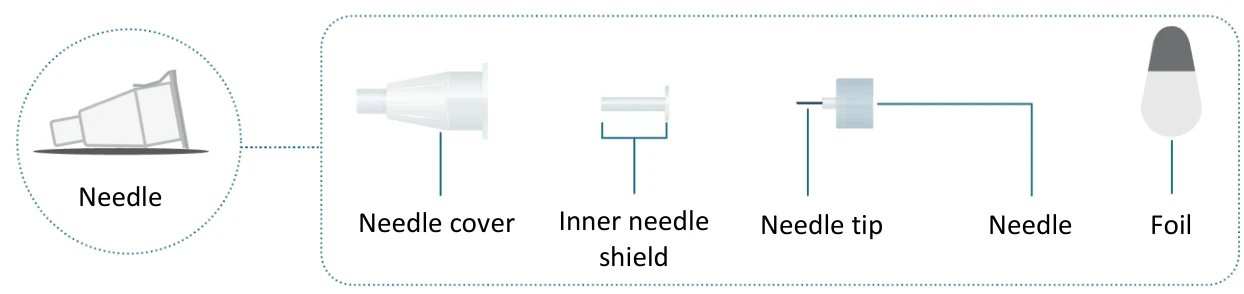
You will also need
Figure B
Sharps disposal container
Alcohol wipe
Needle
Needle cover
Inner needle shield
Needle tip
Needle
Foil
| 1 Prepare your supplies for the injection | ||
|---|---|---|
Before you start: Step 1
| ||
Step 2 Wash your hands well with soap and water (figure C). | Figure C 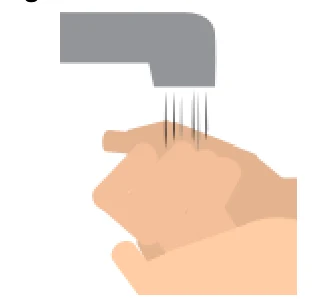 | |
| 2 Prepare pen and needle | ||
Step 1 Take your Yorvipath pen out from the inner carton. Make sure it is the correct strength and check the expiry date. Take a needle and check the expiry date on the needle (figure D). Important: If the medicine is expired, do not use the pen. Use a new pen. | Figure D 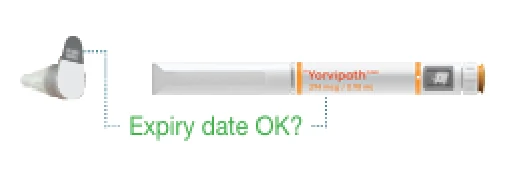 | |
Step 2 Pull off the pen cap and check the inspection window to make sure the medicine inside the pen is clear and colourless (figure E). Important: If the medicine has visible particles in it do not use the pen. Use a new pen. | 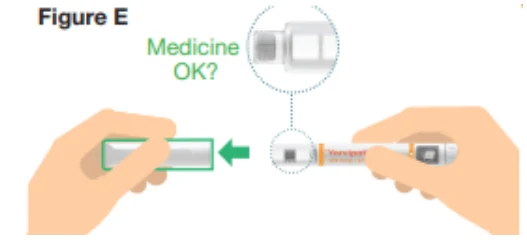 | |
Step 3 Pull the foil off the needle (figure F). This needle can only be used 1 time. Always use a new needle for each injection. Important: Make sure to only use the needles that come with the Yorvipath pen for your injections. | Figure F 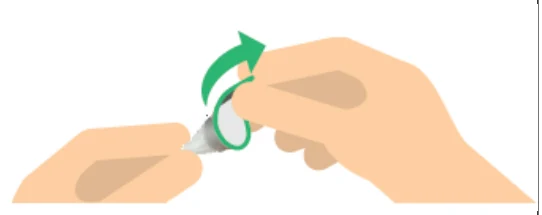 | |
Step 4 Attach the needle straight onto your pen, then screw the needle onto the pen until secure (clockwise) (figure G). | Figure G 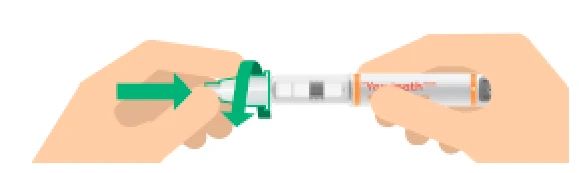 | |
Step 5 Pull off the needle cover and the inner needle shield (figure H). Throw away the inner needle shield in the regular garbage and keep the needle cover for later. | 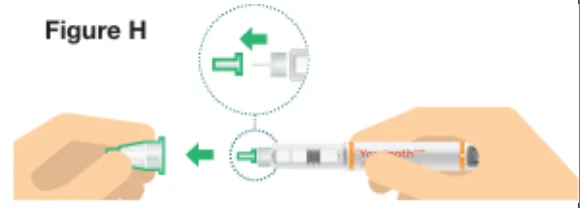 | |
| 3 If new pen, test pen flow | ||
Only test pen flow (steps A - C) the first time you use a new pen. See below for instructions on troubleshooting. If your pen is already in use, go to section "3 Prepare injection and select dose" | ||
Step A Turn the dose selector clockwise (to the right) 2 clicks until you see the droplet symbol “ ” in the dose window (figure I). Note: You can always correct the selection by turning the dose selector. | Figure I 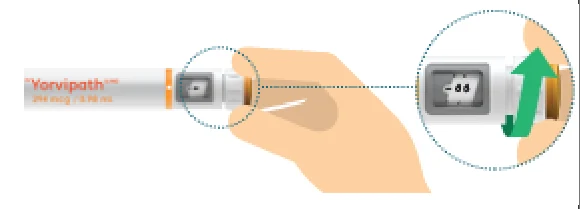 | |
Step B Make any air bubbles rise to the top of the pen by tapping the inspection window (figure J). Keep the pen with the needle tip pointed up. Note: Tiny air bubbles are ok. | 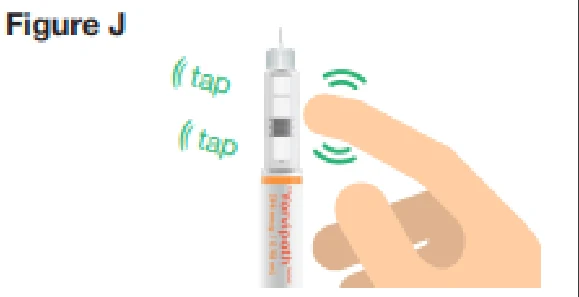 | |
Step C Press the push button and watch drops of medicine come out of the needle tip. When you press, make sure that the dose selector rotates back to the symbol “●” (figure K). Important: If you do not see drops of medicine, repeat this test (steps A - C) up to 5 times. If drops are still not seen, change the needle and repeat the test. | 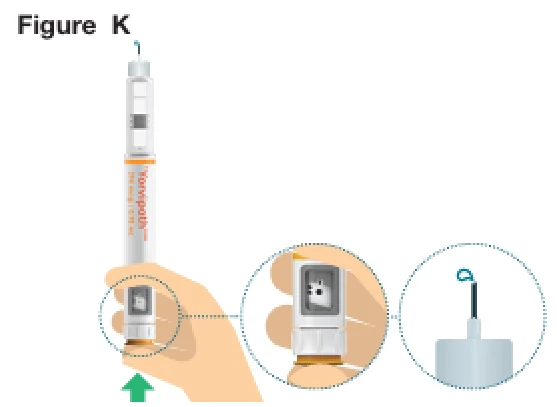 | |
Day
1
| 4 Prepare injection and select dose | |
|---|---|
Step 6 Choose injection site. There are two regions of your body you can inject into (figure L). Avoid injecting where skin is red, swollen or scarred. Choose a different injection site each time you inject. | Figure L Front |
Step 7 Clean the injection site with an alcohol wipe (figure M). | Figure M 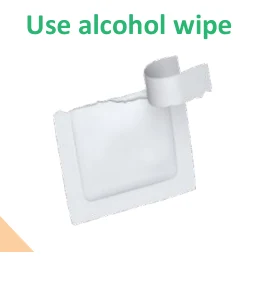 Use alcohol wipe |
Step 8 Select your dose as prescribed by your doctor (15, 18 or 21 mcg) by turning the dose selector clockwise (to the right) (figure N). Important: Make sure not to press the push button while selecting your dose to not spill medicine. Note: Always throw away your pen and use another pen if you cannot dial a full dose. | Figure N 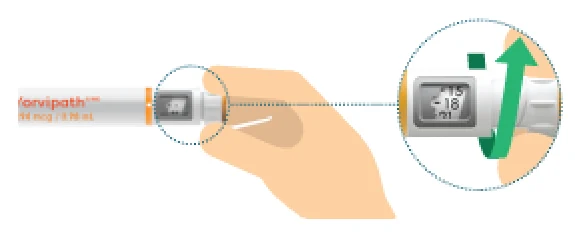 |

Belly (abdomen)
at least 5 centimetres away
from the belly button
Front of the thighs
| 5 Inject dose | ||
|---|---|---|
| Use the injection technique recommended by your doctor or nurse. Read this whole section (steps 9 - 11) before you start to inject. | ||
Step 9 Make sure you can see the dose window. To insert the needle into the skin (figure O), press the pen against injection site in a straight movement. | Figure O 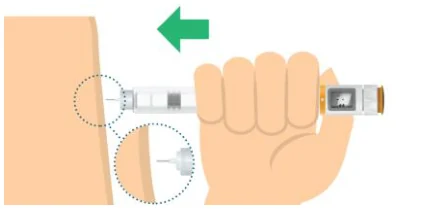 | |
Step 10 Press the push button all the way in and hold steady for 5 seconds (COUNT TO 5 S-L-O-W-L-Y). Make sure the dose selector rotates back to the symbol “●”. This means that you have given the full dose (figure P). | Figure P Press… 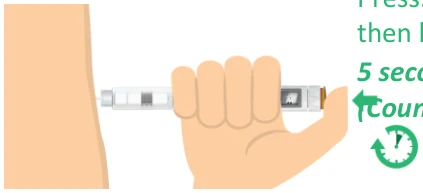 then hold 5 seconds (Count SLOWLY) | |
Step 11 Slowly remove the pen from the injection site in a straight angle (figure Q). | Figure Q 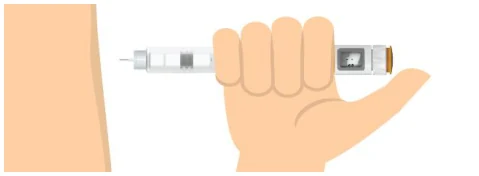 | |
| 6 Throw away used needle | ||
Step 12 Reattach the needle cover to carefully remove the needle. Lead the needle tip into the needle cover and secure the needle cover onto the needle (figure R). Important: Always reattach the needle cover before removing the needle to reduce the risk of needle stick and cross-contamination. | 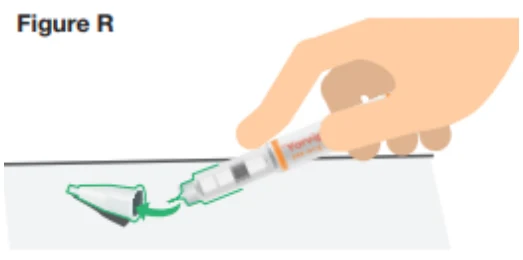 | |
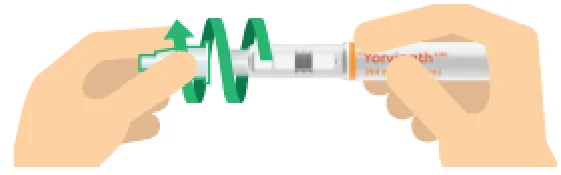
Step 13 Unscrew the needle. Safely throw away the needle according to local regulations (figure S). | Figure S | |
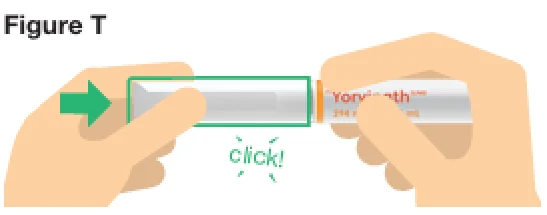
Step 14 Click the pen cap firmly onto the pen to protect it between injections and to protect the medicine from light (figure T). | ||
| 7 Throw away used pen | ||
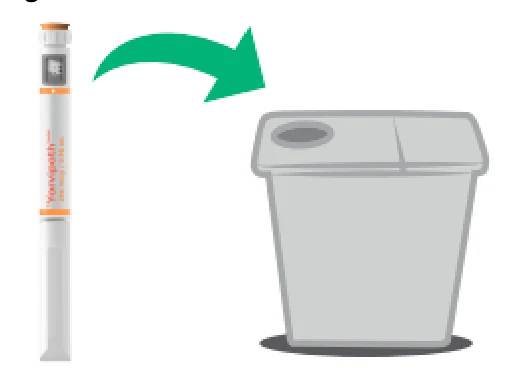
Important: Always throw away your pen after 14 days of use, even if it still has medicine inside (figure U). This is important to make sure that you get the full effect of your medicine It is recommended to fill out the 'Open date:' field on the carton, in order to know when 14 days has passed. Note: Remember to throw away the extra needle when you throw away your pen. | Figure U | |

 | |
 | |
 |
Day
14
Troubleshooting
You should only test the pen flow (section 2) the first time you use a new pen (or if you think it might be damaged) to not waste medicine. The test checks to make sure the medicine flows through the pen so that you get the right doses of medicine.
If you see no drop on the needle tip after 5 attempts, it might be because there is no flow through the pen and needle. Change the needle (see section 5, step 12) and test the pen flow again (see section 2, steps A - C). You can be sure the flow works correctly when you see the drop of medicine. If it still does not work discard the pen and contact your health care provider.
Your injection is only completed after you have pressed the push button all the way in and the dose selector has rotated back to the “●” and you have kept the needle in the skin for 5 seconds (COUNT TO FIVE slowly).
Some medicine might flow back into the pen or flow backward from the injection site and be left on the skin. Holding the pen in the skin for 5 seconds helps to make sure that all the medicine has been injected.
The pen does not allow a larger dose to be set than what is left in the pen. If your dose is larger than the amount of medicine left in the pen you will not be able to dial a full dose. You must throw away your pen and take the full dose of medicine with a new pen. |
|---|
INSTRUCTIONS FOR USE
PrYorvipath®
palopegteriparatide injection
420 mcg / 1.4 mL
For 24, 27 or 30 mcg doses only
Solution for injection in pre-filled pen
For subcutaneous use
These instructions for use contain information on how to inject Yorvipath
Additional information
If you do not understand or are unable to complete a step that is described in these instructions for use, contact your doctor or nurse.
Important information you need to know before using your Yorvipath pen Read and follow the package leaflet and these instructions for use carefully so that you inject Yorvipath the right way. Make sure you have received training from your doctor or nurse before injecting. This is important to make sure that you get the correct treatment. For correct use
|
|---|
Special instructions for doses larger than 30 mcg/day If your dose is above 30 mcg/day:
|
Caring for your pen
|
Parts overview
Figure A
Parts of the Yorvipath multi-use prefilled pen
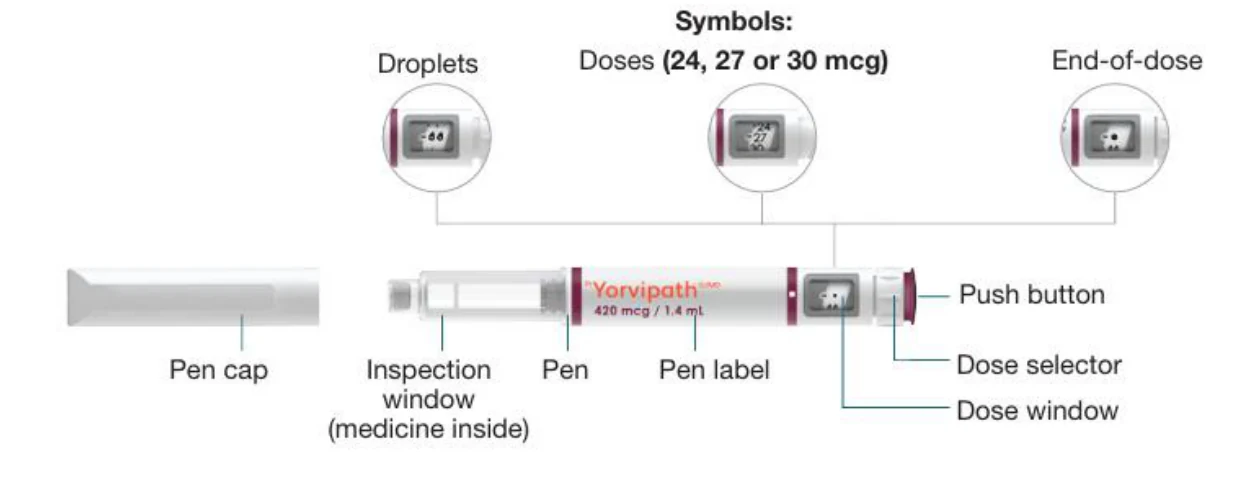
Pen needle parts (needles are included in the inner carton)
You will also need
Figure B
Sharps disposal container
Alcohol wipe
Needle
Needle cover
Inner needle shield
Needle tip
Needle
Foil
| 1 Prepare your supplies for the injection | |
|---|---|
Before you start: Step 1
| |
Step 2 Wash your hands well with soap and water (figure C). | Figure C 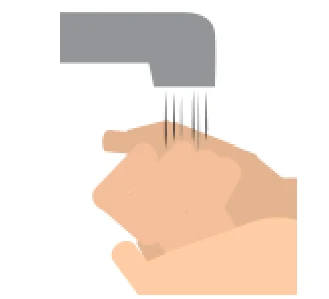 |
| 2 Prepare pen and needle | |
Step 1 Take your Yorvipath pen out from the inner carton. Make sure it is the correct strength and check the expiry date. Take a needle and check the expiry date on the needle (figure D). Important: If the medicine is expired, do not use the pen. Use a new pen. | Figure D 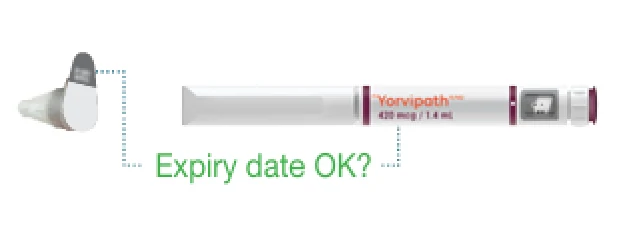 |
Step 2 Pull off the pen cap and check the inspection window to make sure the medicine inside the pen is clear and colourless (figure E). Important: If the medicine has visible particles in it do not use the pen. Use a new pen. | 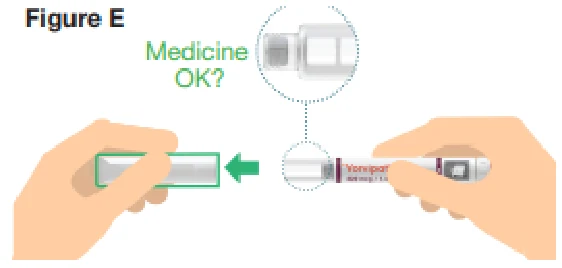 |
|---|---|
Step 3 Pull the foil off the needle (figure F). This needle can only be used 1 time. Always use a new needle for each injection. Important: Make sure to only use the needles that come with the Yorvipath pen for your injections. | Figure F 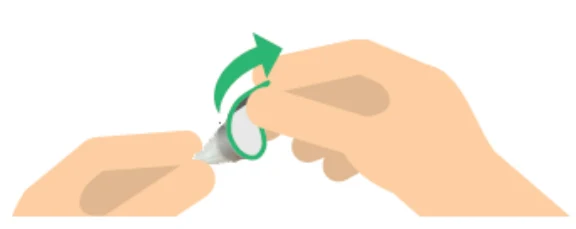 |
Step 4 Attach the needle straight onto your pen, then screw the needle onto the pen until secure (clockwise) (figure G). | Figure G 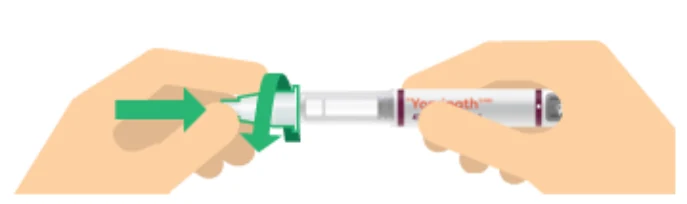 |
Step 5 Pull off the needle cover and the inner needle shield (figure H). Throw away the inner needle shield (in the regular garbage) and keep the needle cover for later. | 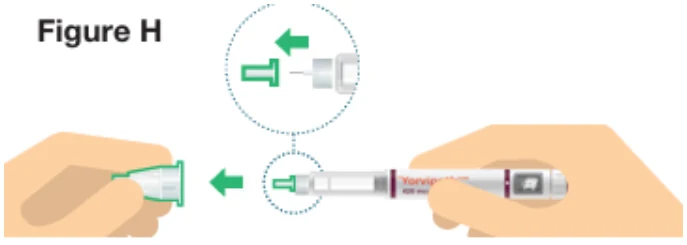 |
| 3 If new pen, test pen flow | ||
|---|---|---|
Only test pen flow (steps A - C) the first time you use a new pen. See below for instructions on troubleshooting. If your pen is already in use, go to section "3 Prepare injection and select dose". | ||
Step A Turn the dose selector clockwise (to the right) 2 clicks until you see the droplet symbol “ ” in the dose window (figure I). Note: You can always correct the selection by turning the dose selector. | Figure I 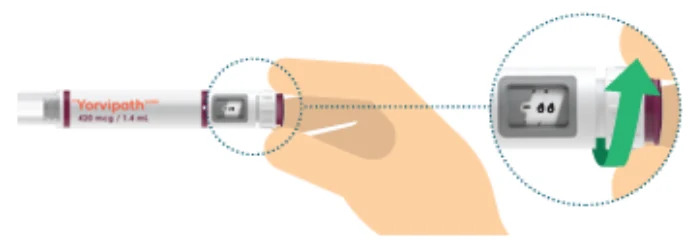 | |
Step B Make any air bubbles rise to the top of the pen by tapping the inspection window (figure J). Keep the pen with the needle tip pointed up. Note: Tiny air bubbles are ok. | Figure J 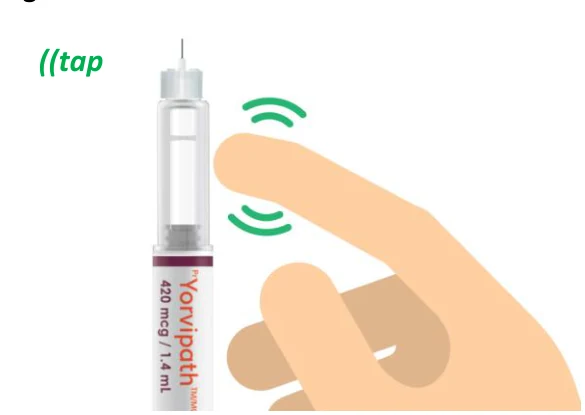 ((tap | |
Step C Press the push button and watch drops of medicine come out of the needle tip. When you press, make sure that the dose selector rotates back to the symbol “●” (figure K). Important: If you do not see drops of medicine, repeat this test (steps A - C) up to 5 times. If drops are still not seen, change the needle and repeat the test. | Figure K 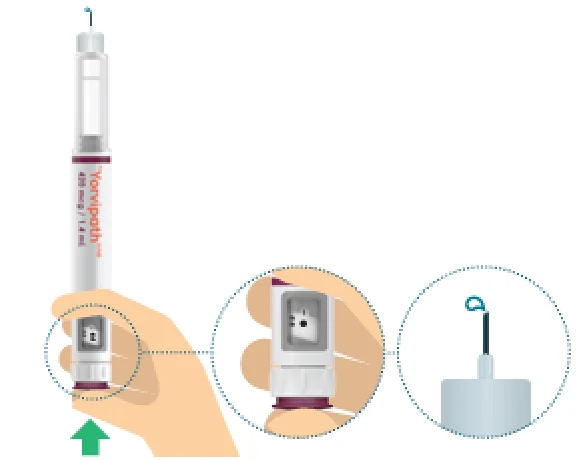 | |
Day
1
| 4 Prepare injection and select dose | |
|---|---|
Step 6 Choose injection site. There are two regions of your body you can inject into (figure L). Avoid injecting where skin is red, swollen or scarred. Choose a different injection site each time you inject. | Figure L |
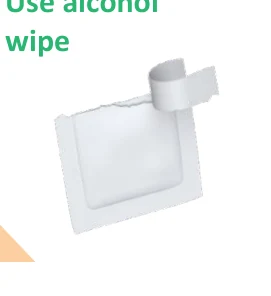
Step 7 Clean the injection site with an alcohol wipe (figure M). | Figure M Use alcohol wipe |
Step 8 Select your dose as prescribed by your doctor (24, 27 or 30 mcg) by turning the dose selector clockwise (to the right) (figure N). Important: Make sure not to press the push button while selecting your dose to not spill medicine. Note: Always throw away your pen and use another pen if you cannot dial a full dose. | Figure N 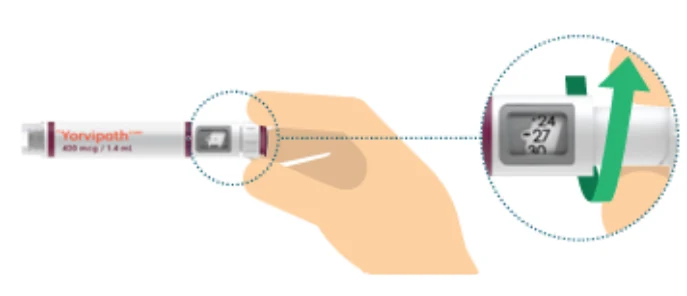 |

 |
Belly (abdomen)
at least 5 centimetres away
from the belly button
Front of the thighs
| 5 Inject dose | ||
|---|---|---|
| Use the injection technique recommended by your doctor or nurse. Read this whole section (steps 9 - 11) before you start to inject. | ||
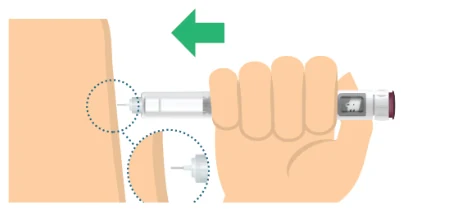
Step 9 Make sure you can see the dose window. To insert the needle into the skin (figure O), press the pen against injection site in a straight movement. | Figure O | |
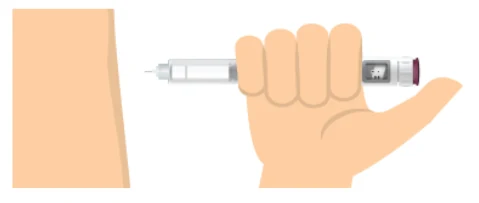
Step 10 Press the push button all the way in and hold steady for 5 seconds (COUNT TO 5 S-L-O-W-L-Y). Make sure the dose selector rotates back to the symbol “●”. This means that you have given the full dose (figure P). | Figure P | |
Step 11 Slowly remove the pen from the injection site in a straight angle (figure Q). | Figure Q | |
| 6 Throw away used needle | |
|---|---|
Step 12 Reattach the needle cover to carefully remove the needle. Lead the needle tip into the needle cover and secure the needle cover onto the needle (figure R). Important: Always reattach the needle cover before removing the needle to reduce the risk of needle stick and cross-contamination. | 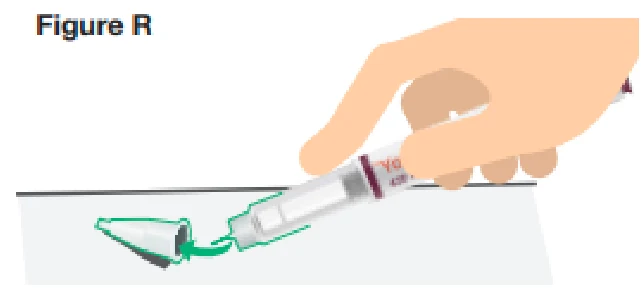 |
 | |
 |

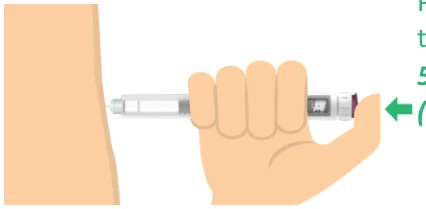 |
Press… then hold
5 seconds (Count SLOWLY)
Step 13 Unscrew the needle. Safely throw away the needle according to local regulations (figure S). | Figure S 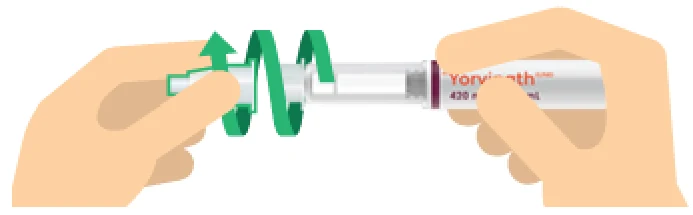 |
|---|---|
Step 14 Click the pen cap firmly onto the pen to protect it between injections and to protect the medicine from light (figure T). | 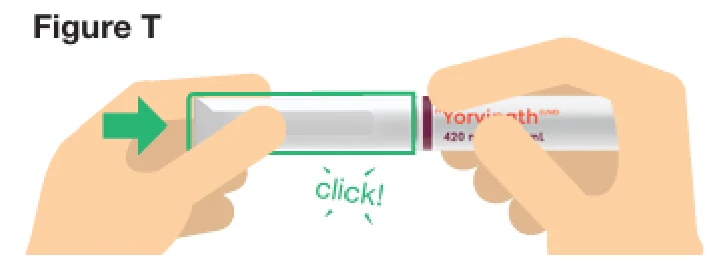 |
| 7 Throw away used pen | |
Important: Always throw away your pen after 14 days of use, even if it still has medicine inside (figure U). This is important to make sure that you get the full effect of your medicine. It is recommended to fill out the 'Open date:' field on the carton, in order to know when 14 days has passed. Note: Remember to throw away the extra needle when you throw away your pen. | Figure U 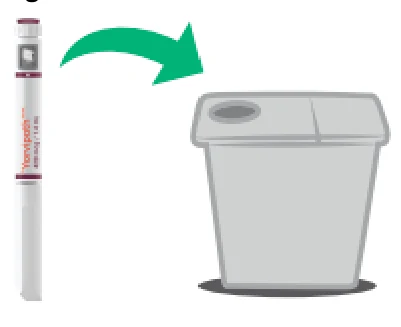 |
Day
14
Troubleshooting
You should only test the pen flow (section 2) the first time you use a new pen (or if you think it might be damaged) to not waste medicine. The test checks to make sure the medicine flows through the pen so that you get the right doses of medicine.
If you see no drop on the needle tip after 5 attempts, it might be because there is no flow through the pen and needle. Change the needle (see section 5, step 12) and test the pen flow again (see section 2, steps A - C). You can be sure the flow works correctly when you see the drop of medicine. If it still does not work discard the pen and contact your health care provider.
Your injection is only completed after you have pressed the push button all the way in and the dose selector has rotated back to the “●” and you have kept the needle in the skin for 5 seconds (COUNT TO FIVE slowly).
Some medicine might flow back into the pen or flow backward from the injection site and be left on the skin. Holding the pen in the skin for 5 seconds helps to make sure that all the medicine has been injected.
The pen does not allow a larger dose to be set than what is left in the pen. If your dose is larger than the amount of medicine left in the pen you will not be able to dial a full dose. You must throw away your pen and take the full dose of medicine with a new pen. |
|---|
Date of Authorization: 2026-10-08