


Patient Medication Information: uses, side effects, how to take - Ngenla
What NGENLA is used for:
- NGENLA is used for the long-term treatment of children who are not growing because of low growth hormone levels.
How NGENLA works:
NGENLA helps your child’s bones and muscles to grow and also helps your child’s fat and muscle tissues to develop in the right amounts. It is a modified form of human growth hormone which allows weekly dosing.
The ingredients in NGENLA are:
Medicinal ingredients: somatrogon
Non-medicinal ingredients: citric acid monohydrate, L-Histidine, m-Cresol, poloxamer 188, sodium chloride, trisodium citrate dihydrate, water for injection
NGENLA comes in the following dosage forms:
Single-patient use pre-filled pen containing:
- 24 mg of somatrogon in 1.2 mL (20 mg/mL); or
- 60 mg of somatrogon in 1.2 mL (50 mg/mL)
Do not use NGENLA if:
- your child is allergic to somatrogon or any of the ingredients in NGENLA (see The ingredients in NGENLA are: section).
- your child has an active tumour and/or malignancy
your child is seriously ill due to complications following:
- open heart surgery,
- abdominal surgery,
- multiple accidental trauma, or
- acute respiratory failure
- Your child’s bones have already finished growing (this is called closure of the growth plates).
To help avoid side effects and ensure proper use, talk to your child’s healthcare professional before your child takes NGENLA. Talk about any health conditions or problems your child may have, including if your child:
- develops visual changes, headache, big change in behaviour, nausea and/or vomiting.
- is being treated with daily growth hormone therapy or is treated with glucocorticoid replacement. Your child’s doctor should monitor your child’s cortisol levels.
- is being treated with thyroid hormones. Your child’s doctor should monitor your child’s thyroid function.
- has diabetes. You should closely monitor your child’s blood sugar level during treatment with NGENLA. Discuss the results with your child’s doctor to determine if there is a need to change the dose of your child’s medicines to treat diabetes.
- has persistent pain in their hip or knee, or starts to limp. These could be symptoms of the end of the bone having slipped from the cartilage (slipped capital femoral epiphysis) or a serious condition where the bone tissue dies due to a lack of blood supply (osteonecrosis of femoral head, e.g., Legg-Calvé-Perthes disease).
- has changes in skin color or in the appearance of birthmarks or moles on the skin.
is pregnant or could become pregnant. NGENLA contains components that might interact with pregnancy tests. If your child needs to take a pregnancy test, it should be done before your child’s injection to reduce the risk of interference.
- is breastfeeding or plans to breastfeed.
- has signs of scoliosis.
- has ever had any kind of tumour.
- has Prader-Willi syndrome. There have been reports of sudden deaths in children with Prader-Willi syndrome who were treated with growth hormone and had one or more of the following risk factors: severe obesity, breathing problems, colds or lung infections.
Tell your child’s healthcare professional about all the medicines your child takes, including any drugs, vitamins, minerals, natural supplements or alternative medicines.
The following may interact with NGENLA:
- medicines used to treat diabetes.
- glucocorticoid treatments such as cortisone and prednisone.
- sex hormones (for example oral estrogens).
- cyclosporine (a medicine that weakens the immune system after transplantation).
- medicines to control epilepsy (anticonvulsants).
How to take NGENLA:
Your child’s healthcare professional will show you how to inject NGENLA before using it for the first time. Do NOT try to inject NGENLA until you have been shown the right way by your child’s healthcare professional.
NGENLA is injected under the skin (subcutaneously) and can be given in the stomach (abdomen), thighs, buttocks or upper arms. Use a different injection site every week to help prevent loss of fat under the skin or enlargement or thickening of fat tissue.
If your child needs more than one injection for a full dose, each one should be given at a different injection site.
Use NGENLA once weekly, on the same day each week, at any time of the day.
You may change the day of the week your child uses NGENLA as long as the last dose was given 3 or more days before. After selecting a new day, the once weekly dosing should be continued.
NGENLA pre-filled pens are for use by 1 person only.
Do NOT share your child’s NGENLA pre-filled pens and needles with another person, even if the needle has been changed. Your child may give another person an infection or get an infection from them.
Do NOT shake your child’s pen; shaking can damage the medicine.
Usual dose:
The recommended dose is 0.66 mg/kg body weight injected once weekly. Your child’s healthcare professional will prescribe the dose of medicine that is right for your child. Your child’s doctor may perform regular blood tests to check how your child is responding to the treatment. Their dose may be changed according to blood test results, as necessary.
Overdose:
| If you think your child, or a person you are caring for, have taken too much NGENLA, contact a healthcare professional, hospital emergency department, regional poison control centre or Health Canada’s toll-free number, 1-844 POISON-X (1-844-764-7669) immediately, even if there are no signs or symptoms. |
|---|
Missed Dose:
If your child misses a dose of NGENLA, take the missed dose as soon as possible within 3 days of the missed dose. If more than 3 days have passed, skip the missed dose and give your child the next dose on the regularly scheduled day.
Possible side effects from using NGENLA:
These are not all the possible side effects your child may have when taking NGENLA. If your child experiences any side effects not listed here, tell your child’s healthcare professional.
Side effects may include:
Very common (may affect more than 1 in 10 people)
- injection site reactions including pain, redness, itching, swelling and/or local thickening of the skin
- fever
Common
- cold
- headache
Unknown frequency
- lipoatrophy
Serious side effects and what to do about them
| Frequency/Side Effect/Symptom | Talk to your healthcare professional | Stop taking this drug and get immediate medical help | |||
|---|---|---|---|---|---|
| Only if severe | In all cases | ||||
| Very Common | |||||
| Respiratory tract infections: Cough; sneezing; nasal congestion; runny nose; fever; scratchy or sore throat. | ✓ | ||||
| Skin infections: Redness of the skin and a rash; itching, pain, and tenderness. | ✓ | ||||
| Common | |||||
| Ear infections: Ear pain; fever; drainage from the ear that is thick and yellow or bloody; loss of appetite, vomiting, and grumpy behavior; trouble sleeping. | ✓ | ||||
| Infection in the small intestine: Gas, bloating, diarrhea, abdominal pain or cramping; constipation. | ✓ | ||||
| Pain or stiffness in the joints: Stiffness in the arms and legs; joint pain; muscle pain. | ✓ | ||||
| Worsening of curvature of the spine (scoliosis): Back pain; one shoulder blade is higher than the other; one shoulder blade sticks out more than the other; uneven hips. | ✓ | ||||
| Uncommon | |||||
| Serious allergic reactions: Swelling of the face, lips, mouth, or tongue; trouble breathing; wheezing; severe itching; skin rashes, redness, or swelling; dizziness or fainting; fast heartbeat or pounding the chest; sweating. | ✓ | ||||
If your child has a troublesome symptom or side effect that is not listed here or becomes bad enough to interfere with your child’s daily activities, tell your child’s healthcare professional.
Reporting Side Effects
You can report any suspected side effects associated with the use of health products to Health Canada by:
NOTE: Contact your healthcare professional if you need information about how to manage your side effects. The Canada Vigilance Program does not provide medical advice. |
Storage:
Prior to each use the pen can be left at room temperature for a more comfortable injection, not more than 32°C for a maximum 2 hours. Do NOT use beyond the expiration date stamped on the carton.
Before first use (unused pre-filled pens):
- Store your child’s NGENLA pens in the refrigerator between 2°C to 8°C and in the original carton and away from direct sunlight.
- Do NOT freeze your child’s pen or expose it to heat.
- Unused pre-filled pens may be used until the expiration date printed on the carton, if kept in the refrigerator.
After first use (up to 28 days of use):
- To help you remember when to dispose of your child’s NGENLA pen, you can write the date of first use on the pen label.
- Store your child’s pen in the refrigerator at 2°C to 8°C in between each use and away from direct sunlight.
- Do NOT freeze your child’s pen or expose it to heat.
- Always remove and safely discard the needle after each injection. Do NOT store the pen with a needle attached.
- Always use a new needle for each injection.
- Keep the pen cap on your child’s pen when it is not in use.
Discard your child’s pen when:
- the pen is empty or, has been used 5 times,
- the pen has been left out of the refrigerator (up to 32°C) for more than 2 hours with each use,
- the pen has been exposed to temperatures above 32°C, or
- it has been more than 28 days after first use, discard it even if it contains unused medicine.
Any unused product or waste material should be disposed of in accordance with local requirements.
When travelling, transport your child’s NGENLA pen in its original carton in an insulated container with an ice pack. To avoid freezing, make sure your child’s pen does not touch the ice pack. Once you arrive, your child’s pen should be placed in a refrigerator as soon as possible. Do NOT leave it in a car or other place where it can get too hot or too cold.
Keep out of reach and sight of children.
If you want more information about NGENLA:
- Talk to your child’s healthcare professional
- Find the full product monograph that is prepared for healthcare professionals and includes the Patient Medication Information by visiting the Health Canada Drug Product Database website (Drug Product Database: Access the database); the manufacturer’s website http://www.pfizer.ca; or by calling 1-800-463-6001.
Date of Authorization: 2026-07-13
NGENLA®
Somatrogon Injection
24 mg/1.2 mL (20 mg/mL), pre-filled pen for subcutaneous injection
INSTRUCTIONS FOR USE (IFU)
Injection for subcutaneous (under the skin) use only
Keep this leaflet. These instructions show step-by-step directions on how to prepare and give an injection.
Important information about your child’s NGENLA pen:
- NGENLA for injection is a single-patient use, disposable (throw away) pre-filled pen containing 24 mg of medicine. You can give more than 1 dose from the pen.
- NGENLA for injection can be given by a patient, caregiver or healthcare provider. Do NOT try to inject NGENLA yourself until you are shown the right way to give the injections and read and understand the Instructions for Use. If your child’s healthcare provider decides that you may be able to give your child’s injections of NGENLA at home, you should receive training on the right way to prepare and inject NGENLA. It is important that you read, understand, and follow these instructions so that you inject NGENLA the right way.
- It is important to talk to your child’s healthcare provider to be sure you understand your child’s NGENLA dosing instructions. To help you remember when to inject NGENLA, you can mark your calendar ahead of time. Call your child’s healthcare provider if you have any questions about the right way to inject NGENLA, or by calling Pfizer Canada ULC at 1-800-463-6001.
- Do NOT share your child’s pen with other people, even if the needle has been changed. Your child may give other people a serious infection, or get a serious infection from them.
- Each turn (click) of the dose knob has 0.2 mg of medicine. You can give from 0.2 mg to 12 mg in a single injection. If your child’s dose is more than 12 mg, you will need to give more than 1 injection. Each injection should be given at a different injection site.
- A new pen may contain slightly more than 24 mg of medicine, this is normal.
- Always use a new sterile needle for each injection. This will reduce the risk of contamination, infection, leakage of medicine, and blocked needles leading to the wrong dose.
- Do NOT shake your child’s pen. Shaking can damage the medicine.
- The pen is NOT recommended for use by the blind or visually impaired without the assistance of a person trained in the proper use of the product.
Supplies you will need each time you inject
Included in the carton:
- 1 NGENLA pre-filled pen.
Not included in the carton:
- 1 new sterile needle for each injection.
Alcohol swabs
- Cotton balls or gauze pads
- Adhesive bandage
- 1 appropriate “sharps” disposal container for disposal of pen needles and pens (See How should I dispose of the pen needles and pens?)
24 mg NGENLA pen:
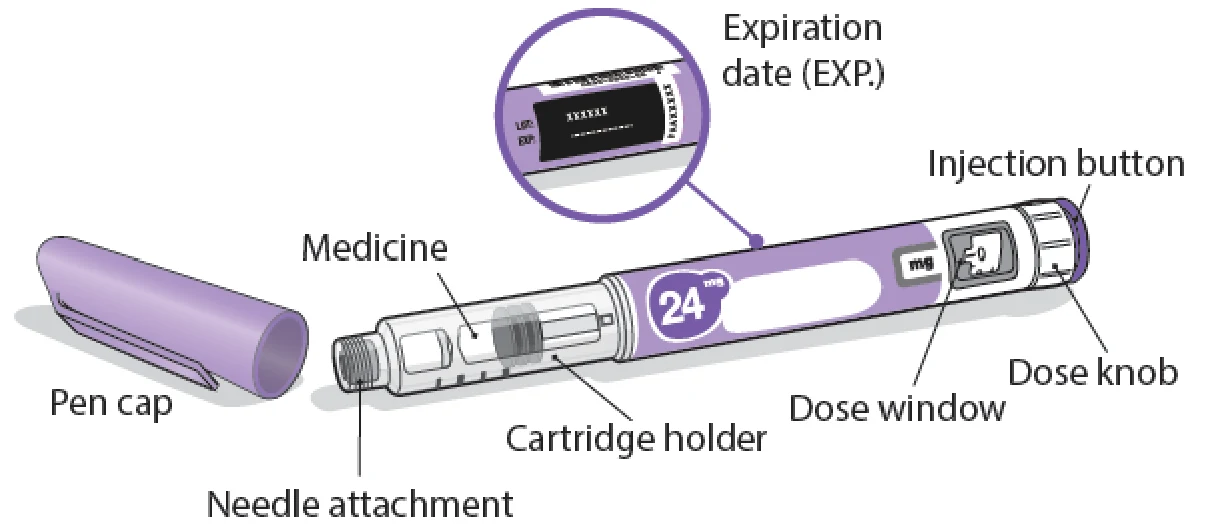
Needles to use:
Pen needles are not included with your child’s NGENLA pen. You will need a prescription from your child’s healthcare provider to get pen needles up to a length of 8 mm from your pharmacy.
Needles to use with your child’s NGENLA pen:
- 32G (Novo Nordisk®, NovoFine® Plus)
- 31G (Novo Nordisk®, NovoFine®)
- 31G (Becton, Dickinson and Company, BD Ultra-Fine™ or BD Micro-Fine™)
Needles with safety shield to use with your child’s NGENLA pen:
- 30G (Becton, Dickinson and Company, AutoShield Duo™)
- 30G (Novo Nordisk®, NovoFine® AutoCover®)
- Talk with your child’s healthcare provider about the right needle for your child.
Sterile needle (example) not supplied:

Sterile needle with safety shield (example) not supplied:

Note: Needles with safety shield do not have an inner needle cap. Steps 5, 6 and 11 within these instructions relating to the inner needle cap may not apply when using a needle with safety shield. Refer to the needle manufacturer’s instructions for use for more information.
Caution: Never use a bent or damaged needle. Always handle pen needles with care to make sure you do not prick yourself (or anyone else) with the needle. Do NOT attach a new needle to your child’s pen until you are ready to give the injection.
Prior to each use the pen can be left at room temperature for a more comfortable injection, not more than 32°C for a maximum 2 hours. Do NOT use beyond the expiration date stamped on the carton.
Preparing for your child’s injection
Step 1 - Getting ready
- Wash and dry your hands.
- You can use your child’s pen straight from the refrigerator. For a more comfortable injection, leave your child’s pen at room temperature for up to 30 minutes.
- Check the name, strength, and label of your child’s pen to make sure it is the medicine your child’s healthcare provider has prescribed for your child.
- Check the expiration date on the pen label. Do NOT use if the expiration date has passed.
Do NOT use your child’s pen if:
- It has been frozen or exposed to heat.
- It has been dropped.
- It looks broken or damaged.
- It has been more than 28 days after first use of the pen.
- It has been used 5 times.
- It has been left out of the refrigerator (up to 32°C) for more than 2 hours with each use.
- It has been exposed to temperatures above 32°C.
- Do NOT remove the pen cap from your child’s pen - until you are ready to inject.
Step 2 - Choose and clean your child’s injection site
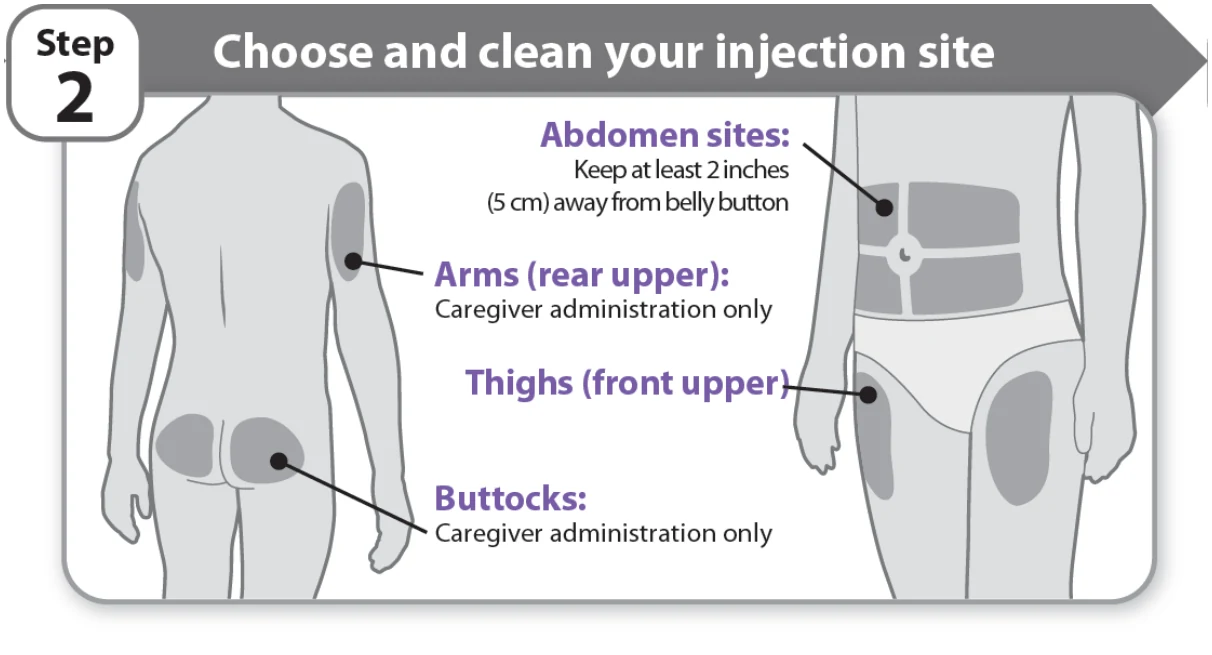
- NGENLA can be given in the abdomen, thighs, buttocks, or upper arms.
- Choose the best place to inject, as recommended by your child’s healthcare provider.
- If more than 1 injection is needed to complete your child’s full dose, each injection should be given in a different injection site.
- Use a different injection site every week.
- Do NOT inject into bony areas, areas that are bruised, red, sore or hard, and areas that have scars or skin conditions.
- Clean the injection site with an alcohol swab.
Allow the injection site to dry.
Do NOT touch injection site after cleaning.
Step 3 - Check medicine
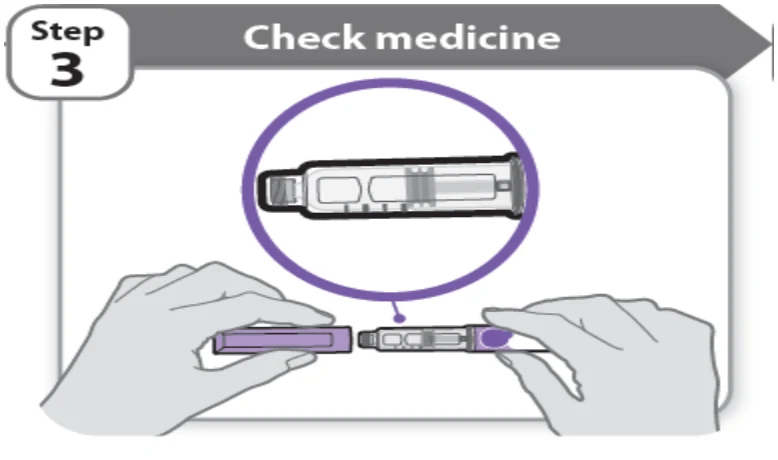
- Pull off the pen cap and keep it for after your child’s injection.
- Check the medicine inside the cartridge holder.
- Make sure the medicine is clear and colorless to slightly light yellow. Do NOT inject the medicine if it is cloudy or dark yellow.
Make sure the medicine is free of flakes or particles. Do NOT inject the medicine if it has flakes or particles.
Note: It is normal to see one or more bubbles in the medicine.
Step 4 - Attach needle
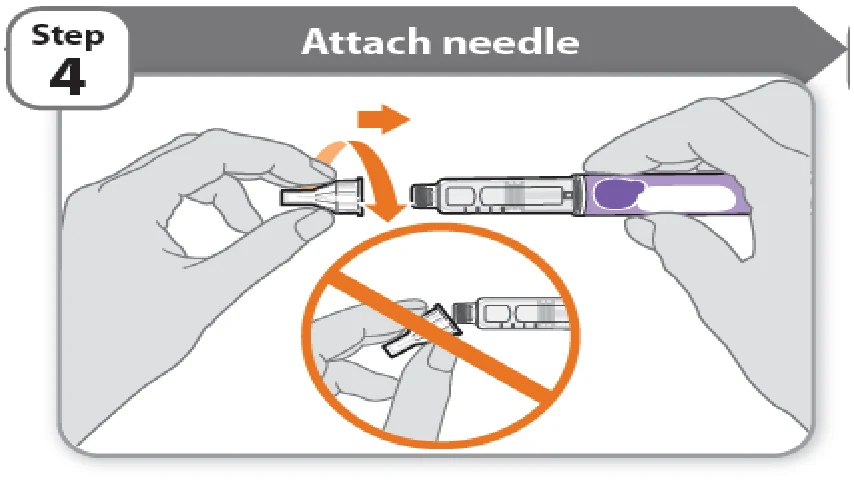
- Take a new needle and pull off the protective paper.
- Line the needle up with your child’s pen keeping them both straight.
Gently push and then screw the needle onto your child’s pen.
Do NOT over tighten.
Note: Be careful not to attach the needle at an angle. This may cause the pen to leak.
Caution: Needles have sharp tips at both ends. Handle with care to make sure you do not prick yourself (or anyone else) with the needle.
Step 5 - Pull off outer needle cover
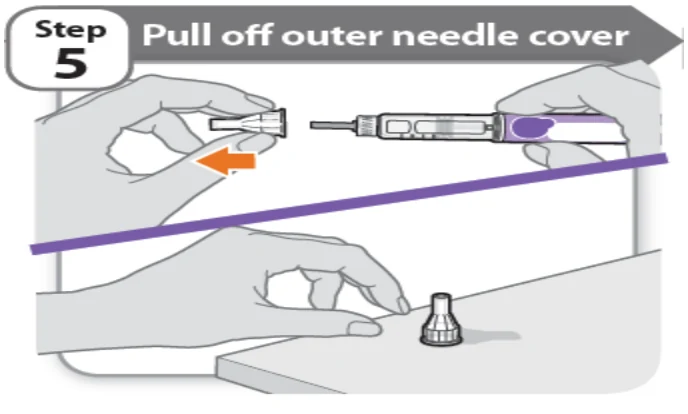
- Pull off the outer needle cover.
Make sure you keep the outer needle cover. You will need it later to remove the needle.
Note: You should see an inner needle cap after you have removed the outer cover. If you do not see this, try to attach the needle again.
Note: If using needle with safety shield, refer to the manufacturer’s instructions for use.
Step 6 - Pull off inner needle cap
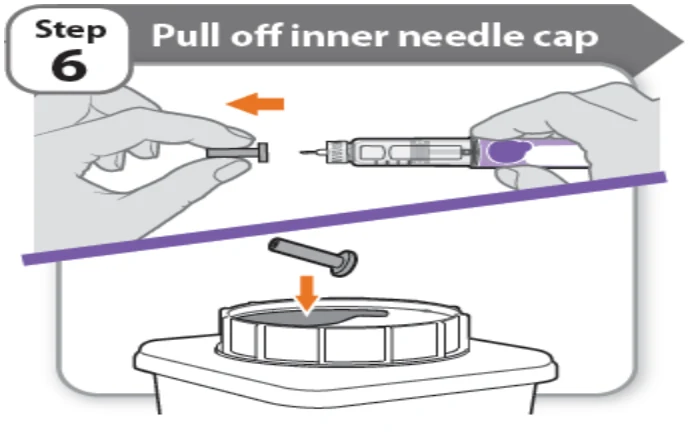
- Pull off the inner needle cap carefully to show the needle.
- Throw away the inner needle cap in an appropriate “sharps” container. It is not needed again.
Note: If using needle with safety shield, refer to the manufacturer’s instructions for use.
Is this pen new?
Yes: Go to new pen set up
No
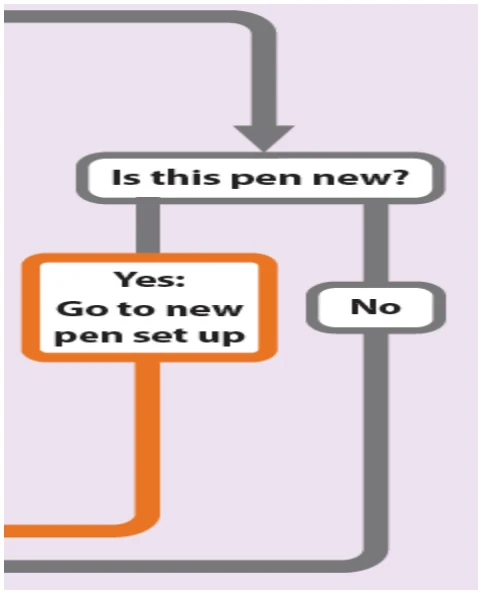
(‘Yes: Go to new pen set up’ has an arrow directing to ‘New pen set up (priming)’ and ‘No’ has an arrow directing to ‘Setting your child’s prescribed dose’)
New pen set up (priming) – for the first use of a new pen only
You must set up each new pen (priming) before using it for the first time
- New pen set up is done before each new pen is used for the first time.
The purpose of setting up a new pen is to remove air bubbles and make sure your child gets the correct dose.
Important: Skip Step-A through to Step-C if you have already set up your child’s pen.
A - Set knob to 0.4
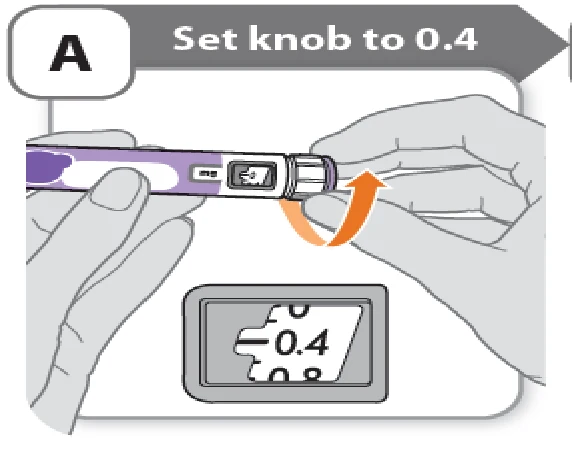
Turn the dose knob to 0.4.
Note: If you turn the dose knob too far, you can turn it back.
B - Tap cartridge holder
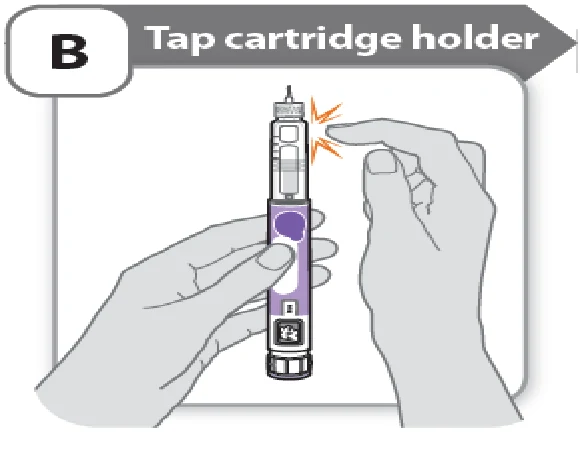
- Hold the pen with the needle pointing up so that the air bubbles can rise.
Tap the cartridge holder gently to float any air bubbles to the top.
Important: Follow Step-B even if you do not see air bubbles.
C - Press button and check for liquid
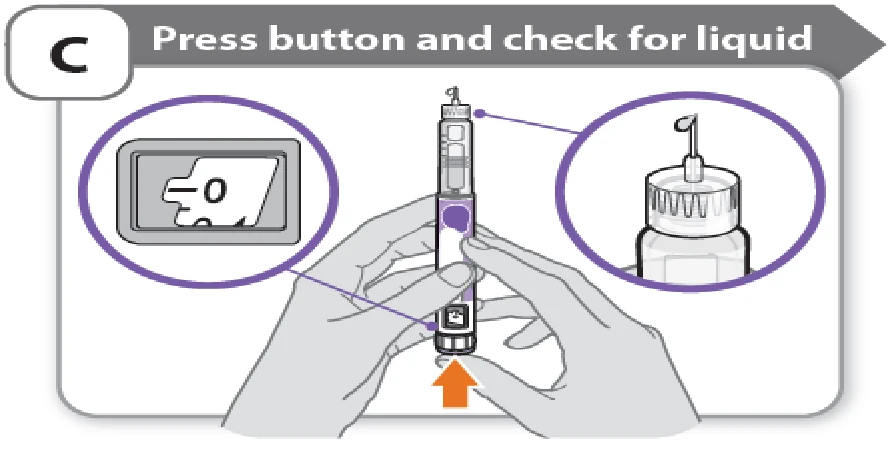
- Press the injection button until it cannot go any further and “0” is shown in the dose window.
- Check for liquid at the needle tip. If liquid appears, your child’s pen is set up.
Always make sure that a drop of liquid appears before you inject. If liquid has not appeared, repeat Step-A through to Step-C.
- If liquid does not appear after you have repeated Step-A through Step-C five (5) times, attach a new needle and try 1 more time. Do not use the pen if a drop of liquid still does not appear. Contact your child’s healthcare provider or pharmacist and use a new pen.
Setting your child’s prescribed dose
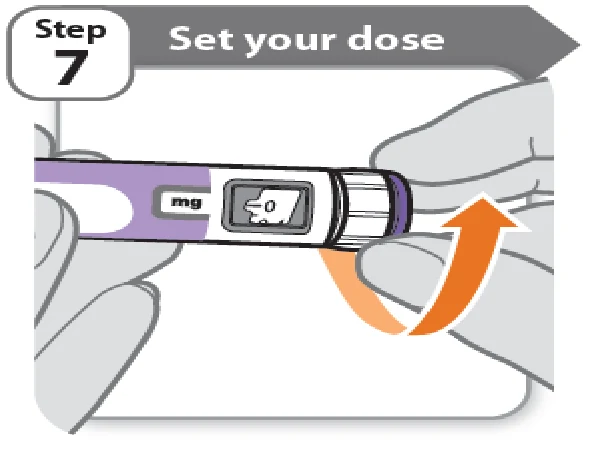
Step 7 - Set your child’s dose
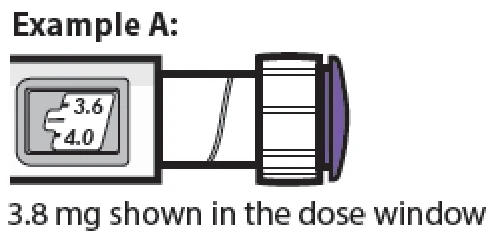
Example A:
3.8 mg shown in the dose window
Example B:
12.0 mg shown in the dose window
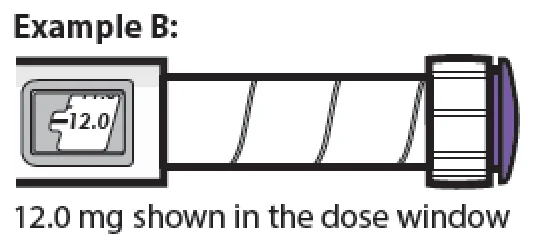
Turn the dose knob to set your child’s dose.
- The dose can be increased or decreased by turning the dose knob in either direction.
- The dose knob turns 0.2 mg at a time.
- Your child’s pen contains 24 mg of medicine, but you can only set a dose of up to 12 mg for a single injection.
- The dose window shows the dose in mg. See Examples A and B.
Always check the dose window to make sure you have set the correct dose.
Important: Do not press the injection button while setting your child’s dose.
What should I do if I cannot set the dose my child needs?
- If your child’s dose is more than 12 mg you will need more than 1 injection.
You can give from 0.2 mg to 12 mg in a single injection.
- If you need help dividing up your child’s dose the right way, ask your child’s Healthcare provider.
- Use a new needle for each injection (See Step 4: Attach needle).
- If you normally need to give 2 injections for your child’s full dose, be sure to give your child’s second dose.
What should I do if I do not have enough medicine left in my child’s pen?
If your child’s pen contains less than 12 mg of medicine, the dose knob will stop with the remaining amount of medicine shown in the dose window.
If there is not enough medicine left in your child’s pen for their full dose, you may either:
- Inject the amount left in your child’s pen, then prepare a new pen to complete your child’s dose in full. Remember to subtract the dose your child has already received. For example, if the dose is 3.8 mg and you can only set the dose knob to 1.8 mg, you should inject another 2.0 mg with a new pen.
- Or get a new pen and inject the full dose.
Injecting your child’s dose
Step 8 - Insert the needle
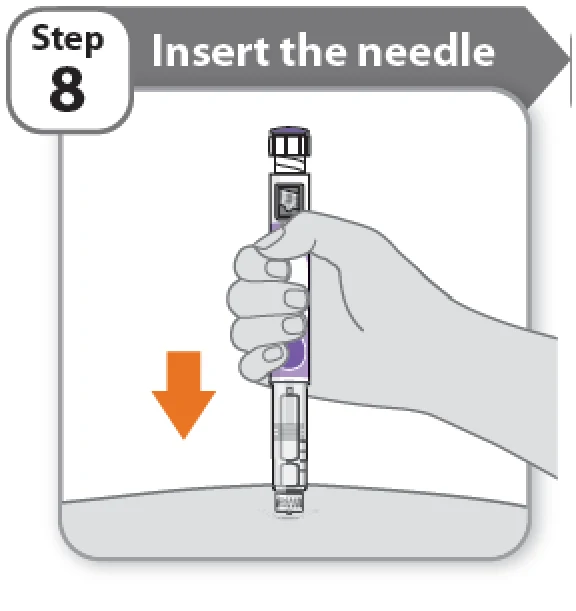
- Hold your child’s pen so you can see the numbers in the dose window.
- Insert the needle straight into your child’s skin.
Step 9 - Inject your child’s medicine
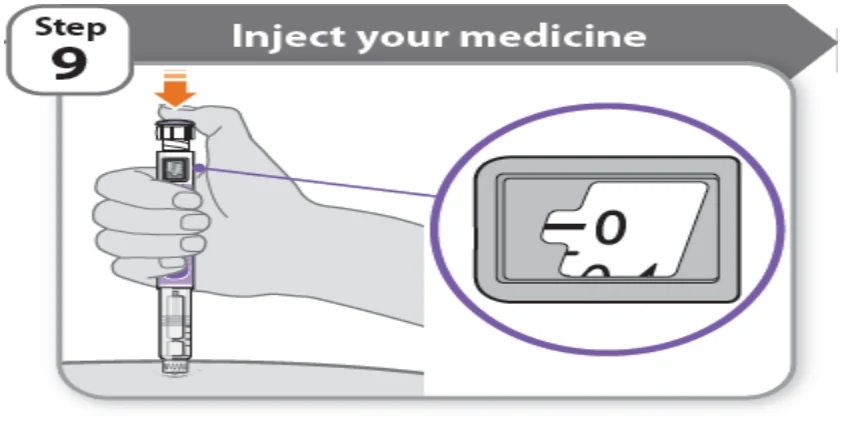
- Keep holding the needle in the same position in your child’s skin.
- Press the injection button until it cannot go any further and “0” is shown in the dose window.
Step 10 - Count to 10
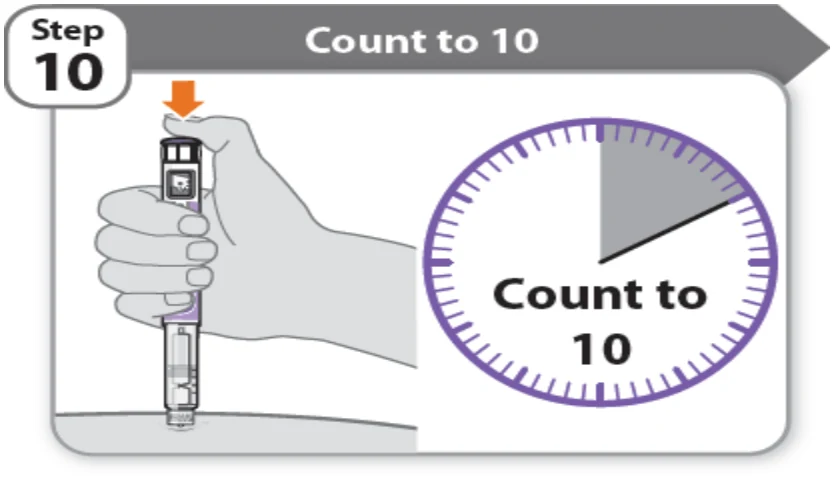
- Continue to press the injection button while counting to 10. Counting to 10 will allow the full dose of medicine to be given.
After counting to 10, let go of the injection button and slowly remove the pen from the injection site by pulling the needle straight out.
Note: You may see a drop of medicine at the needle tip. This is normal and does not affect the dose your child just received.
Step 11 - Attach outer needle cover
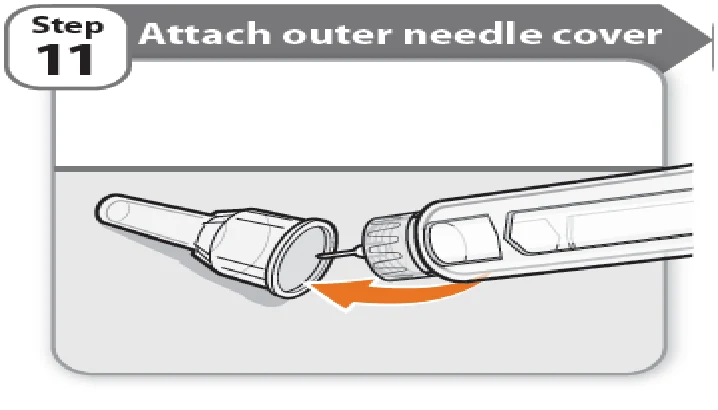
- Carefully place the outer needle cover back on the needle.
Press on the outer needle cover until it is secure.
Caution: Never try to put the inner needle cap back on the needle. You may prick yourself with the needle.
Note: If using needle with safety shield, refer to the manufacturer’s instructions for use.
Step 12 - Remove the needle
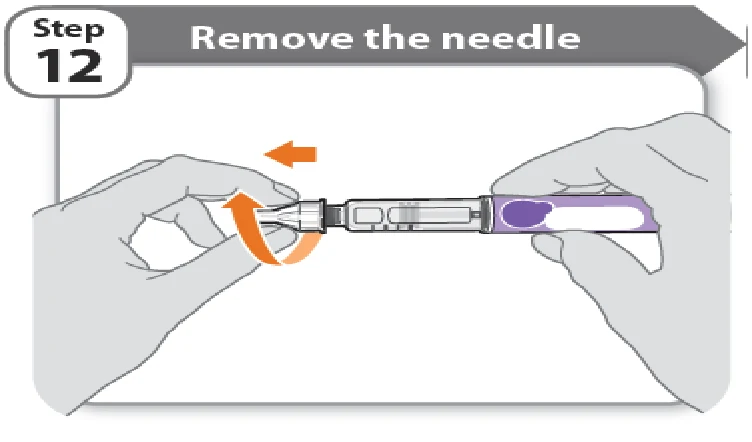
- Unscrew the needle from the pen.
Gently pull until the needle comes off.
Note: If the needle is still on, replace the outer needle cover and try again. Be sure to apply pressure when unscrewing the needle.
- Throw away the needle in an appropriate “sharps” container (See How do I dispose of the pen needles and pens?). Important: Always remove and throw away used needles. Do NOT reuse needles.
Step 13 - Replace the pen cap
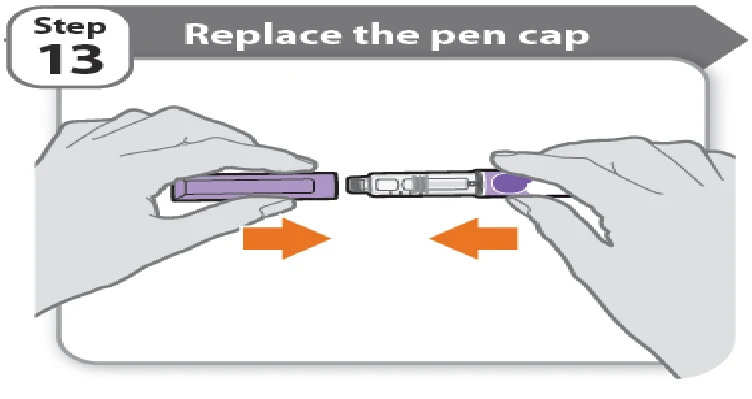
- Replace the pen cap back onto your child’s pen.
- Do NOT recap the pen with a needle attached.
- If there is any medicine left in your child’s pen, store in the refrigerator between uses (See How should I store my child’s pen?).
Step 14 - After your child’s injection
- Press lightly on the injection site with a clean cotton ball or gauze pad and hold for a few seconds.
- Do not rub the injection site. Your child may have slight bleeding. This is normal.
- You may cover the injection site with a small adhesive bandage, if needed.
- If your child’s pen is empty, has been used 5 times, has been left out of the refrigerator (up to 32°C) for more than 2 hours with each use, has been exposed to temperatures above 32°C or it has been more than 28 days after first use, throw it away even if it contains unused medicine. Refer to “Storage and disposal” on the right side of this leaflet.
Storage and disposal:
How should I store my child’s pen?
- Keep NGENLA, injection supplies, and all medicines out of the reach of children.
Before first use (unused pens):
- Store your child’s pens in the refrigerator between 2°C to 8°C.
- Do NOT freeze your child’s pen or expose it to heat.
- Unused pens may be used until the expiration date printed on the label, only if the pen has been kept in the refrigerator.
After first use (up to 28 days of use):
- Store your child’s pen in the refrigerator between 2°C to 8°C in between each use and away from direct sunlight.
- Keep the pen cap on your child’s pen when it is not in use.
- Do NOT store the pen with a needle attached.
- If your child’s pen is empty, has been used 5 times, has been left out of the refrigerator (up to 32°C) for more than 2 hours with each use, has been exposed to temperatures above 32°C or it has been more than 28 days after first use, throw it away even if it contains unused medicine.
To help you remember when to dispose of your child’s pen, you can write the date of first use on the pen label and below:
Date of first use ______ / ______ / ______
- When travelling, transport your child’s pen in its original carton in an insulated container with an ice pack. To avoid freezing, make sure your child’s pen does not touch the ice pack. Once you arrive, your child’s pen should be placed in a refrigerator as soon as possible. Do NOT leave it in a car or other place where it can get too hot or too cold.
How should I dispose of the pen needles and pens?
- Throw away your child’s pen, and pen needles into an appropriate “sharps” disposal container or puncture resistant container.
If you do not have a “sharps” disposal container, you may use a household container that:
- is made of heavy-duty plastic.
- can be closed with a tight-fitting, puncture resistant lid, without sharps being able to come out.
- is upright and stable during use.
- is leak-resistant, and properly labeled to warn of hazardous waste inside the container.
- When your “sharps” disposal container is almost full, you will need to follow your community guidelines for the right way to dispose of your “sharps” disposal container. There may be local laws about how you should throw away used needles, syringes, and pre-filled syringes. Ask your child’s doctor or nurse, if you are not sure what to do.
- Do NOT throw away your used sharps disposal container in your household trash unless your community guidelines permit this.
Keep the sharps container out of the reach of children.
NGENLA®
Somatrogon Injection
60 mg/1.2 mL (50 mg/mL), pre-filled pen for subcutaneous injection
INSTRUCTIONS FOR USE (IFU)
Injection for subcutaneous (under the skin) use only
Keep this leaflet. These instructions show step-by-step directions on how to prepare and give an injection.
Important information about your child’s NGENLA pen:
- NGENLA for injection is a single-patient use, disposable (throw away) pre-filled pen containing 60 mg of medicine. You can give more than 1 dose from the pen.
- NGENLA for injection can be given by a patient, caregiver or healthcare provider. Do NOT try to inject NGENLA yourself until you are shown the right way to give the injections and read and understand the Instructions for Use. If your child’s healthcare provider decides that you may be able to give your child’s injections of NGENLA at home, you should receive training on the right way to prepare and inject NGENLA. It is important that you read, understand, and follow these instructions so that you inject NGENLA the right way.
- It is important to talk to your child’s healthcare provider to be sure you understand your child’s NGENLA dosing instructions. To help you remember when to inject NGENLA, you can mark your calendar ahead of time. Call your child’s healthcare provider if you have any questions about the right way to inject NGENLA, or by calling Pfizer Canada ULC at 1-800-463-6001.
- Do NOT share your child’s pen with other people, even if the needle has been changed. Your child may give other people a serious infection, or get a serious infection from them.
- Each turn (click) of the dose knob dials 0.5 mg of medicine. You can give from 0.5 mg to 30 mg in a single injection. If your child’s dose is more than 30 mg, you may need to give more than 1 injection. Each injection should be given at a different injection site.
- A new pen may contain slightly more than 60 mg of medicine, this is normal.
- Always use a new sterile needle for each injection. This will reduce the risk of contamination, infection, leakage of medicine, and blocked needles leading to the wrong dose.
- Do NOT shake your child’s pen. Shaking can damage the medicine.
- The pen is not recommended for use by the blind or visually impaired without the assistance of a person trained in the proper use of the product.
Supplies you will need each time you inject
Included in the carton:
- 1 NGENLA pre-filled pen.
Not included in the carton:
- 1 new sterile needle for each injection.
- Alcohol swabs.
- Cotton balls or gauze pads.
- Adhesive bandage.
- 1 appropriate “sharps” disposal container for disposal of pen needles and pens (See How should I dispose of the pen needles and pens?).
60 mg NGENLA pen:
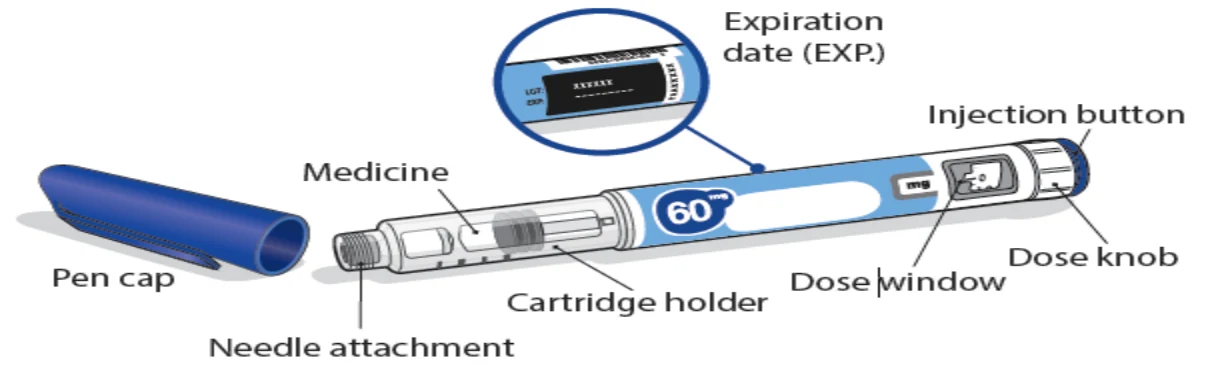
Needles to use:
Pen needles are not included with your child’s NGENLA pen. You will need a prescription from your child’s healthcare provider to get pen needles up to a length of 8 mm from your pharmacy.
Needles to use with your child’s NGENLA pen:
- 32G (Novo Nordisk®, NovoFine® Plus)
- 31G (Novo Nordisk®, NovoFine®)
- 31G (Becton, Dickinson and Company, BD Ultra-Fine™ or BD Micro-Fine™)
Needles with safety shield to use with your child’s NGENLA pen:
- 30G (Becton, Dickinson and Company, AutoShield Duo™)
- 30G (Novo Nordisk®, NovoFine® AutoCover®)
- Talk with your child’s healthcare provider about the right needle for your child.
Sterile needle (example) not supplied:

Sterile needle with safety shield (example) not supplied:

Note: Needles with safety shield do not have an inner needle cap. Steps 5, 6 and 11 within these instructions relating to the inner needle cap may not apply when using a needle with safety shield. Refer to the needle manufacturer’s instructions for use for more information.
Caution: Never use a bent or damaged needle. Always handle pen needles with care to make sure you do not prick yourself (or anyone else) with the needle. Do NOT attach a new needle to your pen until you are ready to take your injection.
Prior to each use the pen can be left at room temperature for a more comfortable injection, not more than 32°C for a maximum 2 hours. Do NOT use beyond the expiration date stamped on the carton.
Preparing for your injection
Step 1 - Getting ready
- Wash and dry your hands.
- You can use your child’s pen straight from the refrigerator. For a more comfortable injection, leave your child’s pen at room temperature for up to 30 minutes.
- Check the name, strength, and label of your child’s pen to make sure it is the medicine your child’s healthcare provider has prescribed for your child.
- Check the expiration date on the pen label. Do NOT use if the expiration date has passed.
Do NOT use your child’s pen if:
- It has been frozen or exposed to heat.
- It has been dropped.
- It looks broken or damaged.
- It has been more than 28 days after first use of the pen.
- It has been used 5 times.
- It has been left out of the refrigerator (up to 32°C) for more than 2 hours with each use.
- It has been exposed to temperatures above 32°C.
- Do NOT remove the pen cap from your child’s pen - until you are ready to inject.
Step 2 - Choose and clean your child’s injection site
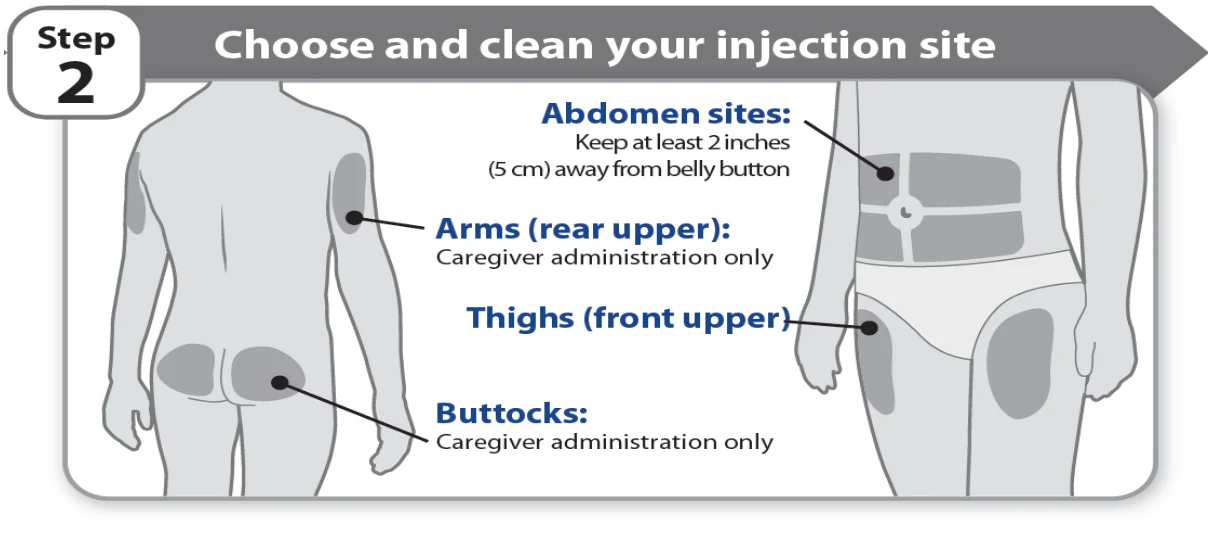
- NGENLA can be given in the abdomen, thighs, buttocks, or upper arms.
- Choose the best place to inject, as recommended by your child’s healthcare provider.
- If more than 1 injection is needed to complete your child’s full dose, each injection should be given in a different injection site.
- Use a different injection site every week.
- Do NOT inject into bony areas, areas that are bruised, red, sore or hard, and areas that have scars or skin conditions.
- Clean the injection site with an alcohol swab.
Allow the injection site to dry.
Do NOT touch injection site after cleaning.
Step 3 - Check medicine
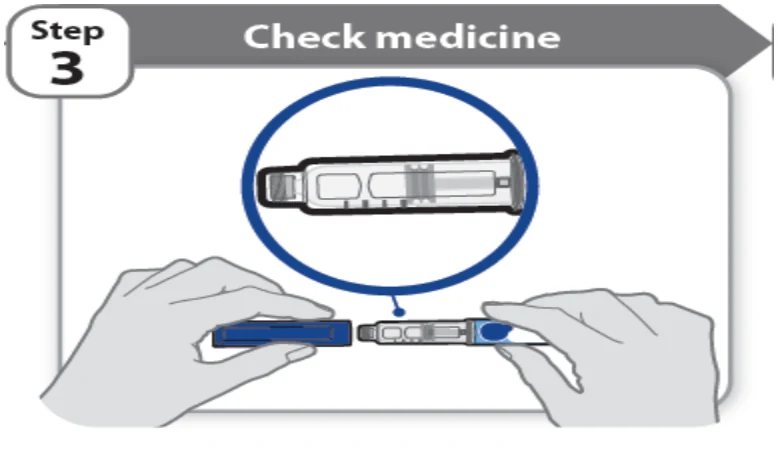
- Pull off the pen cap and keep it for after your child’s injection.
- Check the medicine inside the cartridge holder.
- Make sure the medicine is clear and colorless to slightly light yellow. Do NOT inject the medicine if it is cloudy or dark yellow.
Make sure the medicine is free of flakes or particles. Do NOT inject the medicine if it has flakes or particles.
Note: It is normal to see one or more bubbles in the medicine.
Step 4 - Attach needle
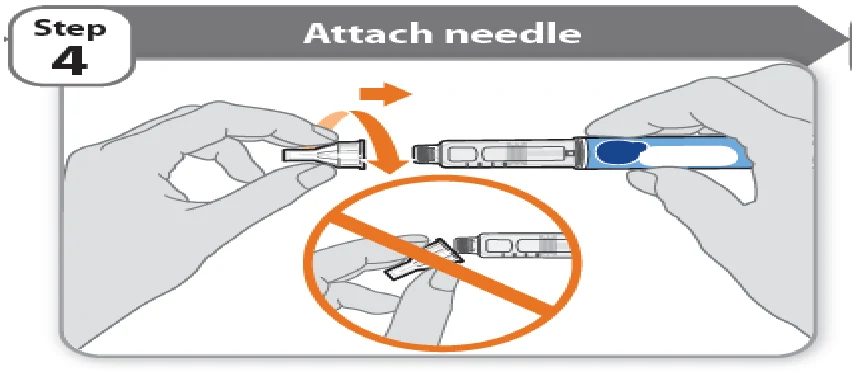
- Take a new needle and pull off the protective paper.
- Line the needle up with your child’s pen keeping them both straight.
Gently push and then screw the needle onto your child’s pen.
Do not over tighten.
Note: Be careful not to attach the needle at an angle. This may cause the pen to leak.
Caution: Needles have sharp tips at both ends. Handle with care to make sure you do not prick yourself (or anyone else) with the needle.
Step 5 - Pull off outer needle cover
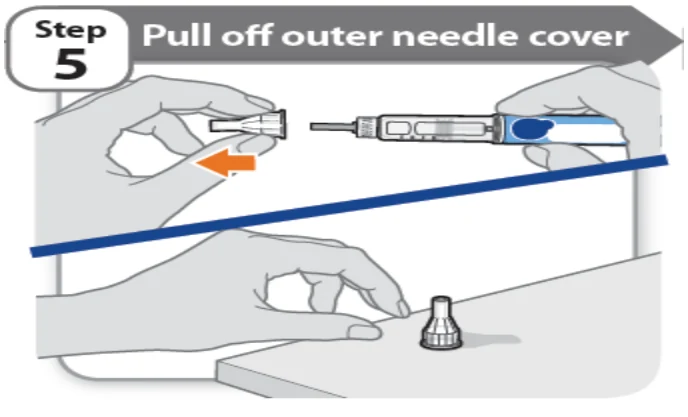
- Pull off the outer needle cover.
Make sure you keep the outer needle cover. You will need it later to remove the needle.
Note: You should see an inner needle cap after you have removed the outer cover. If you do not see this, try to attach the needle again.
Note: If using needle with safety shield, refer to the manufacturer’s instructions for use.
Step 6 - Pull off inner needle cap
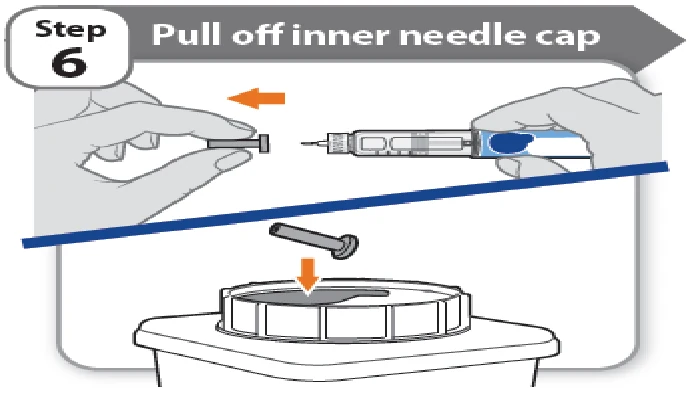
- Pull off the inner needle cap carefully to show the needle.
- Throw away the inner needle cap in an appropriate “sharps” container. It is not needed again.
Note: If using needle with safety shield, refer to the manufacturer’s instructions for use.
Is this pen new?
Yes: Go to new pen set up
No
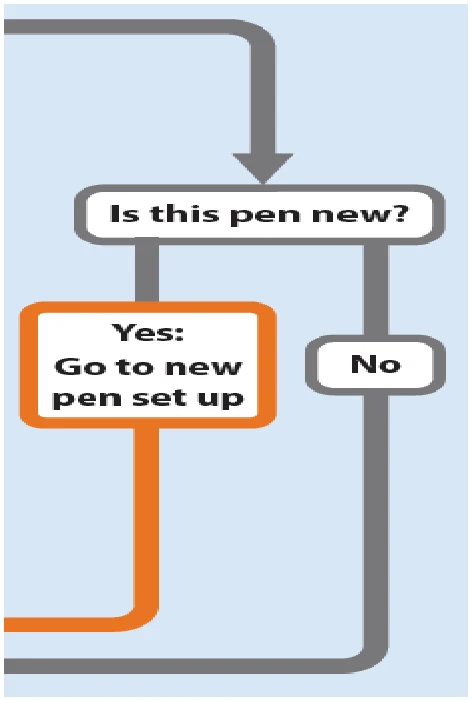
(‘Yes: Go to new pen set up’ has an arrow directing to ‘New pen set up (priming)’ and ‘No’ has an arrow directing to ‘Setting your child’s prescribed dose’)
New pen set up (priming) – for the first use of a new pen only
You must set up each new pen (priming) before using it for the first time
- New pen set up is done before each new pen is used for the first time.
The purpose of setting up a new pen is to remove air bubbles and make sure your child gets the correct dose.
Important: Skip Step-A through to Step-C if you have already set up your child’s pen.
A - Set knob to 1.0
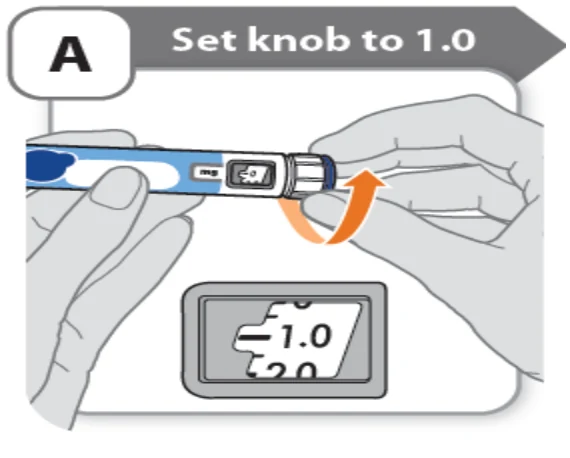
Turn the dose knob to 1.0.
Note: If you turn the dose knob too far, you can turn it back.
B - Tap cartridge holder
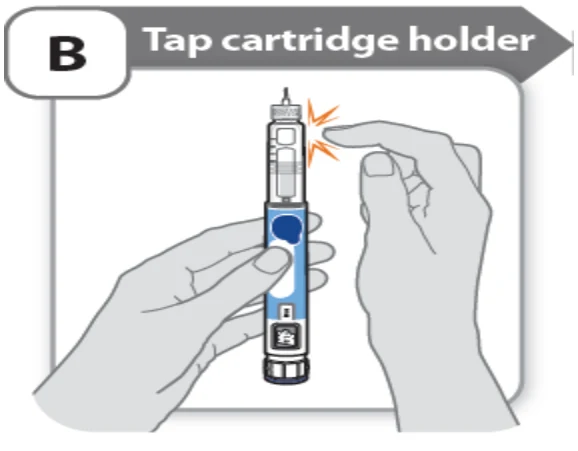
- Hold the pen with the needle pointing up so that the air bubbles can rise.
Tap the cartridge holder gently to float any air bubbles to the top.
Important: Follow Step-B even if you do not see air bubbles.
C - Press button and check for liquid
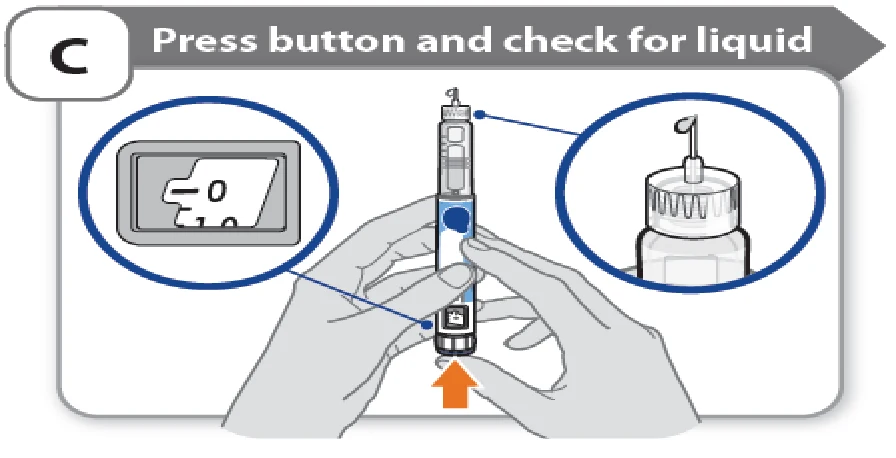
- Press the injection button until it cannot go any further and “0” is shown in the dose window.
- Check for liquid at the needle tip. If liquid appears, your child’s pen is set up.
Always make sure that a drop of liquid appears before you inject. If liquid has not appeared, repeat Step-A through to Step-C.
- If liquid does not appear after you have repeated Step-A through Step-C five (5) times, attach a new needle and try 1 more time. Do NOT use the pen if a drop of liquid still does not appear. Contact your child’s healthcare provider or pharmacist and use a new pen.
Setting your child’s prescribed dose
Step 7 - Set your child’s dose
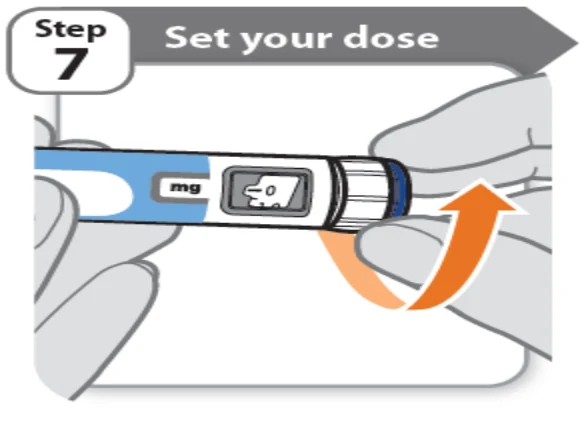
Example A:
21.5 mg shown in the dose window
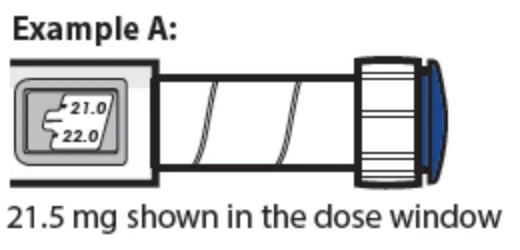
Example B:
30.0 mg shown in the dose window
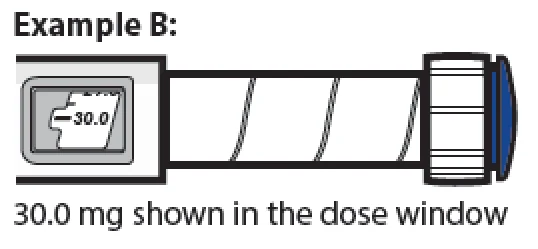
Turn the dose knob to set your child’s dose.
- The dose can be increased or decreased by turning the dose knob in either direction.
- The dose knob turns 0.5 mg at a time.
- Your child’s pen contains 60 mg of medicine, but you can only set a dose of up to 30 mg for a single injection.
- The dose window shows the dose in mg. See Examples A and B.
Always check the dose window to make sure you have set the correct dose.
Important: Do not press the injection button while setting your child’s dose.
What should I do if I cannot set the dose my child needs?
- If your child’s dose is more than 30 mg you will need more than 1 injection.
You can give from 0.5 mg to 30 mg in a single injection.
- If you need help dividing up your child’s dose the right way, ask your child’s Healthcare provider.
- Use a new needle for each injection (See Step 4: Attach needle).
- If you normally need to give 2 injections for your child’s full dose, be sure to give your child’s second dose.
What should I do if I do not have enough medicine left in my child’s pen?
- If your child’s pen contains less than 30 mg of medicine, the dose knob will stop with the remaining amount of medicine shown in the dose window.
If there is not enough medicine left in your child’s pen for your child’s full dose, you may either:
- Inject the amount left in your child’s pen, then prepare a new pen to complete your child’s dose in full. Remember to subtract the dose your child has already received. For example, if the dose is 21.5 mg and you can only set the dose knob to 17 mg, you should inject another 4.5 mg with a new pen.
- Or get a new pen and inject the full dose.
Injecting your child’s dose
Step 8 - Insert the needle
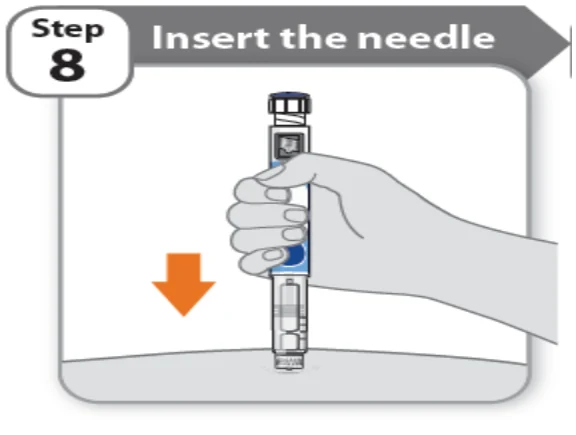
- Hold your child’s pen so you can see the numbers in the dose window.
- Insert the needle straight into your child’s skin.
Step 9 - Inject your child’s medicine
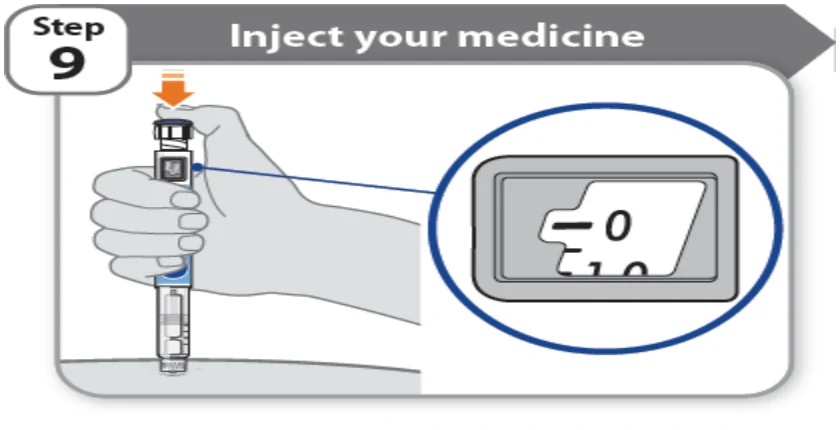
- Keep holding the needle in the same position in your child’s skin.
- Press the injection button until it cannot go any further and “0” is shown in the dose window.
Step 10 - Count to 10
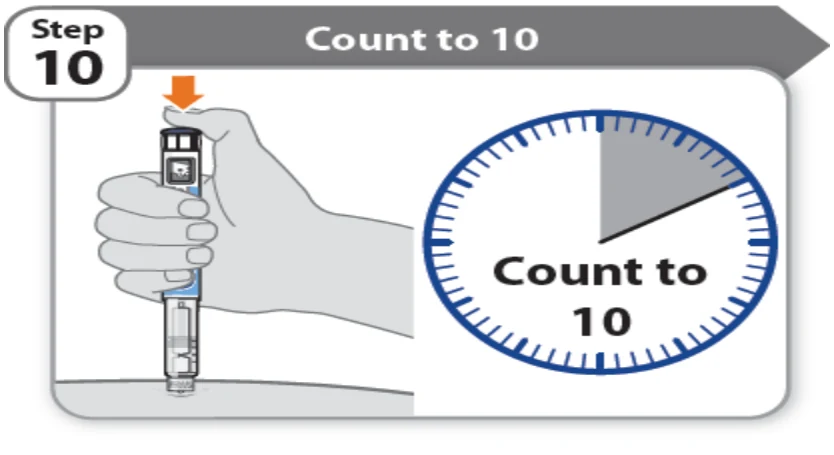
- Continue to press the injection button while counting to 10. Counting to 10 will allow the full dose of medicine to be given.
After counting to 10, let go of the injection button and slowly remove the pen from the injection site by pulling the needle straight out.
Note: You may see a drop of medicine at the needle tip. This is normal and does not affect the dose your child just received.
Step 11 - Attach outer needle cover
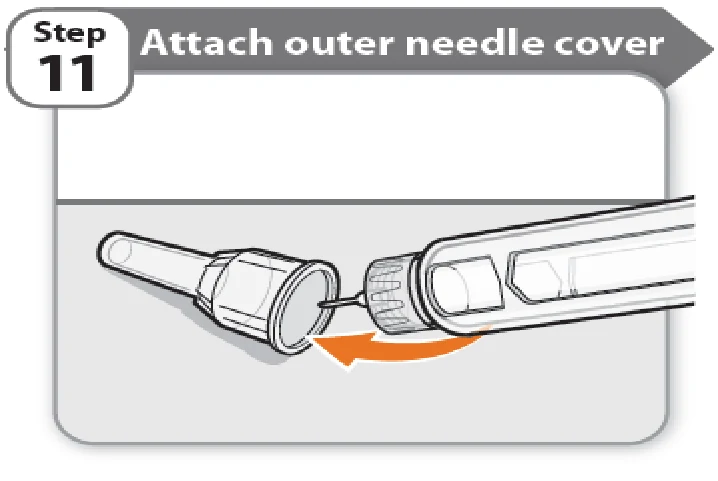
- Carefully place the outer needle cover back on the needle.
Press on the outer needle cover until it is secure.
Caution: Never try to put the inner needle cap back on the needle. You may prick yourself with the needle.
Note: If using needle with safety shield, refer to the manufacturer’s instructions for use.
Step 12 - Remove the needle
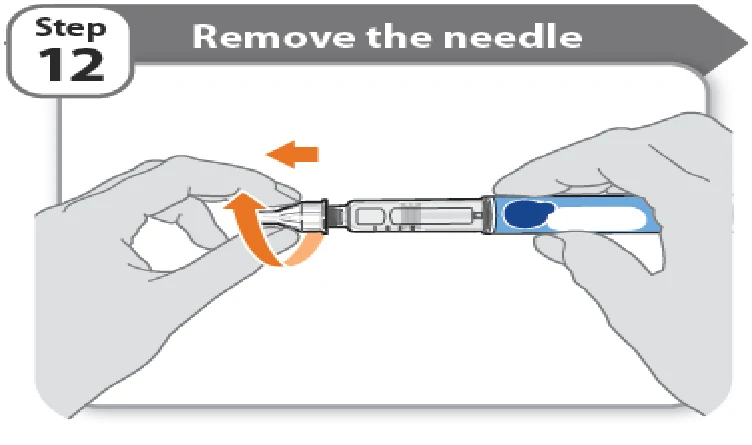
- Unscrew the needle from the pen.
Gently pull until the needle comes off.
Note: If the needle is still on, replace the outer needle cover and try again. Be sure to apply pressure when unscrewing the needle.
- Throw away the needle in the “sharps” container (See How do I dispose of the pen needles and pens?). Important: Always remove and throw away used needles. Do NOT reuse needles.
Step 13 - Replace the pen cap
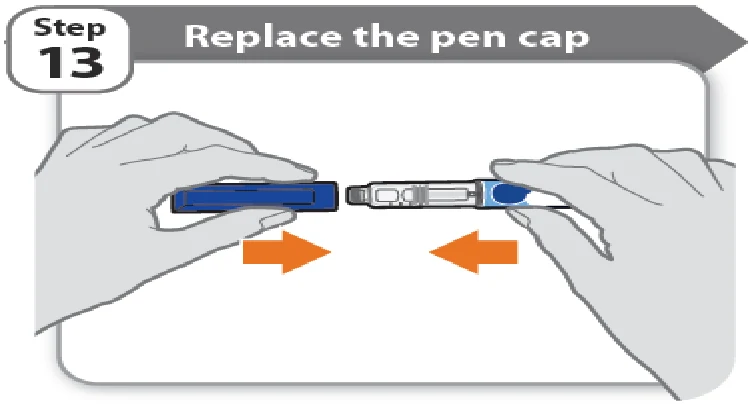
- Replace the pen cap back onto your child’s pen.
- Do NOT recap the pen with a needle attached.
- If there is any medicine left in your child’s pen, store in the refrigerator between uses (See How should I store my child’s pen?).
Step 14 - After your child’s injection
- Press lightly on the injection site with a clean cotton ball or gauze pad and hold for a few seconds.
- Do NOT rub the injection site. Your child may have slight bleeding. This is normal.
- You may cover the injection site with a small adhesive bandage, if needed.
- If your child’s pen is empty, has been used 5 times, has been left out of the refrigerator (up to 32°C) for more than 2 hours with each use, has been exposed to temperatures above 32°C or it has been more than 28 days after first use, throw it away even if it contains unused medicine. Refer to “Storage and disposal” on the right side of this leaflet.
Storage and disposal:
How should I store my child’s pen?
- Keep NGENLA, injection supplies, and all medicines out of the reach of children.
Before first use (unused pens):
- Store your child’s pens in the refrigerator between 2°C to 8°C.
- Do NOT freeze your child’s pen or expose it to heat.
- Unused pens may be used until the expiration date printed on the label, only if the pen has been kept in the refrigerator.
After first use (up to 28 days of use):
- Store your child’s pen in the refrigerator at 2°C to 8°C in between each use and away from direct sunlight.
- Keep the pen cap on your child’s pen when it is not in use.
- Do NOT store the pen with a needle attached.
- If your child’s pen is empty, has been used 5 times, has been left out of the refrigerator (up to 32°C) for more than 2 hours with each use, has been exposed to temperatures above 32°C or it has been more than 28 days after first use, throw it away even if it contains unused medicine.
To help you remember when to dispose of your child’s pen you can write the date of first use on the pen label and below:
Date of first use ______ / ______ / ______
- When travelling, transport your child’s pen in its original carton in an insulated container with an ice pack. To avoid freezing, make sure your child’s pen does not touch the ice pack. Once you arrive, your child’s pen should be placed in a refrigerator as soon as possible. Do NOT leave it in a car or other place where it can get too hot or too cold.
How should I dispose of the pen needles and pens?
- Throw away your child’s pen, and pen needles into an appropriate “sharps” disposal container or puncture resistant container.
If you do not have a “sharps” disposal container, you may use a household container that:
- is made of heavy-duty plastic.
- can be closed with a tight-fitting, puncture resistant lid, without sharps being able to come out.
- is upright and stable during use.
- is leak-resistant, and properly labeled to warn of hazardous waste inside the container.
- When your “sharps” disposal container is almost full, you will need to follow your community guidelines for the right way to dispose of your “sharps” disposal container. There may be local laws about how you should throw away used needles, syringes, and pre-filled syringes. Ask your child’s doctor or nurse, if you are not sure what to do.
- Do NOT throw away your used sharps disposal container in your household trash unless your community guidelines permit this.
- Keep the sharps container out of the reach of children.