


Patient Medication Information: uses, side effects, how to take - Andembry
What ANDEMBRY is used for:
ANDEMBRY is a medicine used in patients aged 12 years and older with Hereditary Angioedema (HAE) to prevent angioedema attacks.
ANDEMBRY should not be used to treat an acute HAE attack. In the event of an acute attack, seek medical attention.
How ANDEMBRY works:
HAE is a disorder that causes recurrent episodes of swelling, known as HAE attacks, throughout your body due to proteins in your blood called bradykinin. Too much bradykinin causes your body to swell. Your body also produces another protein called Factor XII (FXII) which in turn produces bradykinin. Blood levels of activated FXII (FXIIa) have been shown to increase in patients during HAE attacks. The active substance in ANDEMBRY, garadacimab, attaches to FXII and prevents it from working and limiting the production of bradykinin, which would potentially limit swelling and HAE attacks.
The ingredients in ANDEMBRY are:
Medicinal ingredients: garadacimab
Non-medicinal ingredients: L-arginine monohydrochloride, L-histidine, L-proline, polysorbate 80, water for injection.
ANDEMBRY comes in the following dosage forms:
ANDEMBRY is a sterile, preservative-free, slightly opalescent to clear, brownish-yellow to yellow solution available in the following presentations:
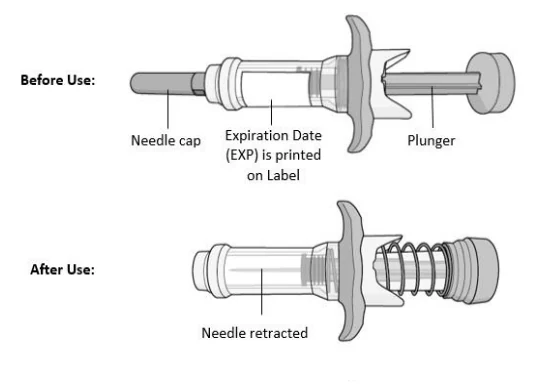
- 200 mg/1.2 mL solution in a single-dose prefilled glass syringe with needle safety device (Figure 1) or
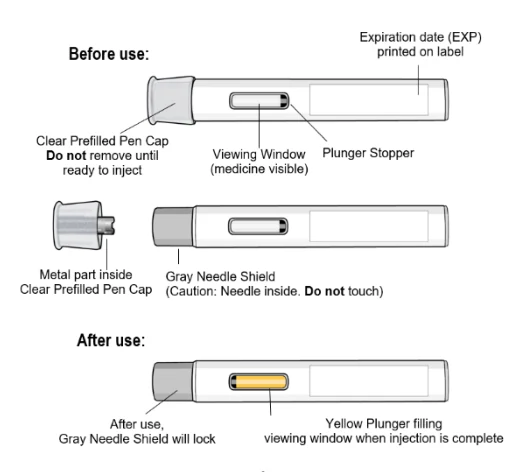
- 200 mg/1.2 mL solution in a single-dose prefilled pen (Figure 2)
Do not use ANDEMBRY if:
- If you have a severe allergic reaction to garadacimab or any of the other ingredients in this medicine.
Parts of the Prefilled Syringe with needle safety device / Prefilled Pen:
To help avoid side effects and ensure proper use, talk to your healthcare professional before you take ANDEMBRY. Talk about any health conditions or problems you may have, including if you:
are pregnant or planning to become pregnant. It is not known if ANDEMBRY can harm your unborn baby.
- are breastfeeding or plan to breastfeed. It is not known if ANDEMBRY passes into your breastmilk. Talk to your healthcare provider about the best way to feed your baby while using ANDEMBRY.
Tell your healthcare professional about all the medicines you take, including any drugs, vitamins, minerals, natural supplements or alternative medicines.
- No interaction studies have been performed.
How to take ANDEMBRY:
- Keep the prefilled syringe/ prefilled pen in its original carton box until use, to protect it from light.
- Do not remove the clear prefilled pen cap or the needle cap until you are ready to inject the medicine.
- For prefilled syringe: Do not recap the prefilled syringe.
- For prefilled pen: Do not put the Clear Prefilled Pen Cap back on the prefilled pen after it has been removed because this could start the injection and cause injury.
- Do not reuse the same prefilled syringe/prefilled pen. The prefilled syringe /prefilled pen. contains 1 dose and is for single-use only.
- The prefilled syringe/prefilled pen is for subcutaneous (under the skin) injection only.
- Do not use the prefilled syringe/prefilled pen if it looks damaged, has cracks, or is leaking medicine, or has been dropped. In these cases, throw away the prefilled syringe/prefilled pen and use a new one.
- Do not inject through clothing.
- For prefilled pen: Do not touch or try to remove the gray needle shield at any time.
Keep ANDEMBRY and all medicines out of reach of children.
Figure 1
Figure 2
Instructions for administration:
These medical devices (prefilled syringe or prefilled pen) work differently than other injection devices. Read the instruction for use carefully and each time you get a new device. There may be new information. This information does not this information does not replace talking to your healthcare provider about your medical condition or treatment.
In adolescent patients, administer ANDEMBRY under the supervision of an adult. Make sure you have been trained by your healthcare provider before you use this prefilled syringe / prefilled pen for the first time.
Assemble Supplies
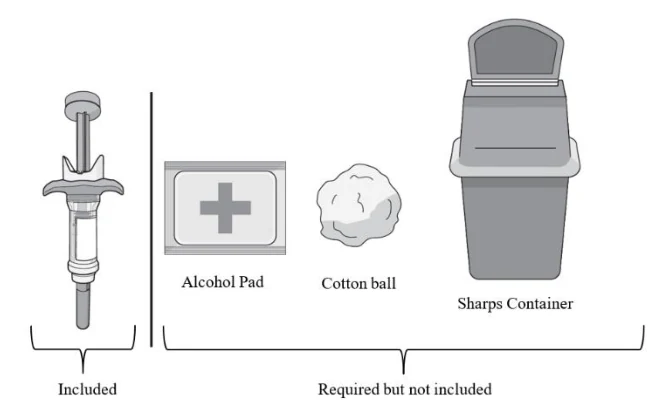
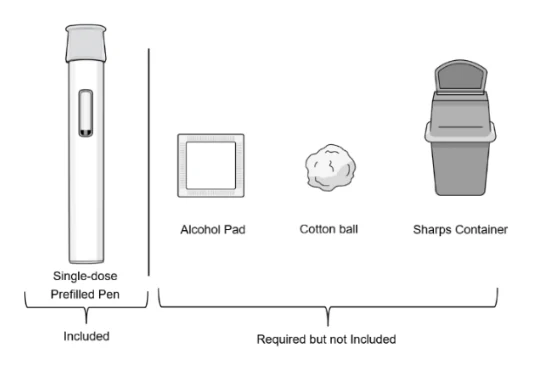
Supplies needed for the Prefilled pen (see Figure 3)/Prefilled syringe (see Figure 4)
Included in the carton box:
- 1 Single-dose Prefilled pen or 1 Prefilled syringe
Required supplies but not included in the carton box:
1 Alcohol pad
- 1 Cotton ball or gauze pad
- 1 sharps container or puncture-resistant container for disposal (see Instruction for Use: step by step guide Step 11. under Prefilled Pen or Step 12. under Syringe respectively)
NOTE: FOR “INSTRUCTIONS FOR USE” – PLEASE REFER TO END OF THE PATIENT MEDICATION INFORMATION
Usual dose:
The recommended dose of ANDEMBRY is an initial loading dose of 400 mg given as two 200 mg injections on the first day of treatment followed by one 200 mg injection given once a month.
Overdose:
No cases of overdose were reported in clinical studies. There is no available information to identify potential signs and symptoms of overdose.
Figure 3
Figure 4
| If you think you, or a person you are caring for, have taken too much ANDEMBRY, contact a healthcare professional, hospital emergency department, regional poison control centre or Health Canada's toll-free number, 1-844 POISON-X (1-844-764-7669) immediately, even if there are no symptoms. |
|---|
Missed Dose:
If a dose of ANDEMBRY is missed, administer the dose as soon as possible, and then administer the next dose according to the original schedule. If you're unsure about when to take the missed dose, especially if it's close to the time for your next scheduled dose, consult your healthcare professional.
Possible side effects from using ANDEMBRY:
These are not all the possible side effects you may have when taking ANDEMBRY. If you experience any side effects not listed here, tell your healthcare professional. Allergic reactions may happen with ANDEMBRY. Call your healthcare provider or get emergency help right away if you have any of the following symptoms:
- hives
- tightness of the chest
- difficulty breathing
- wheezing
- low blood pressure
- anaphylaxis
The most common side effects of ANDEMBRY are:
- Injection site reactions (redness, itchiness, and bruising), headache and abdominal pain
If you have a troublesome symptom or side effect that is not listed here or becomes bad enough to interfere with your daily activities, tell your healthcare professional.
Reporting Side Effects
You can report any suspected side effects associated with the use of health products to Health Canada by:
NOTE: Contact your health professional if you need information about how to manage your side effects. The Canada Vigilance Program does not provide medical advice. |
We recommend that CSL Behring Canada be copied when reporting suspected side effects, at the following address:
AdverseReporting@CSLBehring.com
Storage:
- Keep out of reach and sight of children.
- Store in a refrigerator (2⁰C to 8⁰C).
- Do not freeze.
- Keep the solution (prefilled syringe with needle safety device or prefilled pen) in the outer carton in order to protect from light.
- The solution (prefilled syringe with needle safety device or prefilled pen) may be stored at room temperature up to 25°C for up to 2 months, but not beyond the expiry date. Do not return ANDEMBRY to refrigerated storage after storage at room temperature up to 25 °C.
Instructions for Use: step by step guide for Prefilled Pen
Preparing for an Injection
Do not remove the clear Prefilled Pen cap until immediately before the injection.
Step 1. Let the Prefilled Pen Reach Room Temperature
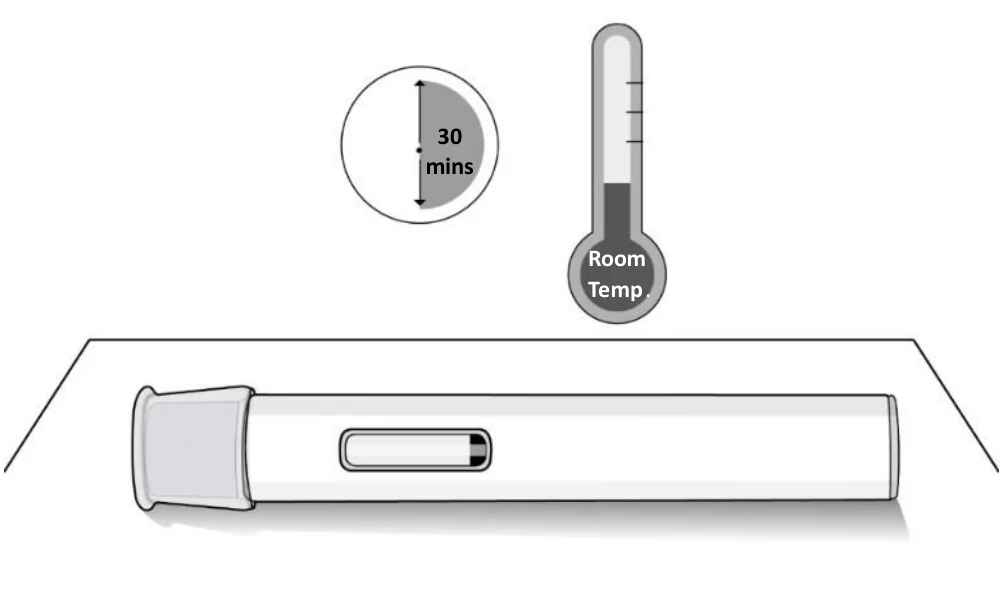
- Remove the prefilled pen from the carton box and place it laying down on a clean flat surface.
- Wait 30 minutes for the medicine to reach room temperature if it was stored in the refrigerator (see Figure A).
- Injecting the medicine cold could be uncomfortable.
Do not try to speed up the warming process in any way. For example, do not warm it in a microwave, in hot water, or leave it in direct sunlight.
Figure A
Step 2. Check the Expiration Date
- Check the expiration date on the prefilled pen label (see Figure B).
- Do not use the prefilled pen if the expiration date has passed.
- Do not use the prefilled pen if stored at room temperature for longer than 2 months.
- If the expiration date has passed or if stored at room temperature for longer than 2 months, then safely dispose of the prefilled pen and get a new one (see Step 11. Disposing of the Prefilled Pen).
Room Temp.
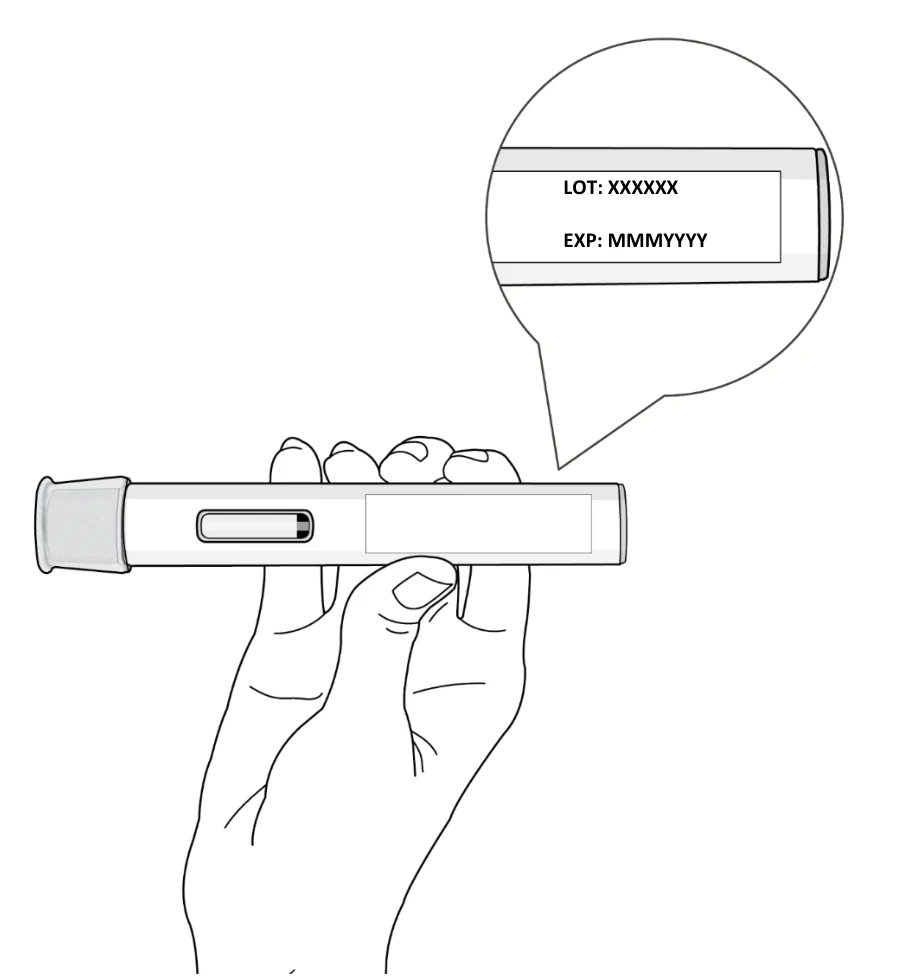
Figure B
Step 3. Inspect the Prefilled Pen and the medicine
- Check the prefilled pen for damage.
- Check the medicine through the viewing window of the prefilled pen (see Figure C).
- It is normal to see air bubbles, do not try to remove the air bubbles.
- The medicine should be slightly opalescent to clear, brownish-yellow to yellow liquid.
Do not use the prefilled pen, safely dispose and a get a new one (see Step 11. Disposing of the Prefilled Pen) if:
- The medicine is discoloured or contains particles
- The prefilled pen looks damaged or has cracks
- The prefilled pen is leaking
The prefilled pen has been dropped on a hard surface, even if it does not look damaged
LOT: XXXXXX EXP: MMMYYYY
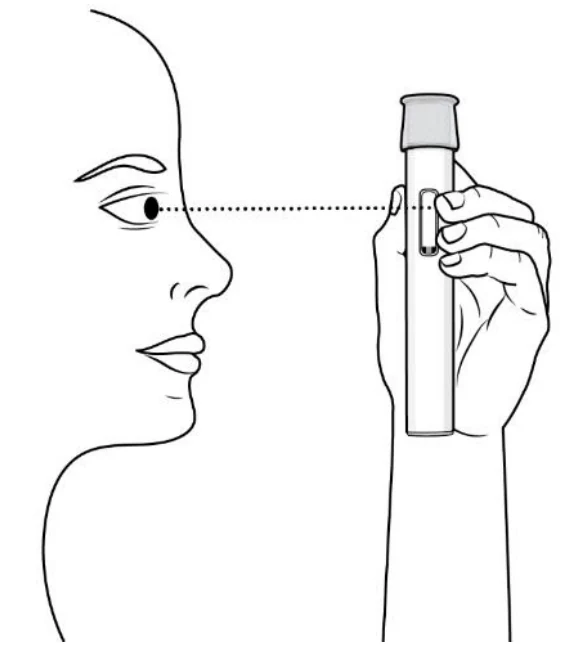
Figure C
Choose and Prepare an Injection Site
Step 4. Clean your Hands
- Wash your hands well with soap and water or use hand sanitizer (see Figure D).
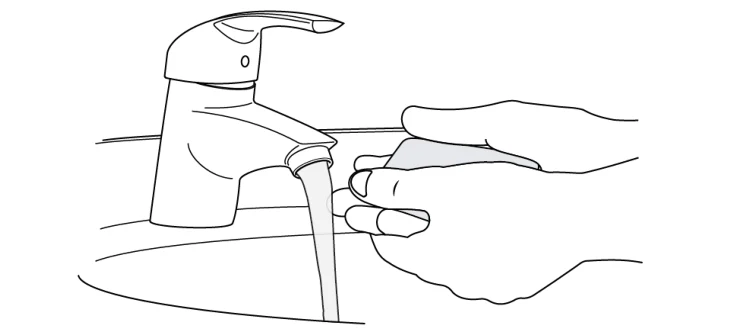
Figure D
Step 5. Select the Injection Site
- Inject into the thigh or belly (abdomen) area, but stay 1 inch (2 cm) away from the belly button (navel) (see Figure E)
- If somebody else (caregiver) gives you the injection, they can also use the upper arm. Do not try to inject into the upper arm yourself.
- Change (rotate) your injection sites with each injection.
- Do not Inject into areas where the skin is tender, red, hard, or injured, or into belly button, moles, scars or bruises or stretch marks.
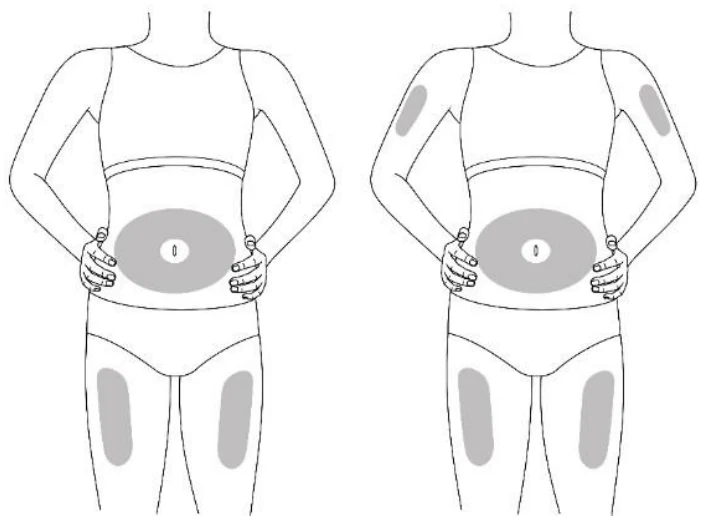
Figure E
Step 6. Prepare the Injection Site
- Clean the injection site with an alcohol pad (see Figure F).
- Let your skin dry on its own.
- Do not touch this area again before injecting.
- Do not fan or blow on the skin area that you cleaned.
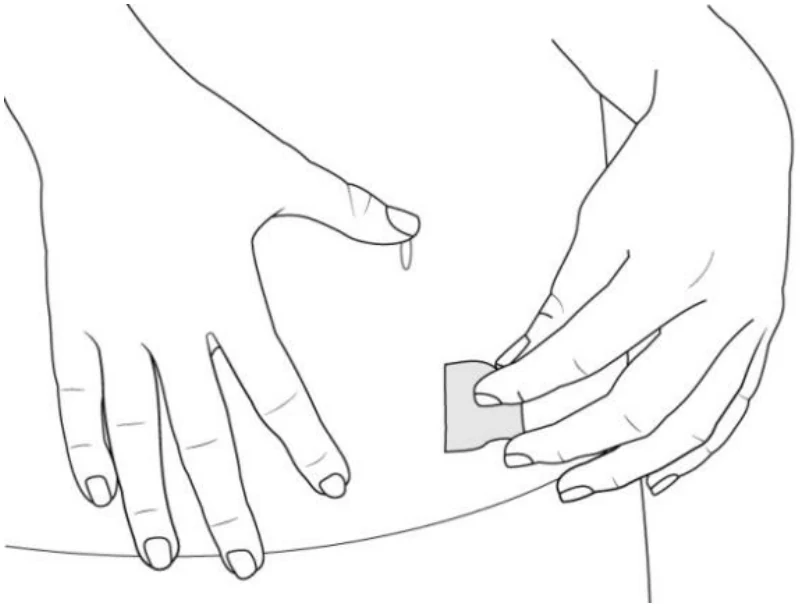
Figure F
Injecting the Medicine with the Prefilled Pen
Complete the Injection without stopping. Read all steps first before beginning.
Do not remove the Clear Cap until you are ready to inject.
Step 7. Remove Clear Prefilled Pen Cap and Dispose of the Cap
- Hold the prefilled pen with one hand and pull the Clear Prefilled Pen Cap straight off with the other hand.
- Do not twist the Clear Cap, (see Figure G). If you cannot remove the Clear Cap, ask a caregiver for help or contact your healthcare provider.
- The Clear Cap has a metal part inside, this is normal.
- Do not put the Clear Cap back on after it has been removed, because this could start the injection and cause injury.
- Dispose of the Clear Cap in a sharps container.
Important:
- Do not touch the gray needle shield of the prefilled pen to avoid injury.
- Do not put the prefilled pen down after removing the Clear Cap.
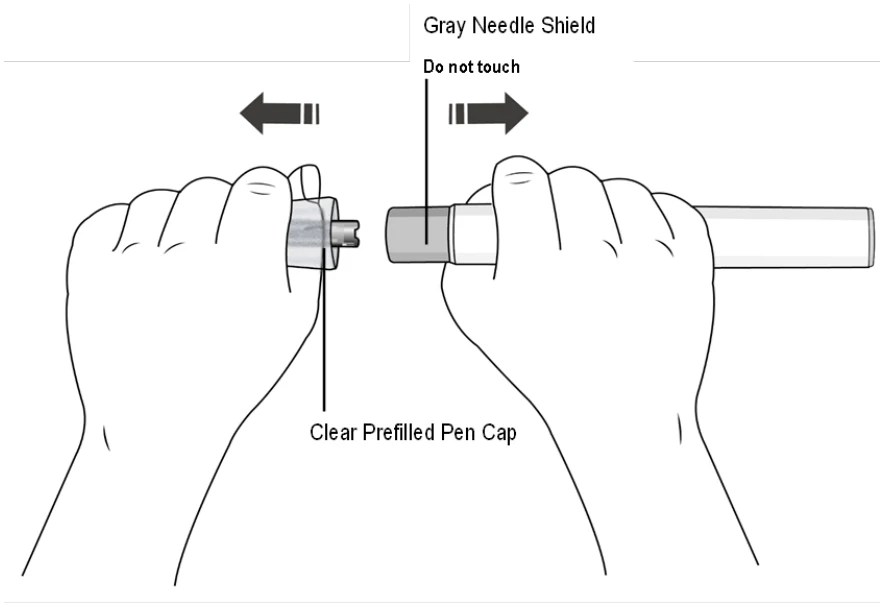
Figure G
Step 8. Pinch the Skin and place the Prefilled Pen on the injection site
Immediately after removing the clear prefilled pen cap, complete the following steps without stopping:
- Gently pinch the area of cleaned skin around the injection site and hold the area firmly until the injection is complete (see Figure H).
- Place the prefilled pen at a 90˚ angle on the cleaned injection site (see Figure H).
- Make sure you can see the viewing window.
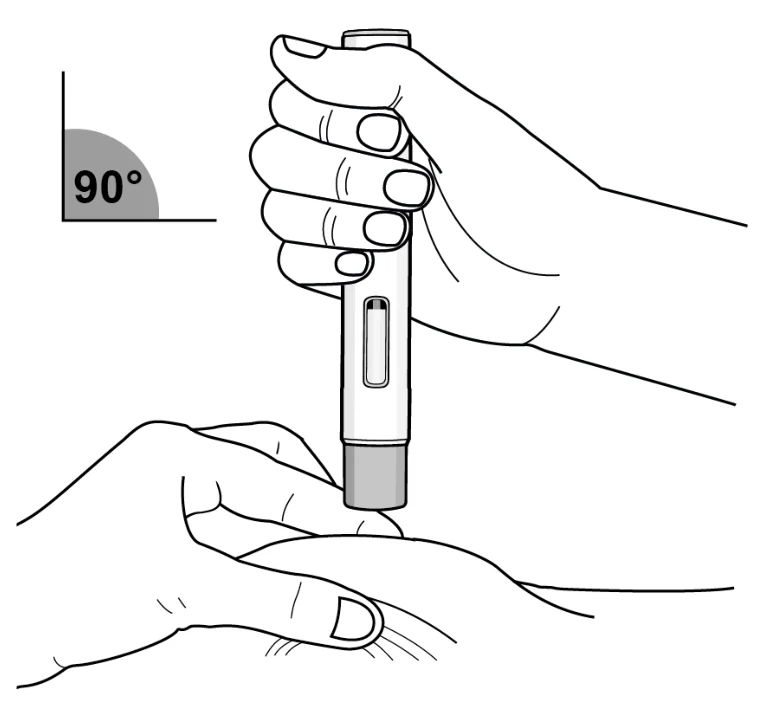
Figure H
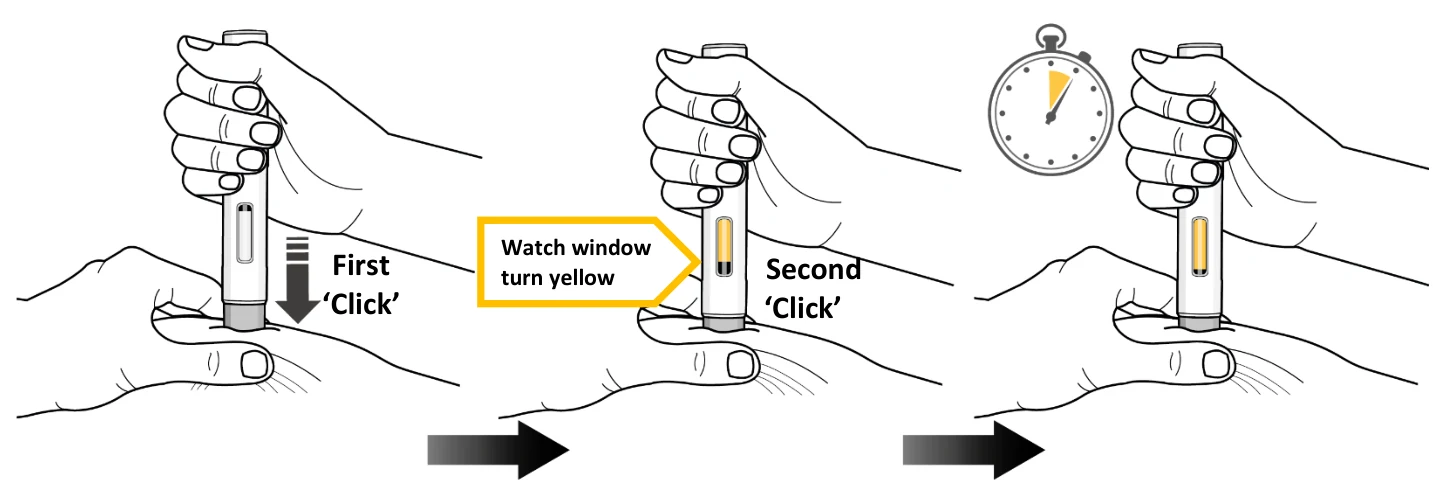
Step 9. Inject Medicine (see Figure I)
You Must Read all of Step 9 before injecting. The injection may take up to 15 seconds.
To ensure you receive a full dose you must keep the prefilled pen firmly pressed against your pinched skin until:
- The yellow plunger has stopped moving and filled the viewing window, and
- 5 seconds has passed after the 2nd “Click.”
| Press the gray needle shield down firmly against the pinched skin to start the injection and keep pressing down until all the steps below are complete. | ||
|---|---|---|
Press down to start the injection and listen for a First ‘Click’.
| Keep pressing the prefilled pen down and watch the viewing window.
Keep pressing the prefilled pen down. | Keep pressing the prefilled pen down for 5 more seconds to make sure you get the full dose. |
Figure I
- Do not remove the prefilled pen until the yellow plunger has stopped moving and completely filled the viewing window, and 5 seconds has passed after the Second “Click”
- Do not remove, tilt, or rotate the prefilled pen during the injection.
 First ‘Click’ Second ‘Click’ Keep Pressing Down |
|---|
Watch window
turn yellow
Press down to start Keep Pressing down for 5 more seconds …1…2…3…4…5 |
|---|
Step 10. Release the Pinch and Remove the Prefilled Pen
- Release the pinch and remove the prefilled pen at a 90° angle from the skin (see Figure J).
- As the prefilled pen is lifted from the skin, the gray needle shield returns to the original (before use) position, and will lock into place, covering the needle.
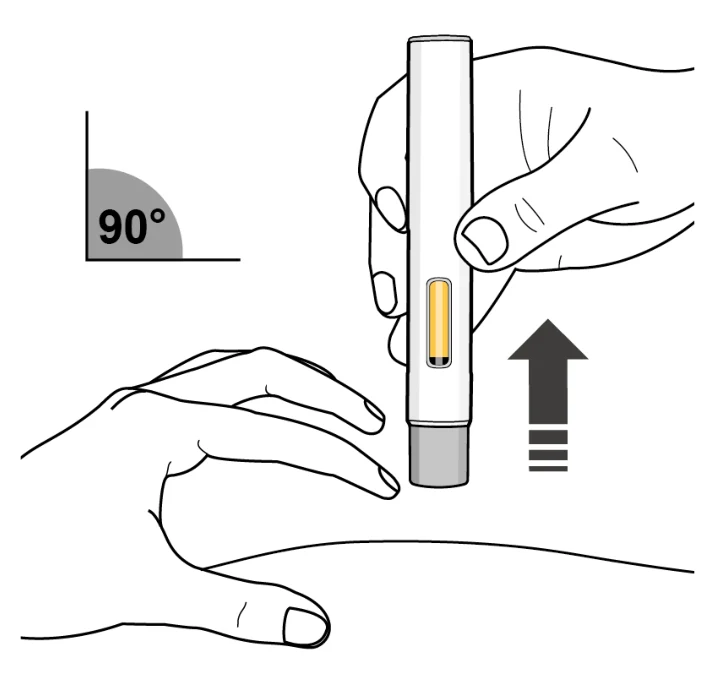
Figure J
Important: If you think that you have not received the full dose contact your healthcare provider right away.
- If there is a little bleeding at the injection site, you can press a cotton ball or gauze over the injection site.
- Do not rub the injection site.
- If needed, you may cover the injection site with a small adhesive bandage.
Disposal
Step 11. Disposing of the Prefilled Pen
- Do not try to reuse the prefilled pen.
- After injecting your dose, put the prefilled pen into a sharps container or closed puncture-resistant container (see Figure K).
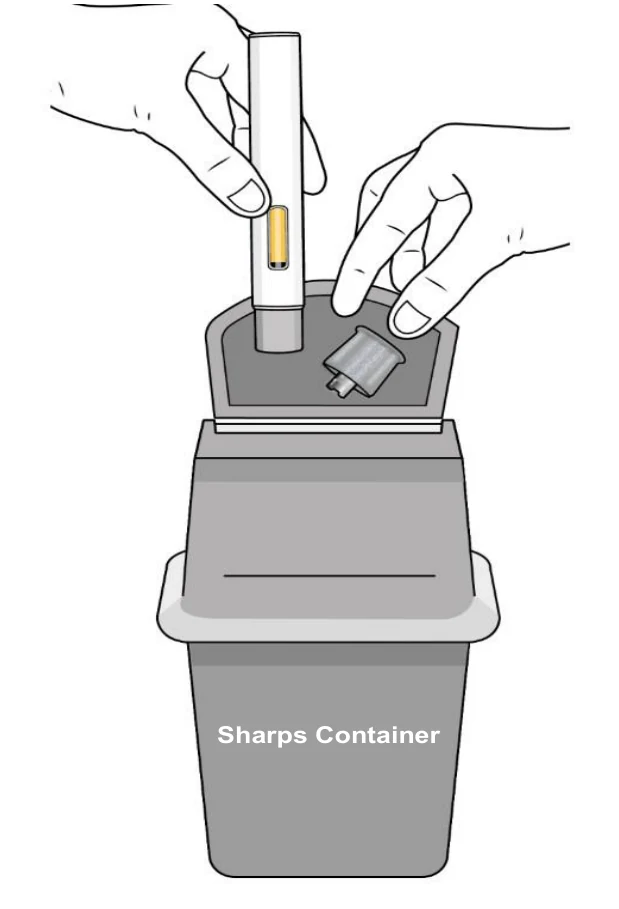
Figure K
If you do not have a sharps container, you may use a household container that is:
- Made of heavy-duty plastic
- Can be closed with a tight-fitting, puncture-resistant lid, without sharps being able to come out
- Upright stable during use
- Leak-resistant
- Properly labeled to warn of hazardous waste inside the container
- When your sharps container is almost full, you will need to follow your local guidelines for the right way to dispose of your sharps container. There may be local laws about how you should throw away used needles and syringes.
- Do not dispose of your used sharps container in your household trash unless your local guidelines permit this.
- Do not recycle your used sharps container.
Step 12. Keep Track of Your Treatment
- If required by your physician, record your injection in a diary to help keep track of your medicine.
Instructions for Use: step by step guide for Prefilled Syringe with Needle Safety Device
Preparing for an Injection
Step 1. Let the Prefilled Syringe Reach Room Temperature
- Remove the prefilled syringe from the carton box and place it on a clean flat surface.
- Do not remove the prefilled syringe from the carton box by holding onto the needle cap or plunger.
- Do not move or pull on the plunger.
- Wait 30 minutes for the medicine to reach room temperature if it has been stored in the refrigerator (see Figure A).
- Injecting the medicine cold could cause you some discomfort.
- Do not try to speed up the warming process in any way. Do not microwave the prefilled syringe, run hot water over it, or leave it in direct sunlight.
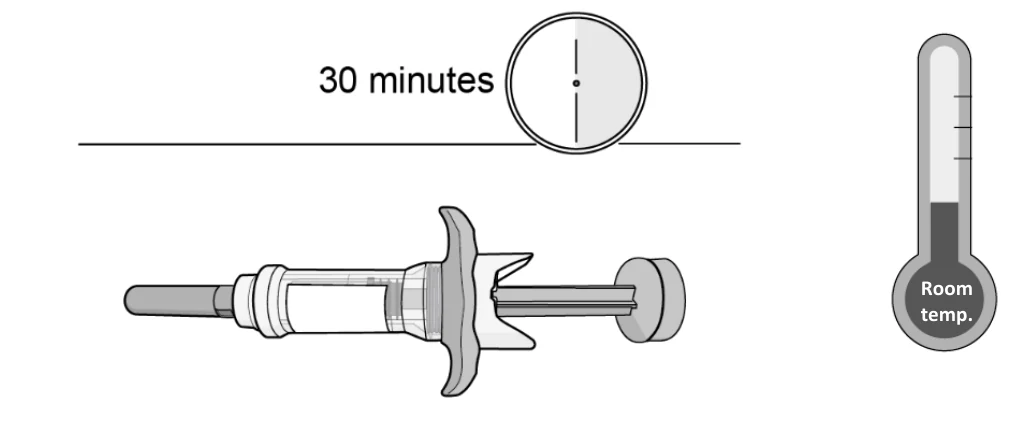
Figure A
Step 2. Check the Expiration
- Check the expiration date on the prefilled syringe (see Figure B).
- Do not use the prefilled syringe if the expiration date has passed.
- Do not use the prefilled syringe if stored at room temperature for longer than 2 months.
- If the expiration date has passed or if stored at room temperature for longer than 2 months, then safely dispose of the prefilled syringe and get a new one (see Step 12. Disposing of the Syringe).
| Room temp. |
|---|
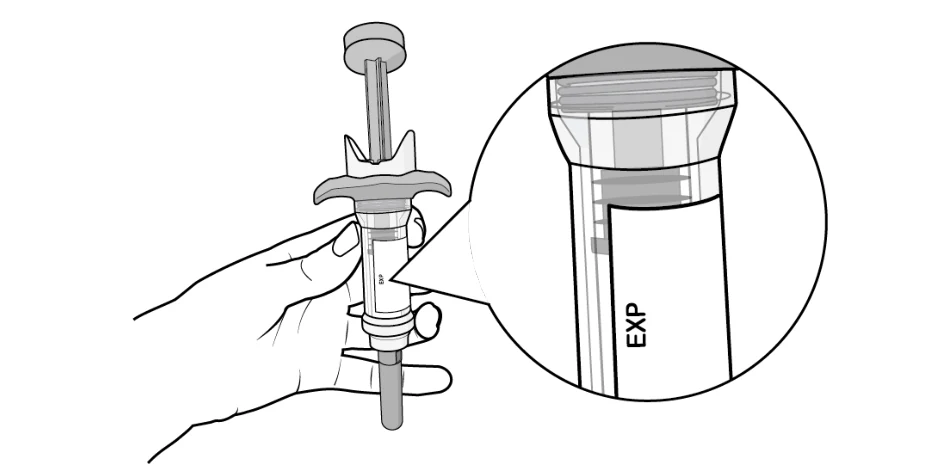
Figure B
Step 3. Inspect the Prefilled Syringe
- Inspect the medicine through the clear window of the prefilled syringe (see Figure C and Figure D).
- Peel back the label to inspect the medicine if you cannot see enough of the medicine through the clear window of the prefilled syringe (see Figure D).
- It is normal to see air bubbles. Do not try to remove the air bubbles.
- The medicine should be slightly opalescent to clear, brownish-yellow to yellow liquid.
- If the medicine is discoloured or contains particles (see Figure C), then do not use. Safely dispose of the prefilled syringe and get a new one (see Step 12. Disposing of the Syringe).
- Check the prefilled syringe. If it looks damaged, has cracks or is leaking medicine, or has been dropped, then safely dispose of the prefilled syringe and get a new one.
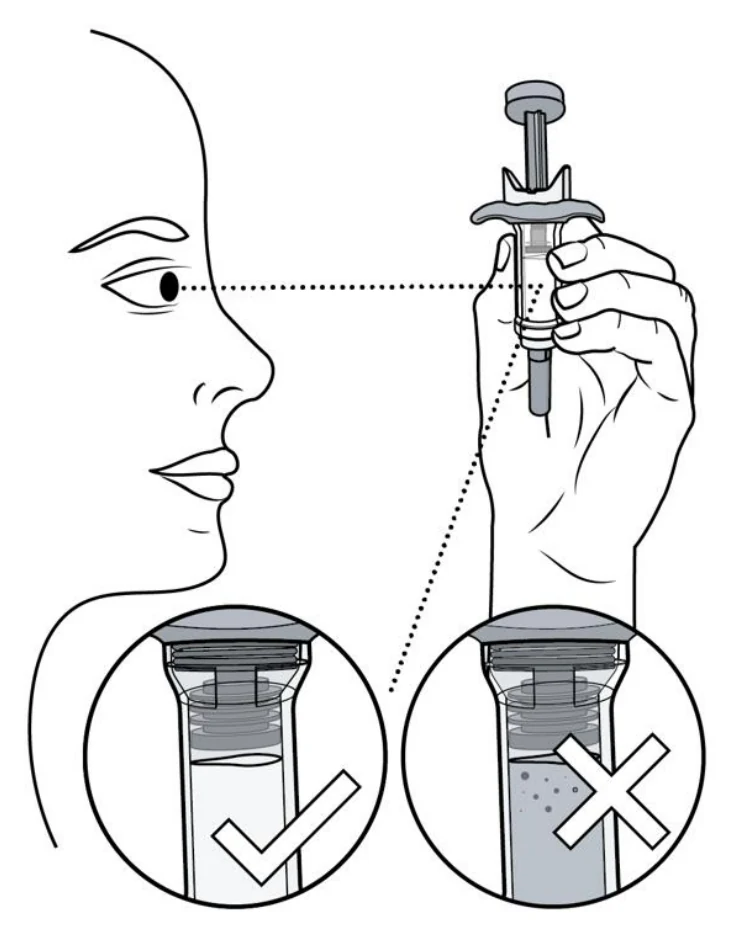
Figure C
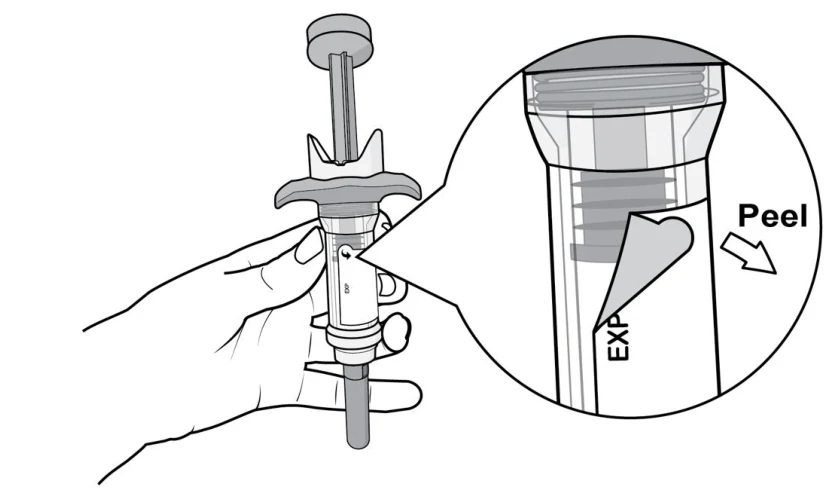
Figure D
Choose and Prepare an Injection Site
Step 4. Clean Your Hands
- Wash your hands well with soap and water or use hand sanitizer (see Figure E).
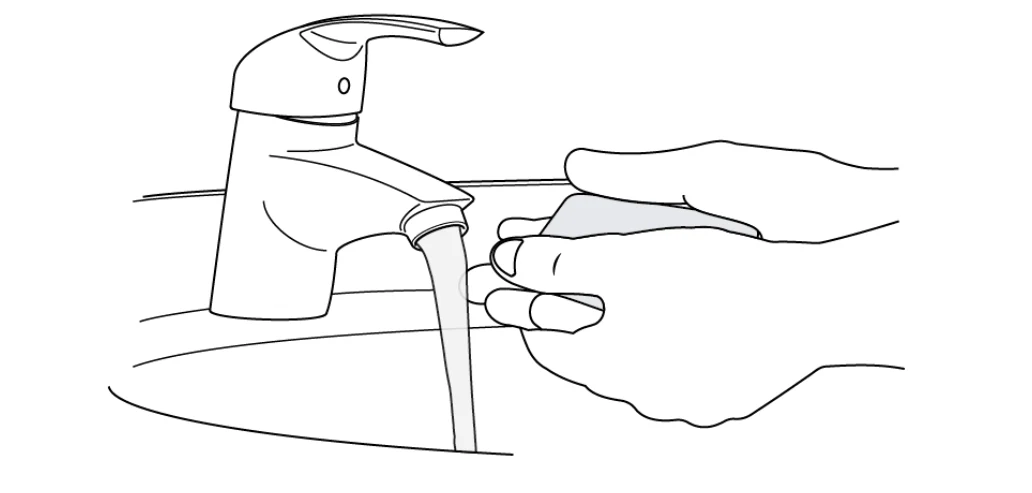
Figure E
Step 5. Select the Injection Site
- Inject into the thigh or belly (abdomen) area, but stay 1 inch (2 cm) away from the belly button (navel) (see Figure F).
- If somebody else (like a caregiver) gives you the injection, you can also use the upper arm.
- Change (rotate) your injection sites with each injection. Do not Inject in the same injection site multiple times if you see that the skin is damaged.
- Do not inject into the belly button, moles, scars or bruises or stretch marks, or into areas where the skin is tender, red, hard, or injured.
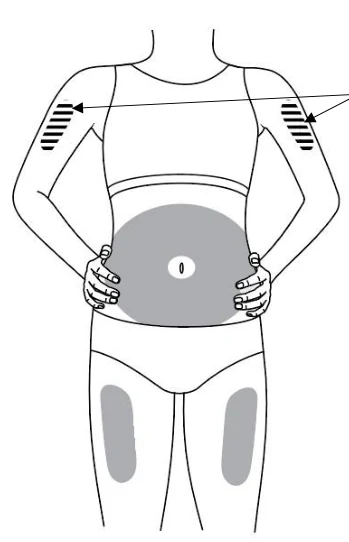
Figure F
Step 6. Prepare the Injection Site
- Clean the injection site with an alcohol pad in a circular motion (see Figure G).
- Allow the injection site to air dry.
- Do not touch the cleaned injection site before giving the injection.
- Do not fan or blow on the skin area that you cleaned.
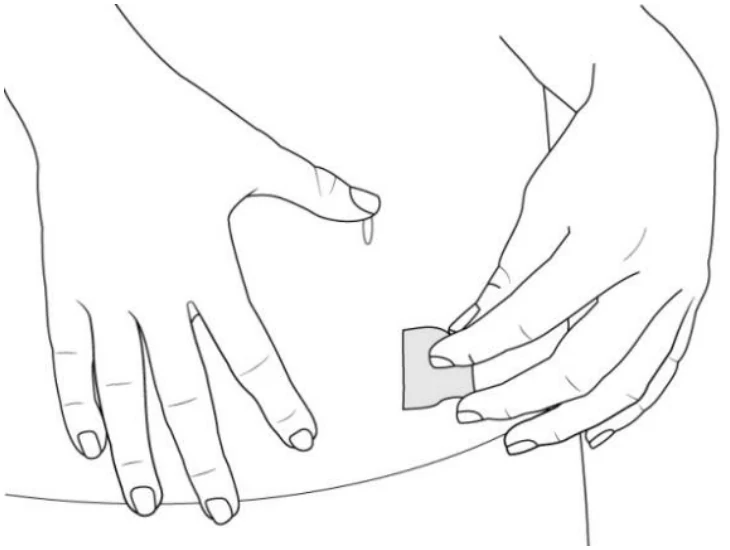
Figure G
Injecting the Medicine with the Prefilled Syringe
| Complete the Injection without stopping. Read all steps first before beginning. |
|---|
Step 7. Remove Needle Cap and Dispose of the Cap
- Do not remove the needle cap until you are ready to inject.
- Hold the prefilled syringe by the body, with the needle facing away from you.
- Pull the needle cap straight off with one hand while holding the prefilled syringe with the other hand (see Figure H). If you cannot remove the cap, you should ask a caregiver for help or contact your healthcare provider.
- Do not touch or hold the plunger during needle cap removal.
- Do not re-cap the prefilled syringe.
- Dispose of the needle cap in a sharps container.
- You may see a drop of liquid at the end of the needle. This is normal.
- The needle should be kept sterile after removing the needle cap. Do not touch the needle or let it touch any surfaces after removing the needle cap.
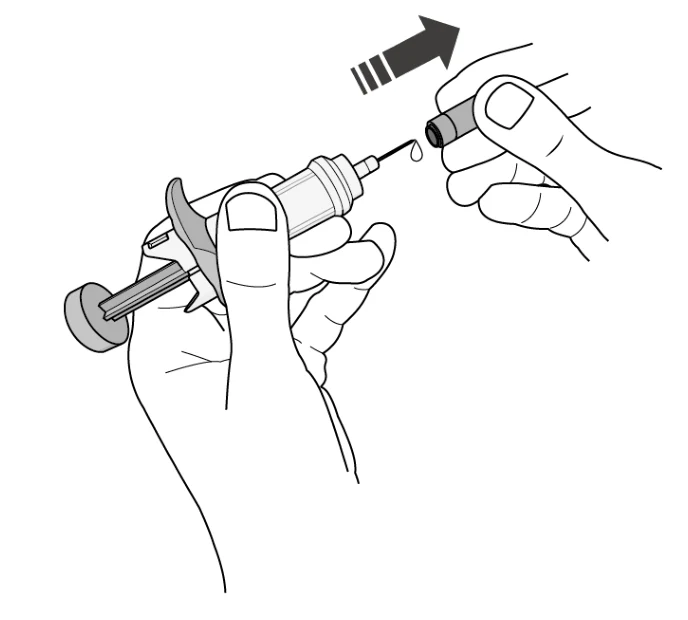
Figure H
Step 8. Pinch the skin and Insert the Needle
Immediately after removing the needle cap, complete the following steps without stopping:
- Gently pinch the area of cleaned skin around the injection site and hold that area firmly until the injection is complete (see Figure I).
- Fully insert the needle at an angle between 45˚ and 90˚. Do not change the angle during the injection. (see Figure I: images show an example of injection at 90˚ angle).
- Do not hold or push on the plunger while inserting the needle into the skin.
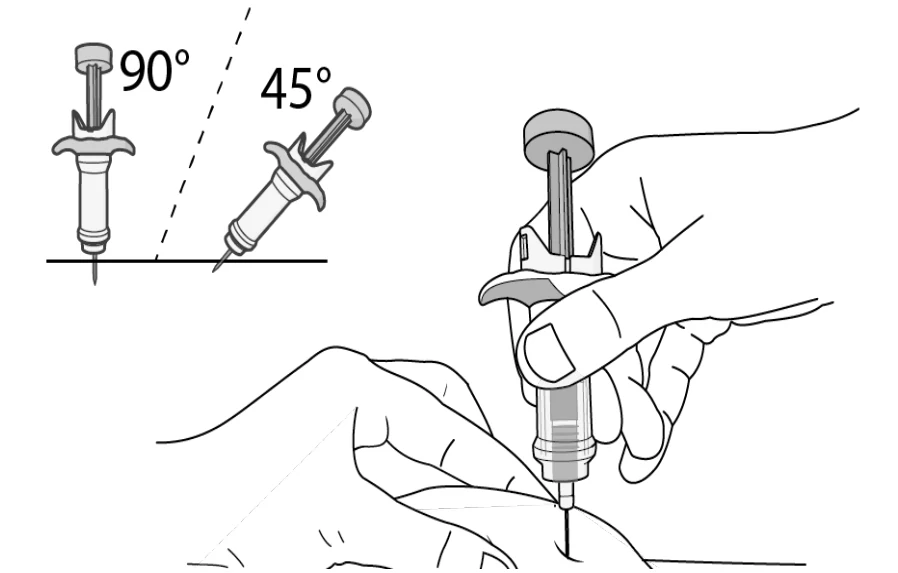
Figure I
Step 9. Inject Medicine
- Hold the prefilled syringe in place and inject all of the medicine by firmly pushing the plunger all the way down (see Figure J).
- Press the plunger all the way down until it stops to get the full dose. Pushing firmly on the plunger until the end of the injection (See Figure K).
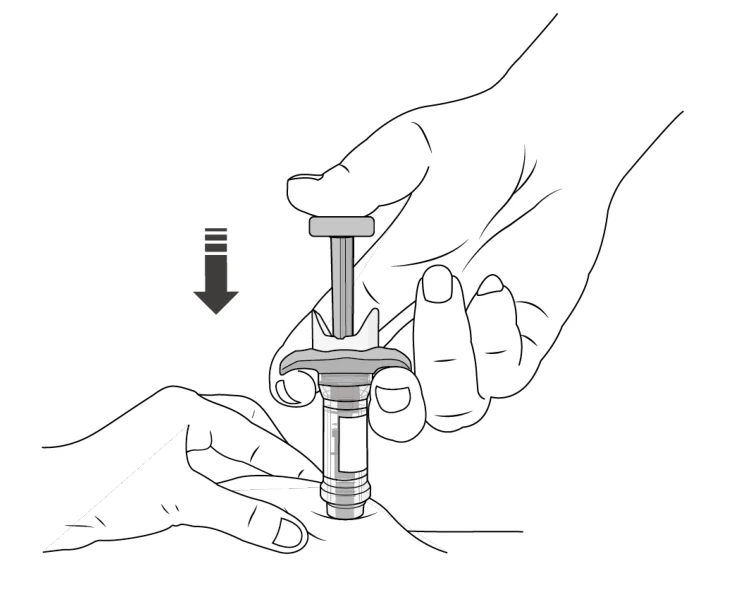
Figure J
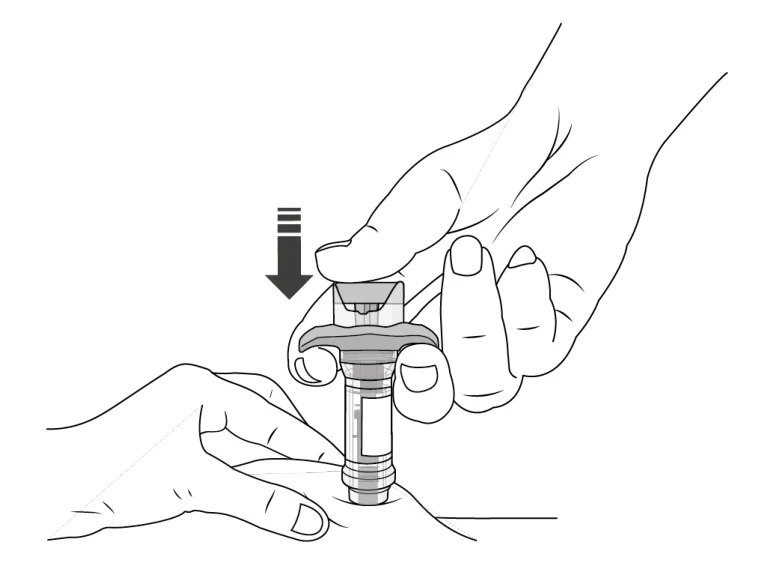
Figure K
Step 10. Release plunger
- After the plunger has been fully pushed down and the full dose injected, slowly remove the thumb from the plunger before removing the syringe from the skin (see Figure L). This will make the needle retract inside the syringe.
Caution: Do not remove the syringe from the skin before removing the thumb, as this could result in a needle stick injury.
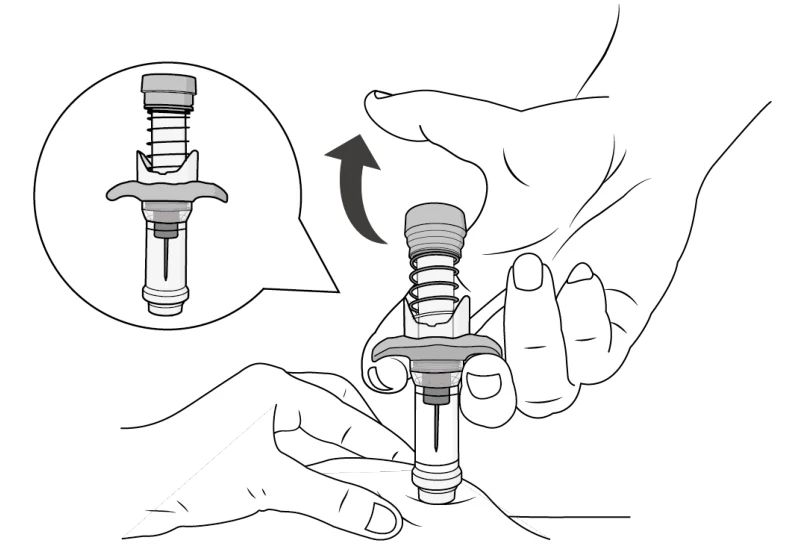
Figure L
Step 11. Release the Pinch and Remove the Prefilled Syringe
- Release the pinch and remove the prefilled syringe from the injection site (see Figure M).
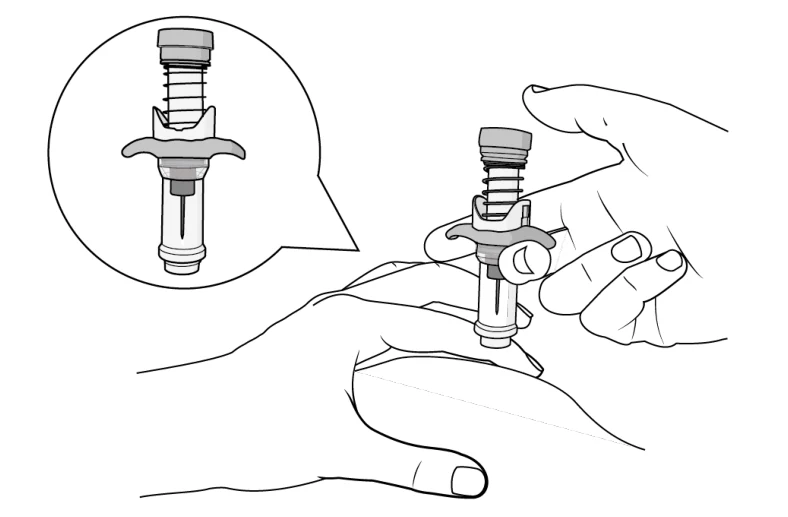
Figure M
- If there is a little bleeding at the injection site, you can press a cotton ball or gauze over the injection site.
- Do not rub the injection site.
- If needed, you may cover the injection site with a small adhesive bandage.
Disposal
Step 12. Disposing of the Syringe
- Do not reuse the prefilled syringe.
- After injecting the dose, put the syringe into a sharps disposal container or closed puncture-resistant container (see Figure N).
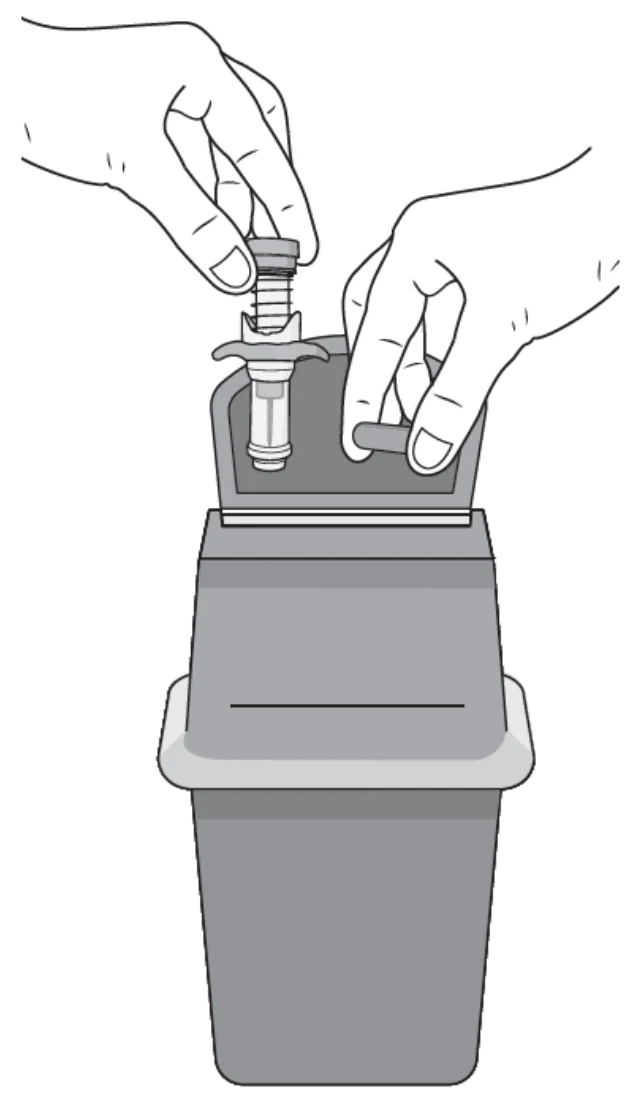
Figure N
If you do not have a sharps disposal container, you may use a household container that is:
- Made of heavy-duty plastic
- Can be closed with a tight-fitting, puncture-resistant lid, without sharps being able to come out
- Upright stable during use
- Leak-resistant
- Properly labeled to warn of hazardous waste inside the container
- When your sharps disposal container is almost full, you will need to follow your local guidelines for the right way to dispose of your sharps disposal container. There may be local laws about how you should throw away used needles and syringes.
- Do not dispose of your used sharps disposal container in your household trash unless your local guidelines permit this.
- Do not recycle your used sharps disposal container.
Step 13. Keep Track of Treatment
- If required by your physician, record your injection in a diary to help keep track of your medicine.
If you want more information about ANDEMBRY:
- Talk to your healthcare professional
- Find the full product monograph that is prepared for healthcare professionals and includes this Patient Medication Information by visiting the Health Canada website: (https://www.canada.ca/en/health-canada/services/drugs-health-products/drug-products/drug-product-database.html; the manufacturer’s website https://www.cslbehring.ca/ , or by calling 1-866-773-7721 .
Date of Authorization: 2026-10-06